
Valentine’s Day is just around the corner. To make your Valentine’s gift just that bit more special and personalized, why not put it in a box of love?
---
I was super excited to try Kassa’s Whiteboard contact paper in my Cricut, and I was even more excited when it cut beautifully and didn’t require any weeding or special tools. As a Valentine’s Day gift from Letter Me! And Kassa, click here for a free downloadable “LOVE” hand lettered by Letter Me! to use in your projects! You can import it into your die cast machine or even just print it out to make your own Valentine’s Day card.
---
So here is a fun and simple way of how I turned a boring black box into a box of love.
What you’ll need:
- Kassa Whiteboard contact paper
- Cricut machine or other die cut machine (if you don’t have a die cut machine, skip straight to Step Nine)
- Letter Me! free downloadable “love” lettering, or hand letter your own message 😊
- Kassa Clear Transfer Paper
- Kassa Liquid Chalk Markers
- Black gift box
- Scissors
- Squeegee

Step One:
Cut out a piece of Kassa Whiteboard contact paper, to the size you would like the word lettered on your box.

Step Two:
Download the hand lettered “love” or hand write your own message. Using your die cut machine and the Kassa Whiteboard contact paper, cut the word out to fit your box.

Step Three:
Remove the negative space from the cut out. Gently bend the Contact Paper slightly and remove the negative space from inside the letters o, v and e. It should come off easily without a weeding tool!

Step Four:
Cut out a piece of Kassa Transfer paper the same size as your Contact Paper.

Step Five:
Peel off the clear gridlines side of the Transfer tape and stick it over the “love” contact paper. Using a plastic scraper or credit card, scrape the transfer tape to ensure that it is stuck down on to the contact paper.

Step Six:
Gently remove the backing paper so that only “love” is stuck to the transfer paper. Be careful as to not touch the sticky side of the word as the oils on your fingertips will affect the adhesiveness of the word.

Step Seven:
Carefully place the transfer tape with your cut out on it, on your black box. When you are happy with the positioning, use the scraper or credit card to firmly scrape the letters down on to your box.

Step Eight:
Gently peel off the transfer tape to reveal your lettering on your box.

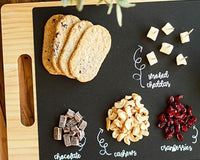
Step Nine:
Now for my favorite part. Take out your vibrant and juicy Kassa liquid chalk markers and decorate your box with words of love.


21 comments
Sarah Love
SAVE YOUR RELATIONSHIP ONLINE Email: odungaspelltemple@gmail.com
Hello, My name is Sarah Love Tover. I live in Dover, Delaware. My boyfriend Juan Tover and I have been dating for the past 4 yrs we were to get married but it never happened..he constantly messes around with his ex’s and other females every time he got caught he apologized and me to forgive him and I keep taking him back because I’m truly in love with this man but after a while he started messing around again. I had to do something about the situation. I went online and saw various testimonies of how people got their ex back but one testimony of Dr Odunga helped me find the right solution and I am very happy I contacted Dr. Odunga regarding my problem. My boyfriend is now my HUSBAND. We got married in United Church in Dover. My problem was solved. I am extremely happy to put his email odungaspelltemple@gmail.com to anyone out here looking to solve his/her relationship problem. You can also Whats-App him with his mobile number +2348167159012
شركة نقل اثاث بجدة
https://sites.google.com/view/movers-riyadh/
https://sites.google.com/view/movers-riyadh/movers-mecca
https://sites.google.com/view/movers-riyadh/home
https://sites.google.com/view/movers-riyadh/movers-jedaah-elhamdniah
https://sites.google.com/view/movers-riyadh/movers-yanbu
https://sites.google.com/view/movers-riyadh/movers-najran
https://sites.google.com/view/movers-riyadh/movers-Jizan
https://sites.google.com/view/movers-riyadh/jazan
https://sites.google.com/view/movers-riyadh/taif
https://sites.google.com/view/movers-riyadh/moversjeddah
https://sites.google.com/view/movers-riyadh/movers-abha
https://sites.google.com/view/movers-riyadh/movers-elahsa
https://sites.google.com/view/movers-riyadh/movers-elkhobar
https://sites.google.com/view/movers-riyadh/movers-elkharj
https://sites.google.com/view/movers-riyadh/movers-elmadina-elmnowara
https://sites.google.com/view/movers-riyadh/movers-eljubail
https://sites.google.com/view/movers-riyadh/movers-elqassim
https://sites.google.com/view/movers-riyadh/movers-hafrelbatin
https://sites.google.com/view/movers-riyadh/movers-elbaha
https://sites.google.com/view/movers-riyadh/movers-jeddah
https://sites.google.com/view/movers-riyadh/movers-dammam
https://sites.google.com/view/movers-riyadh/movers-taif
https://sites.google.com/view/movers-riyadh/movers-burydah
https://sites.google.com/view/movers-riyadh/movers-tabuk
https://sites.google.com/view/movers-riyadh/movers-hail
https://sites.google.com/view/movers-riyadh/movers-khamis-mushait
https://sites.google.com/view/movers-riyadh/movers-rabigh
https://sites.google.com/view/movers-riyadh/madina
https://sites.google.com/view/movers-riyadh/mecca
https://sites.google.com/view/movers-riyadh/dammam
https://sites.google.com/view/movers-riyadh/jeddah
https://sites.google.com/view/movers-riyadh/ahsa
https://sites.google.com/view/movers-riyadh/cleaning-mecca
شركة ريلاكس لنقل العفش والاثاث
http://fullservicelavoro.com/ شركة ريلاكس لنقل العفش والاثاث
http://fullservicelavoro.com/2019/01/07/transfer-movers-taif-furniture/ شركة نقل عفش بالطائف
http://fullservicelavoro.com/2019/01/08/transfer-movers-riyadh-furniture/ شركة نقل عفش بالرياض
http://fullservicelavoro.com/2019/01/08/transfer-movers-jeddah-furniture/ شركة نقل عفش بجدة
http://fullservicelavoro.com/2019/01/01/transfer-and-movers-furniture-mecca/ شركة نقل عفش بمكة
http://fullservicelavoro.com/2019/01/07/transfer-movers-madina-furniture/ شركة نقل عفش بالمدينة المنورة
http://fullservicelavoro.com/2019/01/07/transfer-movers-khamis-mushait-furniture/ شركة نقل عفش بخميس مشيط
http://fullservicelavoro.com/2019/01/09/transfer-movers-abha-furniture/ شركة نقل اثاث بابها
http://fullservicelavoro.com/2019/01/07/transfer-movers-najran-furniture/ شركة نقل عفش بنجران
http://fullservicelavoro.com/2019/01/16/transfer-movers-hail-furniture/ ِشركة نقل عفش بحائل
http://fullservicelavoro.com/2019/01/16/transfer-movers-qassim-furniture/ شركة نقل عفش بالقصيم
http://fullservicelavoro.com/2019/02/02/transfer-movers-furniture-in-bahaa/ شركة نقل عفش بالباحة
http://fullservicelavoro.com/2019/01/13/transfer-movers-yanbu-furniture/ شركة نقل عفش بينبع
http://fullservicelavoro.com/2019/01/18/%d8%af%d9%8a%d9%86%d8%a7-%d9%86%d9%82%d9%84-%d8%b9%d9%81%d8%b4-%d8%a8%d8%a7%d8%a8%d9%87%d8%a7/ دينا نقل عفش بابها
http://fullservicelavoro.com/2019/01/13/%D9%86%D9%82%D9%84-%D8%A7%D9%84%D8%A7%D8%AB%D8%A7%D8%AB-%D8%A8%D8%A7%D9%84%D9%85%D8%AF%D9%8A%D9%86%D8%A9-%D8%A7%D9%84%D9%85%D9%86%D9%88%D8%B1%D8%A9-%D8%A7%D9%87%D9%85-%D8%B4%D8%B1%D9%83%D8%A7%D8%AA/ نقل الاثاث بالمدينة المنورة
http://fullservicelavoro.com/2019/01/12/%D8%A7%D8%B1%D8%AE%D8%B5-%D8%B4%D8%B1%D9%83%D8%A9-%D9%86%D9%82%D9%84-%D8%B9%D9%81%D8%B4-%D8%A8%D9%85%D9%83%D8%A9/ ارخص شركة نقل عفش بمكة
http://fullservicelavoro.com/2019/01/07/transfer-movers-elkharj-furniture/ شركة نقل عفش بالخرج
http://fullservicelavoro.com/2019/01/07/transfer-movers-baqaa-furniture/ شركة نقل عفش بالبقعاء
http://fullservicelavoro.com/2019/02/05/transfer-furniture-in-jazan/ شركة نقل عفش بجازان
شركة كيان لنقل العفش بالرياض والمدينة المنورة
شركة كيان لنقل العفش بالرياض والمدينة المنورة وجدة ومكة والطائف والدمام تقديم لكم دليل كامل لشركات نقل العفش بالمملكة العربية السعودية
https://mycanadafitness.com/ شركة كيان لنقل العفش
https://mycanadafitness.com/forum.html منتدي نقل العفش
https://mycanadafitness.com/movingfurnitureriyadh.html شركة نقل اثاث بالرياض
https://mycanadafitness.com/movingfurniturejaddah.html شركة نقل اثاث بجدة
https://mycanadafitness.com/movingfurnituremecca.html شركة نقل اثاث بمكة
https://mycanadafitness.com/movingfurnituretaif.html شركة نقل اثاث بالطائف
https://mycanadafitness.com/movingfurnituremadina.html شركة نقل اثاث بالمدينة المنورة
https://mycanadafitness.com/movingfurnituredammam.html شركة نقل اثاث بالدمام
https://mycanadafitness.com/movingfurniturekhobar.html شركة نقل اثاث بالخبر
https://mycanadafitness.com/movingfurnituredhahran.html شركة نقل اثاث بالظهران
https://mycanadafitness.com/movingfurniturejubail.html شركة نقل اثاث بالجبيل
https://mycanadafitness.com/movingfurnitureqatif.html شركة نقل اثاث بالقطيف
https://mycanadafitness.com/movingfurnitureahsa.html شركة نقل اثاث بالاحساء
https://mycanadafitness.com/movingfurniturekharj.html شركة نقل اثاث بالخرج
https://mycanadafitness.com/movingfurniturekhamismushit.html شركة نقل اثاث بخميس مشيط
https://mycanadafitness.com/movingfurnitureabha.html شركة نقل اثاث بابها
https://mycanadafitness.com/movingfurniturenajran.html شركة نقل اثاث بنجران
https://mycanadafitness.com/movingfurniturejazan.html شركة نقل اثاث بجازان
https://mycanadafitness.com/movingfurnitureasir.html شركة نقل اثاث بعسير
https://mycanadafitness.com/movingfurniturehail.html شركة نقل اثاث بحائل
https://mycanadafitness.com/movingfurnitureqassim.html شركة نقل عفش بالقصيم
https://mycanadafitness.com/movingfurnitureyanbu.html شركة نقل اثاث بينبع
https://mycanadafitness.com/movingfurnitureburaidah.html شركة نقل عفش ببريدة
https://mycanadafitness.com/movingfurniturehafralbatin.html شركة نقل عفش بحفر الباطن
https://mycanadafitness.com/movingfurniturerabigh.html شركة نقل عفش برابغ
https://mycanadafitness.com/movingfurnituretabuk.html شركة نقل عفش بتبوك
https://mycanadafitness.com/movingfurnitureasfan.html شركة نقل عفش بعسفان
https://mycanadafitness.com/movingfurnituresharora.html شركة نقل عفش بشرورة
https://mycanadafitness.com/companis-moving-riyadh.html شركات نقل العفش بالرياض
https://mycanadafitness.com/cars-moving-riyadh.html سيارات نقل العفش بالرياض
https://mycanadafitness.com/company-number-moving-riyadh.html ارقام شركات نقل العفش بالرياض
https://mycanadafitness.com/company-moving-jeddah.html شركات نقل العفش بجدة
https://mycanadafitness.com/price-moving-jeddah.html اسعار نقل العفش بجدة
https://mycanadafitness.com/company-moving-mecca.html شركات نقل العفش بمكة
نقل عفش شمال الرياض
http://www.domyate.com/2019/08/27/transfer-furniture-north-riyadh/ نقل عفش شمال الرياض
http://www.domyate.com/2019/09/05/movers-company-khamis-mushait/ شركات نقل عفش بخميس مشيط
http://www.domyate.com/2019/09/05/10-company-transfer-furniture-khamis-mushait/ شركة نقل العفش بخميس مشيط
http://www.domyate.com/2019/09/05/all-transfer-furniture-khamis-mushait/ شركات نقل اثاث بخميس مشيط
http://www.domyate.com/2019/09/05/best-company-transfer-furniture-khamis-mushit/ افضل شركات نقل اثاث بخميس مشيط
http://www.domyate.com/2019/09/05/company-transfer-furniture-khamis-mushit/ شركات نقل اثاث بخميس مشيط
http://www.domyate.com/category/%D9%86%D9%82%D9%84-%D8%B9%D9%81%D8%B4-%D8%AC%D8%AF%D8%A9/ نقل عفش جدة
http://www.domyate.com/2019/09/25/movers-furniture-from-jeddah-to-jordan/ نقل عفش من جدة الي الاردن
http://www.domyate.com/2019/10/03/price-cleaning-tanks-in-jeddah/ اسعار شركات تنظيف خزانات بجدة
http://www.domyate.com/2019/09/25/movers-furniture-from-jeddah-to-egypt/ نقل عفش من جدة الي مصر
http://www.domyate.com/2019/09/24/movers-furniture-from-jeddah-to-lebanon/ نقل عفش من جدة الي لبنان
http://www.domyate.com/2019/09/22/%d8%a3%d9%86%d8%ac%d8%ad-%d8%b4%d8%b1%d9%83%d8%a7%d8%aa-%d9%86%d9%82%d9%84-%d8%a7%d8%ab%d8%a7%d8%ab-%d8%a8%d8%ac%d8%af%d8%a9/ شركات نقل اثاث بجدة
http://www.domyate.com/2019/09/22/best-company-movers-jeddah/ افضل شركات نقل اثاث جدة
http://www.domyate.com/2019/09/22/company-transfer-furniture-yanbu/ شركات نقل العفش بينبع
http://www.domyate.com/2019/09/21/taif-transfer-furniture-company/ شركة نقل عفش في الطائف
http://www.domyate.com/2019/09/21/%d8%b4%d8%b1%d9%83%d8%a7%d8%aa-%d9%86%d9%82%d9%84-%d8%a7%d9%84%d8%b9%d9%81%d8%b4/ شركات نقل العفش
http://www.domyate.com/2019/09/21/%d8%b7%d8%b1%d9%82-%d9%86%d9%82%d9%84-%d8%a7%d9%84%d8%b9%d9%81%d8%b4/ طرق نقل العفش
http://www.domyate.com/2019/09/20/%d8%ae%d8%b7%d9%88%d8%a7%d8%aa-%d9%86%d9%82%d9%84-%d8%a7%d9%84%d8%b9%d9%81%d8%b4-%d9%88%d8%a7%d9%84%d8%a7%d8%ab%d8%a7%d8%ab/ خطوات نقل العفش والاثاث
http://www.domyate.com/2019/09/20/best-10-company-transfer-furniture/ افضل 10 شركات نقل عفش
http://www.domyate.com/2019/09/20/%d9%83%d9%8a%d9%81-%d9%8a%d8%aa%d9%85-%d8%a7%d8%ae%d8%aa%d9%8a%d8%a7%d8%b1-%d8%b4%d8%b1%d9%83%d8%a7%d8%aa-%d9%86%d9%82%d9%84-%d8%a7%d9%84%d8%b9%d9%81%d8%b4-%d9%88%d8%a7%d9%84%d8%a7%d8%ab%d8%a7%d8%ab/ اختيار شركات نقل العفش والاثاث
http://www.domyate.com/2019/09/20/cleaning-company-house-taif/ شركة تنظيف منازل بالطائف
http://www.domyate.com/2019/09/20/company-cleaning-home-in-taif/ شركة تنظيف شقق بالطائف
http://www.domyate.com/2019/09/20/taif-cleaning-company-villas/ شركة تنظيف فلل بالطائف
http://www.domyate.com/ شركة نقل عفش
http://www.domyate.com/2017/09/21/%D9%86%D9%82%D9%84-%D8%A7%D9%84%D8%B9%D9%81%D8%B4-%D9%88%D8%A7%D9%84%D8%AA%D8%AE%D8%B2%D9%8A%D9%86/ نقل العفش والتخزين
http://www.domyate.com/2016/07/02/transfer-furniture-dammam شركة نقل عفش بالدمام
http://www.domyate.com/2015/11/12/%D8%B4%D8%B1%D9%83%D8%A9-%D9%86%D9%82%D9%84-%D8%B9%D9%81%D8%B4-%D8%A8%D8%A7%D9%84%D9%85%D8%AF%D9%8A%D9%86%D8%A9-%D8%A7%D9%84%D9%85%D9%86%D9%88%D8%B1%D8%A9/ شركة نقل عفش بالمدينة المنورة
http://www.domyate.com/2016/06/05/transfer-furniture-jeddah/ شركة نقل عفش بجدة
http://www.domyate.com/2017/08/10/movers-company-mecca-naql/ شركات نقل العفش بمكة
http://www.domyate.com/2016/06/05/transfer-furniture-mecca/ شركة نقل عفش بمكة
http://www.domyate.com/2016/06/05/transfer-furniture-taif/ شركة نقل عفش بالطائف
http://www.domyate.com/2016/06/05/transfer-furniture-riyadh/ شركة نقل عفش بالرياض
http://www.domyate.com/2016/06/05/transfer-furniture-yanbu/ شركة نقل عفش بينبع
http://www.domyate.com/category/%D8%AE%D8%AF%D9%85%D8%A7%D8%AA-%D9%86%D9%82%D9%84-%D8%A7%D9%84%D8%B9%D9%81%D8%B4-%D9%88%D8%A7%D9%84%D8%AA%D8%AE%D8%B2%D9%8A%D9%86/ نقل العفش والتخزين
http://www.domyate.com/2015/08/30/furniture-transport-company-in-almadinah/ شركة نقل عفش بالمدينة المنورة
http://www.domyate.com/2016/06/05/transfer-furniture-medina-almonawara/ شركة نقل عفش بالمدينة المنورة
http://www.domyate.com/2018/10/13/%D9%86%D9%82%D9%84-%D8%B9%D9%81%D8%B4-%D8%AC%D8%AF%D8%A9-%D8%B4%D8%B1%D9%83%D8%A7%D8%AA-%D9%86%D9%82%D9%84-%D9%85%D9%85%D9%8A%D8%B2%D8%A9/ نقل عفش بجدة
http://www.domyate.com/2016/07/22/%d8%a7%d8%b1%d8%ae%d8%b5-%d8%b4%d8%b1%d9%83%d8%a9-%d9%86%d9%82%d9%84-%d8%b9%d9%81%d8%b4-%d8%a8%d8%a7%d9%84%d9%85%d8%af%d9%8a%d9%86%d8%a9-%d8%a7%d9%84%d9%85%d9%86%d9%88%d8%b1%d8%a9/ ارخص شركة نقل عفش بالمدينة المنورة
http://www.domyate.com/2016/07/25/%D8%B4%D8%B1%D9%83%D8%A9-%D9%86%D9%82%D9%84-%D8%B9%D9%81%D8%B4-%D8%A8%D8%A7%D9%84%D9%82%D8%B5%D9%8A%D9%85/ شركة نقل عفش بالقصيم
http://www.domyate.com/2016/07/25/%D8%B4%D8%B1%D9%83%D8%A9-%D9%86%D9%82%D9%84-%D8%B9%D9%81%D8%B4-%D8%A8%D8%AE%D9%85%D9%8A%D8%B3-%D9%85%D8%B4%D9%8A%D8%B7/ شركة نقل عفش بخميس مشيط
http://www.domyate.com/2016/07/25/%D8%B4%D8%B1%D9%83%D8%A9-%D9%86%D9%82%D9%84-%D8%B9%D9%81%D8%B4-%D8%A8%D8%A7%D8%A8%D9%87%D8%A7/ شركة نقل عفش بابها
http://www.domyate.com/2016/07/23/%D8%B4%D8%B1%D9%83%D8%A9-%D9%86%D9%82%D9%84-%D8%B9%D9%81%D8%B4-%D8%A8%D8%AA%D8%A8%D9%88%D9%83/ شركة نقل عفش بتبوك
شركة سكاي لخدمات نقل العفش والاثاث
شركة سكاي لخدمات نقل العفش والاثاث بالمنطقة العربية السعودية نحن نوفر خدمات نقل اثاث بالرياض ونقل عفش بالمدينة المنورة ونقل عفش بمكة ونقل عفش بالطائف نحن نقدم افضل نقل اثاث بخميس مشيط ونقل عفش بجدة
https://treeads.net/ شركة سكاي نقل العفش
https://treeads.net/blog.html مدونة لنقل العفش
https://treeads.net/movers-mecca.html شركة نقل عفش بمكة
https://treeads.net/movers-riyadh-company.html شركة نقل عفش بالرياض
https://treeads.net/all-movers-madina.html شركة نقل عفش بالمدينة المنورة
https://treeads.net/movers-jeddah-company.html شركة نقل عفش بجدة
https://treeads.net/movers-taif.html شركة نقل عفش بالطائف
https://treeads.net/movers-dammam-company.html شركة نقل عفش بالدمام
https://treeads.net/movers-qatif.html شركة نقل عفش بالقطيف
https://treeads.net/movers-jubail.html شركة نقل عفش بالجبيل
https://treeads.net/movers-khobar.html شركة نقل عفش بالخبر
https://treeads.net/movers-ahsa.html شركة نقل عفش بالاحساء
https://treeads.net/movers-kharj.html شركة نقل عفش بالخرج
https://treeads.net/movers-khamis-mushait.html شركة نقل عفش بخميس مشيط
https://treeads.net/movers-abha.html شركة نقل عفش بابها
https://treeads.net/movers-qassim.html شركة نقل عفش بالقصيم
https://treeads.net/movers-yanbu.html شركة نقل عفش بينبع
https://treeads.net/movers-najran.html شركة نقل عفش بنجران
https://treeads.net/movers-hail.html شركة نقل عفش بحائل
https://treeads.net/movers-buraydah.html شركة نقل عفش ببريدة
https://treeads.net/movers-tabuk.html شركة نقل عفش بتبوك
https://treeads.net/movers-dhahran.html شركة نقل عفش بالظهران
https://treeads.net/movers-rabigh.html شركة نقل عفش برابغ
https://treeads.net/movers-baaha.html شركة نقل عفش بالباحه
https://treeads.net/movers-asseer.html شركة نقل عفش بعسير
https://treeads.net/movers-mgmaa.html شركة نقل عفش بالمجمعة
https://treeads.net/movers-sharora.html شركة نقل عفش بشرورة
https://treeads.net/how-movers-furniture-yanbu.html كيفية نقل العفش بينبع
https://treeads.net/price-movers-furniture-yanbu.html اسعار نقل عفش بينبع
https://treeads.net/find-company-transfer-furniture-yanbu.html البحث عن شركات نقل العفش بينبع
https://treeads.net/transfer-furniture-khamis-mushit.html شركات نقل العفش بخميس مشيط
https://treeads.net/how-transfer-furniture-khamis-mushit.html كيفية نقل العفش بخميس مشيط
https://treeads.net/price-transfer-furniture-khamis-mushit.html اسعار نقل عفش بخميس مشيط
https://treeads.net/%D8%B4%D8%B1%D9%83%D8%A9-%D8%AC%D9%84%D9%8A-%D8%A8%D9%84%D8%A7%D8%B7-%D8%A8%D8%AC%D8%AF%D8%A9.html شركة جلي بلاط بجدة
https://treeads.net/%D8%B4%D8%B1%D9%83%D8%A9-%D8%AA%D9%86%D8%B8%D9%8A%D9%81-%D9%81%D9%84%D9%84-%D8%A8%D8%AC%D8%AF%D8%A9.html تنظيف فلل بجدة
https://treeads.net/company-transfer-furniture-jazan.html شركة نقل عفش بجازان
https://treeads.net/best-company-cleaning-jeddah-2020.html افضل شركة تنظيف بجدة
شركة السعودي الالماني للخدمات المنزلية
https://saudi-germany.com/ شركة السعودي الالماني للخدمات المنزلية
https://saudi-germany.com/%d8%b4%d8%b1%d9%83%d8%a7%d8%aa-%d8%aa%d9%86%d8%b8%d9%8a%d9%81-%d8%ae%d8%b2%d8%a7%d9%86%d8%a7%d8%aa-%d8%a8%d8%ac%d8%af%d8%a9/ شركات تنظيف خزانات بجدة
https://saudi-germany.com/%d8%aa%d9%86%d8%b8%d9%8a%d9%81-%d8%ae%d8%b2%d8%a7%d9%86%d8%a7%d8%aa-%d8%a8%d8%ac%d8%af%d8%a9/ تنظيف خزانات بجدة
https://saudi-germany.com/%d8%a7%d9%81%d8%b6%d9%84-%d8%b4%d8%b1%d9%83%d8%a9-%d8%aa%d9%86%d8%b8%d9%8a%d9%81-%d8%ae%d8%b2%d8%a7%d9%86%d8%a7%d8%aa-%d8%a8%d8%ac%d8%af%d8%a9/ افضل شركة تنظيف خزانات بجدة
https://saudi-germany.com/%d8%a7%d8%b1%d8%ae%d8%b5-%d8%b4%d8%b1%d9%83%d8%a9-%d8%aa%d9%86%d8%b8%d9%8a%d9%81-%d8%ae%d8%b2%d8%a7%d9%86%d8%a7%d8%aa-%d8%a8%d8%ac%d8%af%d8%a9/ ارخص شركة تنظيف خزانات بجدة
https://saudi-germany.com/%d8%ba%d8%b3%d9%8a%d9%84-%d8%ae%d8%b2%d8%a7%d9%86%d8%a7%d8%aa-%d8%a8%d8%ac%d8%af%d8%a9/ غسيل خزانات بجدة
https://saudi-germany.com/%d8%b4%d8%b1%d9%83%d8%a9-%d8%aa%d9%86%d8%b8%d9%8a%d9%81-%d8%ae%d8%b2%d8%a7%d9%86%d8%a7%d8%aa-%d8%a8%d8%ac%d8%af%d8%a9/ شركة تنظيف خزانات بجدة
https://saudi-germany.com/cleaning-tanks-company-taif/
https://saudi-germany.com/cleaning-tanks-company-mecca/
https://saudi-germany.com/jumperads-transfer-furniture/
https://saudi-germany.com/%d8%a7%d9%81%d8%b6%d9%84-20-%d8%b4%d8%b1%d9%83%d8%a9-%d9%86%d9%82%d9%84-%d8%b9%d9%81%d8%b4-%d8%a8%d9%8a%d9%86%d8%a8%d8%b9-%d8%ae%d8%b5%d9%85-50-%d9%85%d8%b9-%d8%a7%d9%84%d9%81%d9%83-%d9%88%d8%a7/
https://saudi-germany.com/%d8%a7%d8%b1%d8%ae%d8%b5-%d8%b4%d8%b1%d9%83%d8%a9-%d9%86%d9%82%d9%84-%d8%b9%d9%81%d8%b4-%d8%ac%d8%af%d8%a9-%d8%ad%d9%8a-%d8%a7%d9%84%d8%b5%d9%81%d8%a7/
https://saudi-germany.com/%d8%a7%d8%b1%d8%ae%d8%b5-%d8%b4%d8%b1%d9%83%d8%a9-%d9%86%d9%82%d9%84-%d8%b9%d9%81%d8%b4-%d8%ac%d8%af%d8%a9-%d8%a7%d8%a8%d8%ad%d8%b1-%d8%a7%d9%84%d8%b4%d9%85%d8%a7%d9%84%d9%8a%d8%a9/
https://saudi-germany.com/%d8%a7%d8%b1%d9%82%d8%a7%d9%85-%d8%b4%d8%b1%d9%83%d8%a7%d8%aa-%d9%86%d9%82%d9%84-%d8%b9%d9%81%d8%b4-%d8%a8%d8%ac%d8%af%d8%a9-%d9%85%d8%b9-%d8%a7%d9%84%d8%aa%d8%ba%d9%84%d9%8a%d9%81/
https://saudi-germany.com/%d8%a7%d8%b1%d8%ae%d8%b5-%d8%b4%d8%b1%d9%83%d8%a9-%d9%86%d9%82%d9%84-%d8%b9%d9%81%d8%b4-%d8%a8%d8%ac%d8%af%d8%a9/
شركة الفا لنقل عفش واثاث
https://emc-mee.com/blog.html شركات نقل العفش
اهم شركات كشف تسربات المياه بالدمام كذلك معرض اهم شركة مكافحة حشرات بالدمام والخبر والجبيل والخبر والاحساء والقطيف كذكل شركة تنظيف خزانات بجدة وتنظيف بجدة ومكافحة الحشرات بالخبر وكشف تسربات المياه بالجبيل والقطيف والخبر والدمام
https://emc-mee.com/cleaning-company-yanbu.html شركة تنظيف بينبع
https://emc-mee.com/blog.html شركة نقل عفش
اهم شركات مكافحة حشرات بالخبر كذلك معرض اهم شركة مكافحة حشرات بالدمام والخبر والجبيل والخبر والاحساء والقطيف كذلك شركة رش حشرات بالدمام ومكافحة الحشرات بالخبر
https://emc-mee.com/anti-insects-company-dammam.html شركة مكافحة حشرات بالدمام
شركة تنظيف خزانات بجدة الجوهرة من افضل شركات تنظيف الخزانات بجدة حيث ان تنظيف خزانات بجدة يحتاج الى مهارة فى كيفية غسيل وتنظيف الخزانات الكبيرة والصغيرة بجدة على ايدى متخصصين فى تنظيف الخزانات بجدة
https://emc-mee.com/tanks-cleaning-company-jeddah.html شركة تنظيف خزانات بجدة
https://emc-mee.com/water-leaks-detection-isolate-company-dammam.html شركة كشف تسربات المياه بالدمام
https://emc-mee.com/ شركة الفا لنقل عفش واثاث
https://emc-mee.com/transfer-furniture-jeddah.html شركة نقل عفش بجدة
https://emc-mee.com/transfer-furniture-almadina-almonawara.html شركة نقل عفش بالمدينة المنورة
https://emc-mee.com/movers-in-riyadh-company.html شركة نقل اثاث بالرياض
https://emc-mee.com/transfer-furniture-dammam.html شركة نقل عفش بالدمام
https://emc-mee.com/transfer-furniture-taif.html شركة نقل عفش بالطائف
https://emc-mee.com/transfer-furniture-mecca.html شركة نقل عفش بمكة
https://emc-mee.com/transfer-furniture-yanbu.html شركة نقل عفش بينبع
https://emc-mee.com/transfer-furniture-alkharj.html شركة نقل عفش بالخرج
https://emc-mee.com/transfer-furniture-buraydah.html شركة نقل عفش ببريدة
https://emc-mee.com/transfer-furniture-khamis-mushait.html شركة نقل عفش بخميس مشيط
https://emc-mee.com/transfer-furniture-qassim.html شركة نقل عفش بالقصيم
https://emc-mee.com/transfer-furniture-tabuk.html شركة نقل عفش بتبوك
https://emc-mee.com/transfer-furniture-abha.html شركة نقل عفش بابها
https://emc-mee.com/transfer-furniture-najran.html شركة نقل عفش بنجران
https://emc-mee.com/transfer-furniture-hail.html شركة نقل عفش بحائل
https://emc-mee.com/transfer-furniture-dhahran.html شركة نقل عفش بالظهران
https://emc-mee.com/transfer-furniture-kuwait.html شركة نقل عفش بالكويت
https://emc-mee.com/price-transfer-furniture-in-khamis-mushit.html اسعار شركات نقل عفش بخميس مشيط
https://emc-mee.com/numbers-company-transfer-furniture-in-khamis-mushit.html ارقام شركات نقل عفش بخميس مشيط
https://emc-mee.com/new-company-transfer-furniture-in-khamis-mushit.html شركة نقل عفش بخميس مشيط جديدة
https://emc-mee.com/transfer-furniture-from-khamis-to-riyadh.html شركة نقل عفش من خميس مشيط الي الرياض
https://emc-mee.com/transfer-furniture-from-khamis-mushait-to-mecca.html شركة نقل عفش من خميس مشيط الي مكة
https://emc-mee.com/transfer-furniture-from-khamis-mushait-to-jeddah.html شركة نقل عفش من خميس مشيط الي جدة
https://emc-mee.com/transfer-furniture-from-khamis-mushait-to-medina.html شركة نقل عفش من خميس مشيط الي المدينة المنورة
https://emc-mee.com/best-10-company-transfer-furniture-khamis-mushait.html افضل 10 شركات نقل عفش بخميس مشيط
https://emc-mee.com/%D8%B4%D8%B1%D9%83%D9%87-%D9%86%D9%82%D9%84-%D8%B9%D9%81%D8%B4-%D8%A8%D8%AC%D8%AF%D9%87.html
https://emc-mee.com/%D8%B4%D8%B1%D9%83%D8%A9-%D9%86%D9%82%D9%84-%D8%A7%D8%AB%D8%A7%D8%AB-%D8%A8%D8%AC%D8%AF%D9%87.html
شركة المتحدة لنقل العفش و الاثاث
https://jumperads.com/khamis-mushait/anti-insects-company-khamis-mushait.html شركة مكافحة حشرات بخميس مشيط
https://jumperads.com/khamis-mushait/water-leaks-detection-company-khamis-mushait.html شركة كشف تسربات بخميس مشيط
https://jumperads.com/khamis-mushait/khamis-mushait-company-surfaces.html شركة عزل اسطح بخميس مشيط
https://jumperads.com/khamis-mushait/khamis-mushait-company-sewage.html شركة تسليك مجاري بخميس مشيط
https://jumperads.com/khamis-mushait/khamis-mushait-cleaning-company-sofa.html شركة تنظيف كنب بخميس مشيط
https://jumperads.com/khamis-mushait/khamis-mushait-cleaning-company-mosques.html شركة تنظيف مساجد بخميس مشيط
https://jumperads.com/khamis-mushait/khamis-mushait-cleaning-company-Carpet.html شركة تنظيف سجاد بخميس مشيط
https://jumperads.com/khamis-mushait/khamis-mushait-cleaning-company-tanks.html شركة تنظيف خزانات بخميس مشيط
https://jumperads.com/khamis-mushait/khamis-mushait-cleaning-company-swimming-bath.html شركة تنظيف وصيانة مسابح بخميس مشيط
https://jumperads.com/khamis-mushait/khamis-mushait-cleaning-company-Furniture.html شركة تنظيف الاثاث بخميس مشيط
https://jumperads.com/khamis-mushait/khamis-mushait-cleaning-company-home.html شركة تنظيف شقق بخميس مشيط
https://jumperads.com/khamis-mushait/khamis-mushait-cleaning-company-Carpets.html شركة تنظيف موكيت بخميس مشيط
https://jumperads.com/khamis-mushait/khamis-mushait-cleaning-company.html شركة تنظيف مجالس بخميس مشيط
https://jumperads.com/khamis-mushait/khamis-mushait-cleaning-company-house.html شركة تنظيف منازل بخميس مشيط
https://jumperads.com/khamis-mushait/khamis-mushait-cleaning-company-curtains.html شركة تنظيف ستائر بخميس مشيط
https://jumperads.com/khamis-mushait/khamis-mushait-cleaning-company-Villas.html شركة تنظيف فلل بخميس مشيط
https://jumperads.com/khamis-mushait/khamis-mushait-company-tile.html شركة جلي بلاط بخميس مشيط
شركة مكافحة حشرات بنجران وكذلك شركة كشف تسربات المياه بنجران وتنظيف خزانات وتنظيف الموكيت والسجاد والكنب والشقق والمنازل بنجران وتنظيف الخزانات بنجران وتنظيف المساجد بنجران شركة تنظيف بنجران تنظيف المسابح بنجران
https://jumperads.com/najran/anti-insects-company-najran.html شركة مكافحة حشرات بنجران
https://jumperads.com/najran/water-leaks-detection-company-najran.html شركة كشف تسربات بنجران
https://jumperads.com/najran/najran-company-surfaces.html شركة عزل اسطح بنجران
https://jumperads.com/najran/najran-company-sewage.html شركة تسليك مجاري بنجران
https://jumperads.com/najran/najran-cleaning-company-sofa.html شركة تنظيف كنب بنجران
https://jumperads.com/najran/najran-cleaning-company-mosques.html شركة تنظيف مساجد بنجران
https://jumperads.com/najran/najran-cleaning-company-Carpet.html شركة تنظيف سجاد بنجران
https://jumperads.com/najran/najran-cleaning-company-tanks.html شركة تنظيف خزانات بنجران
https://jumperads.com/najran/najran-cleaning-company-swimming-bath.html شركة تنظيف وصيانة مسابح بنجران
https://jumperads.com/najran/najran-cleaning-company-Furniture.html شركة تنظيف الاثاث بنجران
https://jumperads.com/najran/najran-cleaning-company-home.html شركة تنظيف شقق بنجران
https://jumperads.com/najran/najran-cleaning-company-Carpets.html شركة تنظيف موكيت بنجران
https://jumperads.com/najran/najran-cleaning-company.html شركة تنظيف مجالس بنجران
https://jumperads.com/najran/najran-cleaning-company-house.html شركة تنظيف منازل بنجران
https://jumperads.com/najran/najran-cleaning-company-curtains.html شركة تنظيف ستائر بنجران
https://jumperads.com/najran/najran-cleaning-company-Villas.html شركة تنظيف فلل بنجران
https://jumperads.com/najran/najran-company-tile.html شركة جلي بلاط بنجران
شركة مكافحة حشرات بابها وكذلك شركة كشف تسربات المياه بابها وتنظيف خزانات وتنظيف الموكيت والسجاد والكنب والشقق والمنازل بابها وتنظيف الخزانات بابها وتنظيف المساجد بابها شركة تنظيف بابها تنظيف المسابح بابها
https://jumperads.com/abha/anti-insects-company-abha.html شركة مكافحة حشرات بابها
https://jumperads.com/abha/water-leaks-detection-company-abha.html شركة كشف تسربات بابها
https://jumperads.com/abha/abha-company-surfaces.html شركة عزل اسطح بابها
https://jumperads.com/abha/abha-company-sewage.html شركة تسليك مجاري بابها
https://jumperads.com/abha/abha-cleaning-company-sofa.html شركة تنظيف كنب بابها
https://jumperads.com/abha/abha-cleaning-company-mosques.html شركة تنظيف مساجد بابها
https://jumperads.com/abha/abha-cleaning-company-Carpet.html شركة تنظيف سجاد بابها
https://jumperads.com/abha/abha-cleaning-company-tanks.html شركة تنظيف خزانات بابها
https://jumperads.com/abha/abha-cleaning-company-swimming-bath.html شركة تنظيف وصيانة مسابح بابها
https://jumperads.com/abha/abha-cleaning-company-Furniture.html شركة تنظيف الاثاث بابها
https://jumperads.com/abha/abha-cleaning-company-home.html شركة تنظيف شقق بابها
https://jumperads.com/abha/abha-cleaning-company-Carpets.html شركة تنظيف موكيت بابها
https://jumperads.com/abha/abha-cleaning-company.html شركة تنظيف مجالس بابها
https://jumperads.com/abha/abha-cleaning-company-house.html شركة تنظيف منازل بابها
https://jumperads.com/abha/abha-cleaning-company-curtains.html شركة تنظيف ستائر بابها
https://jumperads.com/abha/abha-cleaning-company-Villas.html شركة تنظيف فلل بابها
https://jumperads.com/abha/abha-company-tile.html شركة جلي بلاط بابها
شركة مكافحة حشرات بينبع وكذلك شركة كشف تسربات المياه بينبع وتنظيف خزانات وتنظيف الموكيت والسجاد والكنب والشقق والمنازل بينبع وتنظيف الخزانات بينبع وتنظيف المساجد بينبع شركة تنظيف بينبع تنظيف المسابح بينبع
https://jumperads.com/yanbu/anti-insects-company-yanbu.html شركة مكافحة حشرات بينبع
httsp://jumperads.com/yanbu/water-leaks-detection-company-yanbu.html شركة كشف تسربات بينبع
https://jumperads.com/yanbu/yanbu-company-surfaces.html شركة عزل اسطح بينبع
https://jumperads.com/yanbu/yanbu-company-sewage.html شركة تسليك مجاري بينبع
https://jumperads.com/yanbu/yanbu-cleaning-company-sofa.html شركة تنظيف كنب بينبع
https://jumperads.com/yanbu/yanbu-cleaning-company-mosques.html شركة تنظيف مساجد بينبع
https://jumperads.com/yanbu/yanbu-cleaning-company-Carpet.html شركة تنظيف سجاد بينبع
https://jumperads.com/yanbu/yanbu-cleaning-company-tanks.html شركة تنظيف خزانات بينبع
https://jumperads.com/yanbu/yanbu-cleaning-company-swimming-bath.html شركة تنظيف وصيانة مسابح بينبع
https://jumperads.com/yanbu/yanbu-cleaning-company-Furniture.html شركة تنظيف الاثاث بينبع
https://jumperads.com/yanbu/yanbu-cleaning-company-home.html شركة تنظيف شقق بينبع
https://jumperads.com/yanbu/yanbu-cleaning-company-Carpets.html شركة تنظيف موكيت بينبع
https://jumperads.com/yanbu/yanbu-cleaning-company.html شركة تنظيف مجالس بينبع
https://jumperads.com/yanbu/yanbu-cleaning-company-house.html شركة تنظيف منازل بينبع
https://jumperads.com/yanbu/yanbu-cleaning-company-Villas.html شركة تنظيف فلل بينبع
https://jumperads.com/yanbu/yanbu-cleaning-company-curtains.html شركة تنظيف ستائر بينبع
https://jumperads.com/yanbu/yanbu-company-tile.html شركة جلي بلاط بينبع
شركة مكافحة حشرات بالجبيل وكذلك شركة كشف تسربات المياه بالجبيل وتنظيف خزانات وتنظيف الموكيت والسجاد والكنب والشقق والمنازل بالجبيل وتنظيف الخزانات بالجبيل وتنظيف المساجد بالجبيل شركة تنظيف بالجبيل تنظيف المسابح بالجبيل
https://jumperads.com/jubail/anti-insects-company-jubail.html شركة مكافحة حشرات بالجبيل
https://jumperads.com/jubail/water-leaks-detection-company-jubail.html شركة كشف تسربات بالجبيل
https://jumperads.com/jubail/jubail-company-surfaces.html شركة عزل اسطح بالجبيل
https://jumperads.com/jubail/jubail-company-sewage.html شركة تسليك مجاري بالجبيل
https://jumperads.com/jubail/jubail-cleaning-company-sofa.html شركة تنظيف كنب بالجبيل
https://jumperads.com/jubail/jubail-cleaning-company-mosques.html شركة تنظيف مساجد بالجبيل
https://jumperads.com/jubail/jubail-cleaning-company-Carpet.html شركة تنظيف سجاد بالجبيل
https://jumperads.com/jubail/jubail-cleaning-company-tanks.html شركة تنظيف خزانات بالجبيل
https://jumperads.com/jubail/jubail-cleaning-company-swimming-bath.html شركة تنظيف وصيانة مسابح بالجبيل
https://jumperads.com/jubail/jubail-cleaning-company-Furniture.html شركة تنظيف الاثاث بالجبيل
https://jumperads.com/jubail/jubail-cleaning-company-home.html شركة تنظيف شقق بالجبيل
https://jumperads.com/jubail/jubail-cleaning-company-Carpets.html شركة تنظيف موكيت بالجبيل
https://jumperads.com/jubail/jubail-cleaning-company.html شركة تنظيف مجالس بالجبيل
https://jumperads.com/jubail/jubail-cleaning-company-house.html شركة تنظيف منازل بالجبيل
https://jumperads.com/jubail/jubail-cleaning-company-curtains.html شركة تنظيف ستائر بالجبيل
https://jumperads.com/jubail/jubail-cleaning-company-Villas.html شركة تنظيف فلل بالجبيل
https://jumperads.com/jubail/jubail-company-tile.html شركة جلي بلاط بالجبيل
شركة تنظيف مساجد بابها
https://zlidein.com/read-blog/97062
https://zlidein.com/read-blog/97063
https://zlidein.com/read-blog/97071
https://zlidein.com/read-blog/99326
https://www.skreebee.com/read-blog/110085
https://telegra.ph/%D8%B4%D8%B1%D9%83%D8%A9-%D9%86%D9%82%D9%84-%D8%B9%D9%81%D8%B4-%D9%85%D9%86-%D8%AC%D8%AF%D8%A9-%D8%A7%D9%84%D9%89-%D8%AC%D8%A7%D8%B2%D8%A7%D9%86-07-12
https://webyourself.eu/blogs/25649/%D8%B4%D8%B1%D9%83%D8%A9-%D9%86%D9%82%D9%84-%D8%B9%D9%81%D8%B4-%D9%85%D9%86-%D8%AC%D8%AF%D8%A9-%D8%A7%D9%84%D9%89-%D8%AC%D8%A7%D8%B2%D8%A7%D9%86
https://www.merexpression.com/read-blog/21528
https://www.rolonet.com/blogs/89146/%D8%B4%D8%B1%D9%83%D8%A9-%D9%86%D9%82%D9%84-%D8%B9%D9%81%D8%B4-%D9%85%D9%86-%D8%AC%D8%AF%D8%A9-%D8%A7%D9%84%D9%89-%D8%AC%D8%A7%D8%B2%D8%A7%D9%86
https://oktob.io/posts/41814
https://webyourself.eu/blogs/26016/%D8%A7%D9%81%D8%B6%D9%84-%D8%B4%D8%B1%D9%83%D8%A9-%D9%86%D9%82%D9%84-%D8%B9%D9%81%D8%B4-%D8%AC%D8%AF%D8%A9-%D8%A7%D8%A8%D8%AD%D8%B1-%D8%A7%D9%84%D8%B4%D9%85%D8%A7%D9%84%D9%8A%D8%A9
https://oktob.io/posts/41908
https://www.domyate.com/2022/06/14/why-emc-mee-company-to-transfer-furniture-to-to-jeddah/
https://www.domyate.com/2022/06/12/best-nakl-afsh-jeddah/
https://www.domyate.com/2022/06/12/%d9%83%d9%8a%d9%81%d9%8a%d8%a9-%d9%81%d9%83-%d9%88%d8%aa%d8%b1%d9%83%d9%8a%d8%a8-%d8%a7%d9%84%d8%b9%d9%81%d8%b4-%d9%88%d8%a7%d9%84%d8%a7%d8%ab%d8%a7%d8%ab-%d8%a8%d8%ac%d8%af%d8%a9/
https://zlidein.com/read-blog/99328
https://telegra.ph/%D8%A7%D9%81%D8%B6%D9%84-%D8%B4%D8%B1%D9%83%D8%A9-%D8%AA%D9%86%D8%B8%D9%8A%D9%81-%D9%85%D9%83%D9%8A%D9%81%D8%A7%D8%AA-%D8%A8%D9%85%D9%83%D8%A9-07-17
http://html.net.linux17.wannafindserver.dk/forums/viewtopic.php?f=6&t=447291&sid=d49bfa79507d1da5e63e18cadb51c609
https://www.carookee.de/forum/Retinoblastom-Forum/32167082?mp=49083704862d5f02883b054f8275606a980b0ddf6bde4bc1a0c4b5&mps=%26%231588%3B%26%231585%3B%26%231603%3B%26%231577%3B+%26%231606%3B%26%231602%3B%26%231604%3B+%26%231593%3B%26%231601%3B%26%231588%3B+%26%231575%3B%26%231604%3B%26%231589%3B%26%231602%3B%26%231585%3B+%26%231575%3B%26%231604%3B%26%231583%3B%26%231608%3B%26%231604%3B%26%231610%3B#32167082
http://html.net.linux17.wannafindserver.dk/forums/viewtopic.php?f=5&t=447319&sid=02b7bb5d454a63d0454daad5ff0e8fa3
https://www.carookee.de/forum/Retinoblastom-Forum/32167083?mp=156822404062d6023635638289af31b90d4f5bbea03aea79dc802ca&mps=%26%231588%3B%26%231585%3B%26%231603%3B%26%231577%3B+%26%231578%3B%26%231606%3B%26%231592%3B%26%231610%3B%26%231601%3B+%26%231605%3B%26%231603%3B%26%231610%3B%26%231601%3B%26%231575%3B%26%231578%3B+%26%231576%3B%26%231605%3B%26%231603%3B%26%231577%3B#32167083
https://www.carookee.de/forum/Retinoblastom-Forum/32167084?mp=156822404062d604da7583a085d6df59451e00fbf675ffe4d767997&mps=%26%231588%3B%26%231585%3B%26%231603%3B%26%231577%3B+%26%231578%3B%26%231606%3B%26%231592%3B%26%231610%3B%26%231601%3B+%26%231582%3B%26%231586%3B%26%231575%3B%26%231606%3B%26%231575%3B%26%231578%3B+%26%231576%3B%26%231582%3B%26%231605%3B%26%231610%3B%26%231587%3B+%26%231605%3B%26%231588%3B%26%231610%3B%26%231591%3B#32167084
https://www.carookee.de/forum/Retinoblastom-Forum/32167085?mp=156822404062d60ab56d77ab711e09fefce9f81dfa2064fdad6969e&mps=%26%231588%3B%26%231585%3B%26%231603%3B%26%231577%3B+%26%231606%3B%26%231602%3B%26%231604%3B+%26%231593%3B%26%231601%3B%26%231588%3B+%26%231605%3B%26%231606%3B+%26%231580%3B%26%231583%3B%26%231577%3B+%26%231575%3B%26%231604%3B%26%231609%3B+%26%231580%3B%26%231575%3B%26%231586%3B%26%231575%3B%26%231606%3B#32167085
https://elasakr-jeddah.jimdosite.com/
https://business.go.tz/web/rashid.ndimbo/~/86020/home/-/message_boards/message/24415721
https://business.go.tz/web/rashid.ndimbo/~/86020/home/-/message_boards/message/24415731
https://business.go.tz/web/rashid.ndimbo/~/86020/home/-/message_boards/message/24458120
https://business.go.tz/web/rashid.ndimbo/~/86020/home/-/message_boards/message/24456486
https://bestmoversfurniture.wordpress.com/2022/04/05/transfer-furniture-jeddah/
https://www.smore.com/ps2zt
https://www.smore.com/s9rz8q
https://www.smore.com/0kthj
https://www.muratshriners.com/profile/elsakrjeddah/profile
https://www.medmotion.org/profile/elsakrjeddah/profile
https://ello.co/atar-almadinah
https://ello.co/atar-almadinah/post/9biwwplb4odbgeboq8xcgw
https://nowewyrazy.uw.edu.pl/profil/atar-almadinah
http://findfriendz.com/profile/173148.html
https://companyhouseservice.wordpress.com/2022/08/06/%d8%a7%d9%81%d8%b6%d9%84-%d8%b4%d8%b1%d9%83%d8%a9-%d8%aa%d9%86%d8%b8%d9%8a%d9%81-%d8%a8%d8%a7%d9%84%d8%b1%d9%8a%d8%a7%d8%b6/
https://www.edocr.com/v/d9xod4ar/atar-almadinah/shrka-nkl-aafsh-bgda
https://www.edocr.com/user/atar-almadinah
https://www.tuugo.us/Companies/atar-almadinah/0310006888242
https://www.tuugo.us/SiteViewer/0310006888242
https://topsitenet.com/startpage/ataralmadinah/859508/
https://topsitenet.com/profile/ataralmadinah/859508/
https://en.gravatar.com/elsakrjeddah
https://610b31f1e425e.site123.me/about
https://www.kickstarter.com/profile/atar-almadinah/about
https://500px.com/p/ataralmadinah?view=photos
https://about.me/atar-almadinah/
https://www.behance.net/ataralmadinah/
https://angel.co/u/atar-almadinah
https://vimeo.com/user163509125
https://ello.co/ataralmadinah/post/asrc-rqxhmfvgrr7skhajg
https://ello.co/ataralmadinah
https://www.myminifactory.com/stories/best-transfer-furniture-jeddah-atar-almadinah-62f1c48d224b9
https://www.myminifactory.com/users/atar
https://speakerdeck.com/almadinah
https://fstoppers.com/profile/atar-almadinah
https://www.instructables.com/member/atar-almadinah/
https://www.mifare.net/support/forum/users/atar-almadinah/
https://www.recode.net/users/ataralmadinah
http://simp.ly/p/bwJRTQ
https://zenwriting.net/jzlzjv7sf2
https://writer.zohopublic.com/writer/published/rg9748fafd0f2210f4604b33d2cbf28388aea
https://my.desktopnexus.com/ataralmadinah/journal/furniture-moving-company-in-jeddah-38820/
https://app.ex.co/stories/item/c9e4da01-b4c3-492f-84a4-55474a6abf47
https://pastelink.net/a93tslol
https://pastelink.net/6zkez7a2
https://www.kongregate.com/accounts/ataralmadinah
https://bit.ly/3PiheFn
https://bit.ly/3SJJZxX
https://giphy.com/channel/atar-almadinah
https://fullservicelavoro.com/2022/08/15/furniture-moving-companies-in-jeddah/
https://www.ted.com/profiles/37578103/about
https://www.merexpression.com/elsakr
https://www.merexpression.com/read-blog/31739
https://webyourself.eu/elsakrjeddah
https://webyourself.eu/blogs/31059/%D8%A7%D9%81%D8%B6%D9%84-%D8%B4%D8%B1%D9%83%D8%A9-%D9%86%D9%82%D9%84-%D8%A7%D8%AB%D8%A7%D8%AB-%D9%81%D9%8A-%D8%AC%D8%AF%D8%A9
https://devpost.com/elsakrjeddah
https://knowyourmeme.com/users/jumperads
https://ataralmadinah662300791.wordpress.com/2022/08/21/%d9%86%d9%82%d9%84-%d8%b9%d9%81%d8%b4-%d8%a8%d8%ac%d8%af%d8%a9-2/
https://atar-almadinah.over-blog.com/2022/08/sharikat-naql-eafsh-abhir-alshamalia.html
https://atar-almadinah.over-blog.com/2022/08/naql-eafsh-dakhil-jida.html
https://ataralmadinah662300791.wordpress.com/2022/08/22/%d8%b4%d8%b1%d9%83%d8%a9-%d9%86%d9%82%d9%84-%d8%b9%d9%81%d8%b4-%d8%a7%d8%a8%d8%ad%d8%b1-%d8%a7%d9%84%d8%b4%d9%85%d8%a7%d9%84%d9%8a%d8%a9/
https://jumperads.shutterfly.com/22
http://610b31f1e425e.site123.me/about
https://myworldgo.com/blog/40386/-
https://kaalama.org/read-blog/161044
https://kaalama.org/read-blog/161045
https://myworldgo.com/blog/40387/-
https://projects.umwhistory.org/cwh/myomeka/posters/show/38417
https://projects.umwhistory.org/cwh/myomeka/posters/show/38418
https://projects.umwhistory.org/cwh/myomeka/posters/show/38419
https://projects.umwhistory.org/cwh/myomeka/posters/show/38420
https://www.soft-clouds.com/blogs/1047/%D8%A7%D9%81%D8%B6%D9%84-%D8%B4%D8%B1%D9%83%D8%A9-%D9%86%D9%82%D9%84-%D8%B9%D9%81%D8%B4-%D8%A8%D8%AC%D8%AF%D8%A9
https://moodle.cce.cornell.edu/tag/index.php?tag=%D8%B4%D8%B1%D9%83%D8%A9%20%D9%86%D9%82%D9%84%20%D8%B9%D9%81%D8%B4%20%D8%A8%D8%AC%D8%AF%D8%A9
https://moodle.cce.cornell.edu/tag/index.php?id=3259
https://ataralmadinah.shutterfly.com/pictures#n_5
https://projects.umwhistory.org/cwh/myomeka/posters/show/38482
https://www.soft-clouds.com/blogs/1194/%D8%B4%D9%81%D8%B7-%D8%A8%D9%8A%D8%A7%D8%B1%D8%A9-%D8%A8%D8%AC%D8%AF%D8%A9
https://projects.umwhistory.org/cwh/myomeka/posters/show/38484
https://www.soft-clouds.com/blogs/1195/%D8%B4%D8%B1%D9%83%D8%A9-%D9%86%D9%82%D9%84-%D8%B9%D9%81%D8%B4-%D8%A7%D8%A8%D8%AD%D8%B1-%D8%A7%D9%84%D8%B4%D9%85%D8%A7%D9%84%D9%8A%D8%A9
https://kaalama.org/read-blog/162006
https://kaalama.org/read-blog/162008
https://ataralmadinah.shutterfly.com/pictures#n_5
https://uberant.com/users/ataralmadinah/
https://uberant.com/article/1860769-moving-furniture-in-jeddah/
https://www.ulule.com/elsakrjeddah/#/projects/followed
http://www.quan6.hochiminhcity.gov.vn/thutuchanhchinh/layouts/mobile/dispform.aspx?List=238a972d%2D3d44%2D45fd%2Dac5e%2D9e73bc02b75b&View=5de55f99%2D23ee%2D4fbd%2D9136%2D4fc3c67269b4&ID=4293
http://www.quan6.hochiminhcity.gov.vn/thutuchanhchinh/_layouts/mobile/dispform.aspx?List=238a972d%2D3d44%2D45fd%2Dac5e%2D9e73bc02b75b&View=5de55f99%2D23ee%2D4fbd%2D9136%2D4fc3c67269b4&ID=4295
http://www.quan6.hochiminhcity.gov.vn/thutuchanhchinh/layouts/mobile/dispform.aspx?List=238a972d%2D3d44%2D45fd%2Dac5e%2D9e73bc02b75b&View=5de55f99%2D23ee%2D4fbd%2D9136%2D4fc3c67269b4&ID=4294
https://onlylocal.com.au/listing/%d8%b4%d8%b1%d9%83%d8%a9-%d9%86%d9%82%d9%84-%d8%b9%d9%81%d8%b4-%d9%88%d8%a7%d8%ab%d8%a7%d8%ab-%d8%a8%d8%ac%d8%af%d8%a9/
https://emcmee.blogspot.com/2022/08/transfer-furniture-jeddah.html
안전카지노사이트
안전 카지노사이트 https://betop24.com/
온라인카지노 추천 https://betop24.com/
바카라사이트 추천 https://betop24.com/
247벳코리아 https://betop24.com/247bet/
에볼루션라이트닝 https://betop24.com/
파라오카지노 https://betop24.com/pharaoh-casino/
쿨카지노 https://betop24.com/cool-casino/
뉴헤븐카지노 https://betop24.com/nhcasino/
솔카지노 https://betop24.com/solcasino/
헤라카지노 https://betop24.com/hera-casino/
https://1apricot0.blogspot.com/2023/04/the-best-ontario-club-applications.html
https://5emblica.blogspot.com/2023/04/best-new-online-betting-clubs-australia.html
https://4dragonfruit.blogspot.com/2023/04/top-9-electronic-betting-clubs-in-south.html
https://2blueberry0.blogspot.com/2023/04/investigation-of-web-based-gambling.html
https://4desert.blogspot.com/2023/04/new-jersey-establishes-online-club.html
https://1apricot.mystrikingly.com/blog/the-insider-s-scoop-on-scoring-large
https://2blueberry.mystrikingly.com/blog/are-online-gambling-club-big-stakes-unwinnable
https://3cherry.mystrikingly.com/blog/best-crypto-club-canada-in-2023
https://desert000.mystrikingly.com/blog/the-best-ontario-gambling
https://4dragon.mystrikingly.com/blog/assortment-of-gambling-club
https://5emblica.mystrikingly.com/blog/the-portable-club-industry
https://1apricot0.blogspot.com/2023/04/every-one-of-adventures-of-football.html
https://2blueberry0.blogspot.com/2023/04/select-in-to-25k-brilliant-list-of.html
https://3cherry0.blogspot.com/2023/04/how-to-play-pin-up-gambling-club-in.html
https://4desert.blogspot.com/2023/04/baccarat-online-for-genuine-cash.html
https://4dragonfruit.blogspot.com/2023/04/sylwester-fortuna-wins-2023-pokercode.html
https://5emblica.blogspot.com/2023/04/fairspin-club-mirrors-what-are-they-for.html
https://1apricot.mystrikingly.com/blog/online-betting
https://2blueberry.mystrikingly.com/blog/taking-full-advantage-of-online-club
https://desert000.mystrikingly.com/blog/bragg-gaming-reinforces-spanish-presence
https://4dragon.mystrikingly.com/blog/instructions-to-get-chips-at-a-club
https://5emblica.mystrikingly.com/blog/portable-club-gaming-ios-versus-android
https://3cherry.mystrikingly.com/blog/maximizing-internet-based-gambling-clubs
https://1apricot0.blogspot.com/2023/04/best-opening-titles-for-those-searching.html
https://2blueberry0.blogspot.com/2023/04/online-gambling-clubs-and-significance.html
https://3cherry0.blogspot.com/2023/04/pa-online-club-income-breaks-past.html
https://4desert.blogspot.com/2023/04/how-to-make-your-gambling-club-more.html
https://4dragonfruit.blogspot.com/2023/04/7-hints-to-succeed-at-live-vendor-craps.html
https://5emblica.blogspot.com/2023/04/crypto-gambling-clubs-and-kyc-how-it.html
https://1apricot.mystrikingly.com/blog/demonstrated-tips-for-sweepstakes-club-gaming
https://2blueberry.mystrikingly.com/blog/web-club-playing
https://3cherry.mystrikingly.com/blog/further-develop-your-general-portable-gambling-club-involvement
https://desert000.mystrikingly.com/blog/the-developing-fame-of-online-gambling-clubs
https://4dragon.mystrikingly.com/blog/stupendous-island-gambling-club
https://5emblica.mystrikingly.com/blog/ny-online-club
https://1apricot0.blogspot.com/2023/04/what-is-cooperation-for-checking-doing.html
https://2blueberry0.blogspot.com/2023/04/11-methods-for-further-developing-your.html
https://3cherry0.blogspot.com/2023/04/what-are-notable-club-prizes.html
https://4desert.blogspot.com/2023/04/things-you-had-scarcely-any.html
https://4dragonfruit.blogspot.com/2023/04/best-betting-clubs-enduring-crypto.html
https://5emblica.blogspot.com/2023/04/the-top-methodologies-for-winning-large.html
https://1apricot.mystrikingly.com/blog/demonstrated-tips-for-sweepstakes-club-gaming
https://2blueberry.mystrikingly.com/blog/play-poker-on-the-web
https://3cherry.mystrikingly.com/blog/best-crypto-club-uk
https://desert000.mystrikingly.com/blog/best-gambling-club-applications-that-pay-genuine-cash
https://4dragon.mystrikingly.com/blog/historical-backdrop-of-betting-in-the-us
https://5emblica.mystrikingly.com/blog/what-is-in-a-club
https://1apricot0.blogspot.com/2023/04/the-best-arizona-gambling-club.html
https://2blueberry0.blogspot.com/2023/04/ontario-reports-record-betting-with.html
https://3cherry0.blogspot.com/2023/04/7-privileged-insights-to-effectively.html
https://4desert.blogspot.com/2023/04/fundamental-ways-to-maintain-web-based.html
https://4dragonfruit.blogspot.com/2023/04/peruse-this-valuable-agenda-while.html
https://5emblica.blogspot.com/2023/04/top-live-gambling-club-games-for.html
https://1apricot.mystrikingly.com/blog/best-web-based-openings-canada-genuine-cash-2023
https://2blueberry.mystrikingly.com/blog/web-based-wagering
https://3cherry.mystrikingly.com/blog/add-a-blog-post-title
https://desert000.mystrikingly.com/blog/a-2023-novices-manual-for-online-gambling-clubs
https://4dragon.mystrikingly.com/blog/run-it-once-poker
https://5emblica.mystrikingly.com/blog/online-gambling-club-made-simple
https://1apricot0.blogspot.com/2023/04/awesome-web-based-options-in-contrast.html
https://2blueberry0.blogspot.com/2023/04/state-minister-tells-pas-nothing-bad.htm
https://3cherry0.blogspot.com/2023/04/give-me-cash-card-sharks-escape-as-man.html
https://4desert.blogspot.com/2023/04/nfl-suspends-five-players-over-betting.html
https://4dragonfruit.blogspot.com/2023/04/new-jersey-reinforces-issue-betting.html
https://5emblica.blogspot.com/2023/04/saracen-hails-its-wagering-application.html
https://1apricot.mystrikingly.com/blog/conquering-issue-betting-in-kenya
https://2blueberry.mystrikingly.com/blog/best-bitcoin-club-in-2023
https://3cherry.mystrikingly.com/blog/a-manual-for-realtime-gaming-s-web-based-club-in-the-us
https://desert000.mystrikingly.com/blog/best-poker-destinations-in-2023
https://4dragon.mystrikingly.com/blog/nternet-betting-business-sector-development
https://5emblica.mystrikingly.com/blog/enlivened-club-opening-games
https://1apricot0.blogspot.com/2023/04/best-spots-where-to-play-online-club.html
https://2blueberry0.blogspot.com/2023/04/visa-gift-vouchers-acquiring.html
https://3cherry0.blogspot.com/2023/04/online-gambling-club-and-game.html
https://4desert.blogspot.com/2023/04/what-web-based-wagering-locales-dont.html
https://4dragonfruit.blogspot.com/2023/04/volleyball-world-reports-association.html
https://5emblica.blogspot.com/2023/04/italy-keeps-building-bound-together.html
https://1apricot.mystrikingly.com/blog/portable-betting-offers-a-helpful-and-open-gaming-experience
https://2blueberry.mystrikingly.com/blog/play-at-us-online-club-free-of-charge
https://3cherry.mystrikingly.com/blog/top-bitcoin-and-crypto-club-of-2023
https://desert000.mystrikingly.com/blog/uk-online-gambling-club-scene
https://4dragon.mystrikingly.com/blog/best-club-not-on-gamstop-in-2023
https://5emblica.mystrikingly.com/blog/roulette-extreme
https://1apricot0.blogspot.com/2023/04/house-advisory-group-takes-up-bill-to.html
https://2blueberry0.blogspot.com/2023/04/the-most-effective-method-to-pick-right.html
https://3cherry0.blogspot.com/2023/04/netherlands-to-boycott-sports-wagering.html
https://4desert.blogspot.com/2023/04/online-gambling-club-games-that.html
https://4dragonfruit.blogspot.com/2023/04/big-stake-draftkings-player-wins-record.html
https://5emblica.blogspot.com/2023/04/spains-betting-controller-gave-132m-in.html
https://1apricot.mystrikingly.com/blog/bank-of-montreal-expands-stake-in-rush-road-intelligent-by-more-than-4-000
https://2blueberry.mystrikingly.com/blog/gateway-casino-to-resume-ontario-properties
https://3cherry.mystrikingly.com/blog/5-methods-for-betting-dependably
https://desert000.mystrikingly.com/blog/play-gambling-machines
https://4dragon.mystrikingly.com/blog/the-eventual-fate-of-sports-wagering
https://5emblica.mystrikingly.com/blog/the-most-effective-method-to-play-bonanza
https://1apricot0.blogspot.com/2023/04/ufc-heavyweight-lost-everything-in.html
https://2blueberry0.blogspot.com/2023/04/charge-proposes-online-gambling-club.html
https://3cherry0.blogspot.com/2023/04/voices-why-texas-baptists-go-against.html
https://4desert.blogspot.com/2023/04/scatterhall-club-and-spinpirate.html
https://4dragonfruit.blogspot.com/2023/04/the-market-of-online-gambling-club.html
https://5emblica.blogspot.com/2023/04/in-midst-of-push-for-web-based-betting.html
https://1apricot.mystrikingly.com/blog/top-3-sweeps-coins-gambling-clubs
https://2blueberry.mystrikingly.com/blog/the-ascent-of-versatile-gambling-clubs
https://3cherry.mystrikingly.com/blog/the-financial-effect-of-club-on-nearby-organizations
https://desert000.mystrikingly.com/blog/exciting-web-based-bonanza-games
https://4dragon.mystrikingly.com/blog/spanish-betting-controller-suspends-7-working-licenses-in-2022
https://5emblica.mystrikingly.com/blog/the-transformative-potential-of-virtual-reality-in-gaming
https://1apricot0.blogspot.com/2023/04/how-can-internet-based-club-business.html
https://2blueberry0.blogspot.com/2023/04/house-board-consistently-suggests.html
https://3cherry0.blogspot.com/2023/04/the-following-rush-of-online-club.html
https://4desert.blogspot.com/2023/04/betmgm-grows-bison-wild-wings.html
https://4dragonfruit.blogspot.com/2023/04/looking-at-effect-of-apple-pay-on-web.html
https://5emblica.blogspot.com/2023/04/online-games-bettng-and-gambling-club.html
https://1apricot.mystrikingly.com/blog/opening-the-secrets-of-web-based-betting
https://2blueberry.mystrikingly.com/blog/web-based-betting
https://3cherry.mystrikingly.com/blog/web-based-betting-in-arizona-2023
https://desert000.mystrikingly.com/blog/how-sites-are-shielding-clients-from-online-dangers
https://4dragon.mystrikingly.com/blog/philippine-internet-based-gambling-clubs
https://5emblica.mystrikingly.com/blog/alex-kozikov-talks-poker-bots-and-computer-based-intelligence-bits-of-knowledge
안전카지노사이트
https://bit.ly/3mSEOju
247벳코리아 https://betop24.com/247bet/
파라오카지노 https://betop24.com/pharaoh-casino/
쿨카지노 https://betop24.com/cool-casino/
뉴헤븐카지노 https://betop24.com/nhcasino/
솔카지노 https://betop24.com/solcasino/
헤라카지노 https://betop24.com/hera-casino/
안전 카지노사이트 https://betop24.com/
온라인카지노 추천 https://betop24.com/
바카라사이트 추천 https://betop24.com/
http://hai.byjeanne.com/member/login.html?noMemberOrder=&returnUrl=https://betop24.com
http://hampus.biz/?URL=betop24.com
http://hatenablog-parts.com/embed?url=https://betop24.com
http://hcr233.azurewebsites.net/url?q=https://betop24.com
http://hipposupport.de/url?q=https://betop24.com
http://historisches-festmahl.de/go.php?url=https://betop24.com
http://hockey-now.stage.publishwithagility.com/account/logout?returnUrl=https://betop24.com
http://honsagashi.net/mt-keitai/mt4i.cgi?id=4&mode=redirect&ref_eid=1305&url=https://betop24.com
http://house.speakingsame.com/cn/floorplan.php?sta=vic&addr=91+arthurton+road&q=northcote&url=betop24.com
http://hramacek.de/url?q=https://betop24.com
http://hufschlag-foto.de/gallery2/main.php?g2_view=core.UserAdmin&g2_subView=core.UserLogin&g2_return=https://betop24.com
http://hydronics-solutions.com/bitrix/rk.php?goto=https://betop24.com
http://icecap.us/?URL=betop24.com
http://ighaleb.ir/redirect/redirect.php?url=https://betop24.com
http://ikonet.com/en/visualdictionary/static/us/blog_this?id=https://betop24.com
http://imagelibrary.asprey.com/?URL=betop24.com
http://ime.nu/https://betop24.com
http://imqa.us/visit.php?url=https://betop24.com
http://informatief.financieeldossier.nl/index.php?url=https://betop24.com
http://interflex.biz/url?q=https://betop24.com
http://ivvb.de/url?q=https://betop24.com
http://j.lix7.net/?https://betop24.com
http://jacobberger.com/?URL=betop24.com
http://jahn.eu/url?q=https://betop24.com
http://jamesvelvet.com/?URL=betop24.com
http://jamrefractory.com/default.aspx?key=4KOasVkDUpczQmigaUsZswe-qe-q&out=forgotpassword&sys=user&cul=fa-IR&returnurl=https://betop24.com
http://jewelrybay.co.kr/member/login.html?noMemberOrder=&returnUrl=https://betop24.com
http://jla.drmuller.net/r.php?url=https://betop24.com
http://jp.grplan.com/member/login.html?noMemberOrder&returnUrl=https://betop24.com
http://jump.pagecs.net/https://betop24.com
http://karkom.de/url?q=https://betop24.com
http://kenkyuukai.jp/event/event_detail_society.asp?id=52212&ref=calendar&rurl=https://betop24.com
http://kens.de/url?q=https://betop24.com
http://kikikifigure.com/member/login.html?noMemberOrder&returnUrl=https://betop24.com
http://kinderundjugendpsychotherapie.de/url?q=https://betop24.com
http://kinhtexaydung.net/redirect/?url=https://betop24.com
http://www.kalinna.de/url?q=https://betop24.com
http://www.hartmanngmbh.de/url?q=https://betop24.com
https://www.the-mainboard.com/proxy.php?link=https://betop24.com
https://www.betamachinery.com/?URL=https://betop24.com
http://nishiyama-takeshi.com/mobile2/mt4i.cgi?id=3&mode=redirect&no=67&ref_eid=671&url=https://betop24.com
http://webradio.fm/webtop.cfm?site=https://betop24.com
http://www.sprang.net/url?q=https://betop24.com
http://www.insidearm.com/email-share/send/?share_title=MBNA%20to%20Acquire%20Mortage%20BPO%20Provider%20Nexstar&share_url=https://betop24.com
https://img.2chan.net/bin/jump.php?https://betop24.com
http://www.is.kyusan-u.ac.jp/htmllint/htmllint.cgi?ViewSource=on;URL=https://betop24.com
http://sahakorn.excise.go.th/form_view_activity.php?new_id=NEW20170315185851&url=https://betop24.com
https://forum.everleap.com/proxy.php?link=https://betop24.com
https://secure.nationalimmigrationproject.org/np/clients/nationalimmigration/tellFriend.jsp?subject=Attending%202020+Annual+Pre-AILA+Crimes+and+Immigration+Virtual+CLE&url=https://betop24.com
http://go.takbook.com/index.php?url=https://betop24.com
https://www.vsfs.cz/?id=1758&gal=216&img=15315&back=https://betop24.com
http://www.mosig-online.de/url?q=https://betop24.com
http://www.hccincorporated.com/?URL=https://betop24.com
http://fatnews.com/?URL=https://betop24.com
https://ruddingtongrange.com/?URL=https://betop24.com
https://csirealty.com/?URL=https://betop24.com
http://asadi.de/url?q=https://betop24.com
http://treblin.de/url?q=https://betop24.com
https://kentbroom.com/?URL=https://betop24.com
http://0845.boo.jp/cgi/mt3/mt4i.cgi?id=24&mode=redirect&no=15&ref_eid=3387&url=https://betop24.com
http://110.164.66.211/ULIB6//dublin.linkout.php?url=https://betop24.com
http://110.164.92.12/ULIB//dublin.linkout.php?url=https://betop24.com
http://198.54.125.86.myopenlink.net/describe/?url=https://betop24.com
https://1st-p.jp/responsive-sample?url=https://betop24.com
http://202.144.225.38/jmp?url=https://betop24.com
http://2cool2.be/url?q=https://betop24.com
http://39.farcaleniom.com/index/d2?diff=0&source=og&campaign=8220&content=&clickid=w7n7kkvqfyfppmh5&aurl=https://betop24.com
http://4coma.net/cgi/mt4/mt4i.cgi?cat=12&mode=redirect&ref_eid=3231&url=https://betop24.com
http://4travel.jp/dynamic/redirect.php?mode=dm_tour&url=https://betop24.com
http://4vn.eu/forum/vcheckvirus.php?url=https://betop24.com
http://honsagashi.net/mt-keitai/mt4i.cgi?id=4&mode=redirect&refeid=1305&url=https://betop24.com
http://hufschlag-foto.de/gallery2/main.php?g2view=core.UserAdmin&g2subView=core.UserLogin&g2return=https://betop24.com
https://btng.org/tiki-tell_a_friend.php?url=https://betop24.com
https://de.flavii.de/index.php?flavii=linker&link=https://betop24.com
https://dbpedia.org/describe/?url=https://betop24.com
https://boowiki.info/go.php?go=https://betop24.com
http://happy-lands.com/bitrix/redirect.php?event1=&event2=&event3=&goto=https://betop24.com
http://fr.knubic.com/redirect_to?url=https://betop24.com
http://fewiki.jp/link.php?https://betop24.com
https://www.grungejohn.com/bitrix/redirect.php?event1=&event2=&event3=&goto=https://betop24.com
https://bio2rdf.org/describe/?url=https://betop24.com
https://eve-search.com/externalLink.asp?l=https://betop24.com
http://go.mihantafrih.com/index.php?url=https://betop24.com
https://blaze.su/bitrix/redirect.php?event1=&event2=&event3=&goto=https://betop24.com
http://coolbuddy.com/newlinks/header.asp?add=https://betop24.com
https://rev1.reversion.jp/redirect?url=https://betop24.com
https://cedrus.market/rk.php?goto=https://betop24.com
http://markiza.me/bitrix/rk.php?goto=https://betop24.com
https://abiznes.com.ua/bitrix/redirect.php?event1=&event2=&event3=&goto=https://betop24.com
https://cdn.iframe.ly/api/iframe?url=https://betop24.com
https://bluecorkscrew.com/store/webdevelopment/tabid/522/ctl/compareitems/mid/1909/default.aspx?returnurl=https://betop24.com
https://www.musicpv.jp/music.cgi?order=&class=&keyword=&FF=&price_sort=&pic_only=&mode=p_wide&id=11143&superkey=1&back=https://betop24.com
https://www.bro-bra.jp/entry/kiyaku.php?url=https://betop24.com
https://www.woodlist.us/delete-company?nid=13964&element=https://betop24.com
http://www.marcomanfredini.it/radio/visualizzacollezione.php?paginanews=5&contenuto=13&quale=40&origine=https://betop24.com
https://www.bausch.co.nz/en-nz/redirect/?url=https://betop24.com
https://www.funeralunion.org/delete-company?nid=39&element=https://betop24.com
https://www.poringa.net/?go=https://betop24.com
http://www.hon-cafe.net/cgi-bin/re.cgi?lid=hmw&url=https://betop24.com
https://www.linkytools.com/basic_link_entry_form.aspx?link=entered&returnurl=https://betop24.com&AspxAutoDetectCookieSupport=1
https://datos.cplt.cl/describe/?url=https://betop24.com
https://www.kikuya-rental.com/bbs/jump.php?url=https://betop24.com
http://itstream.net/bitrix/redirect.php?event1=&event2=&event3=&goto=https://betop24.com
https://chipcart.shop/bitrix/redirect.php?event1=&event2=&event3=&goto=https://betop24.com
https://www.steuerberaterinbruehl.de/ext_link?url=https://betop24.com
https://www.sinara-group.com/bitrix/rk.php?goto=https://betop24.com
https://ggurl.gdgdocs.org/url?q=https://betop24.com
https://www.knipsclub.de/weiterleitung/?url=https://betop24.com
https://www.bildungslandschaft-pulheim.de/redirect.php?url=https://betop24.com
https://bangdream.gamerch.com/gamerch/external_link/?url=https://betop24.com
https://www.morgeneyer.de/ahnen/login/default.aspx?returnurl=https://betop24.com
https://belco.org/exit/?url=https://betop24.com
https://www.office-mica.com/ebookmb/index.cgi?id=1&mode=redirect&no=49&ref_eid=587&url=https://betop24.com
http://www.fouillez-tout.com/cgi-bin/redirurl.cgi?https://betop24.com
http://mcclureandsons.com/Projects/FishHatcheries/Baker_Lake_Spawning_Beach_Hatchery.aspx?Returnurl=https://betop24.com
https://account.eleavers.com/signup.php?user_type=pub&login_base_url=https://betop24.com
http://www.zhaoyunpan.cn/transfer.php?url=https://betop24.com
https://unikom.org/bitrix/redirect.php?event1=&event2=&event3=&goto=https://betop24.com
http://talesofasteria.cswiki.jp/index.php?cmd=jumpto&r=https://betop24.com
https://tyadnetwork.com/ads_top.php?url=https://betop24.com
http://yahoo-mbga.jp/r?url=//betop24.com
https://reg.summitmedia.com.ph/betop24.com/register
http://www.sitedossier.com/site/betop24.com
http://daidai.gamedb.info/wiki/?cmd=jumpto&r=https://betop24.com
https://jpn1.fukugan.com/rssimg/cushion.php?url=betop24.com
https://www.thaiall.com/cgi/clicko.pl?20819&betop24.com
https://yapy.jp/?F=contact&t=1&d=betop24.com&fc=FFFFFF&tc=C30046&hc=CCCCCC
https://mozakin.com/bbs-link.php?url=betop24.com
https://www.otinasadventures.com/index.php?w_img=betop24.com
https://savvylion.com/?bmDomain=betop24.com
http://vivadoo.es/jump.php?idbd=2052&url=https://betop24.com
http://www.country-retreats.com/cgi-bin/redirectpaid.cgi?URL=betop24.com
http://linkanalyse.durad.de/?ext_url=betop24.com
https://map.thai-tour.com/re.php?url=https://betop24.com
https://familie-huettler.de/link.php?link=betop24.com
https://www.socializer.info/follow.asp?docurlf=https://betop24.com
http://sameas.org/html?uri=https://betop24.com
https://www.dynonames.com/buy-expired-or-pre-owned-domain-name.php?url=betop24.com
https://www.trainorders.com/discussion/warning.php?forum_id=1&url=https://betop24.com
https://walkpittsburgh.org/?URL=https://betop24.com
https://whois.zunmi.com/?d=betop24.com/cities%2Ftampa-fl%2F.com
http://panchodeaonori.sakura.ne.jp/feed/aonori/feed2js.php?src=https://betop24.com
https://chofu.keizai.biz/banner.php?type=text_banner&position=right&id=3&uri=https://betop24.com
https://www.reddit.com/r/AskReddit/comments/qxx50y/whats_an_extremely_useful_website_mostpeople/i6n9ctk/?context=3
http://www.lucka-uprava-sdz.hr/galerija/emodule/566/eitem/37#.YrQOO3ZBy3B
https://clipperfund.com/?URL=https://betop24.com
https://hulluniunion.com/?URL=https://betop24.com
http://centre.org.au/?URL=https://betop24.com
http://www.restaurant-zahnacker.fr/?URL=https://betop24.com
https://sensationalsoy.ca/?URL=https://betop24.com
https://www.myrtlebeachnational.com/?URL=https://betop24.com
https://www.readconstruction.co.uk/?URL=https://betop24.com
http://www.skoladesignu.sk/?URL=https://betop24.com
https://logick.co.nz/?URL=https://betop24.com
http://www.cafeteriatrend.hu/?URL=https://betop24.com
http://bigline.net/?URL=https://betop24.com
https://www.ticrecruitment.com/?URL=https://betop24.com
http://aquaguard.com/?URL=https://betop24.com
http://cim.bg/?URL=https://betop24.com
https://www.aikenslake.com/?URL=https://betop24.com
https://www.shinobi.jp/etc/goto.html?https://betop24.com
http://www.addtoinc.com/?URL=betop24.com
http://0120-74-4510.com/redirect.php?program=medipa_orange_pc&rd=off&codename=&channel=&device=&url=https://betop24.com
http://11.ernorvious.com/index/d1?diff=0&source=og&campaign=5944&content=&clickid=2aqzrzl2knl1pmit&aurl=ttps://betop24.com&an=&te=&pushMode=popup
http://1.glawandius.com/index/c2?diff=6&source=og&campaign=18410&content=kirill2005&clickid=tpg69ftnn9vtevf9&aurl=https://betop24.com&an=&term=NCR
http://10.faranharbarius.com/index/c1?diff=0&source=og&campaign=16917&content=&clickid=9ymbp6hz0jpb0x49&aurl=https://betop24.com&an=&term=&site=
http://80.inspiranius.com/index/l1?diff=9&source=og&campaign=8464&content=1627&clickid=l44a32xdmkttt9gt&aurl=https://betop24.com&an=&term=&site=
http://90.gregorinius.com/index/d1?diff=0&source=og&campaign=5796&content=&clickid=6glaagrcny71ype6&aurl=https://betop24.com
http://28.restonovius.com/index/s1?diff=1&source=og&campaign=16004&content=somedude3&clickid=m7nz4apsasighm85&aurl=https://betop24.com&an=&term=6876&site=
http://accglobal.net/fr/commerciaux/includes/redirector.php?strURL=https://betop24.com
http://88.gubudakis.com/index/p1?diff=0&source=og&campaign=9931&content=&clickid=m45tvpwmynob8i0c&aurl=https://betop24.com&an=&term=&site=
http://25.quarenafius.com/index/s1?diff=0&source=og&campaign=16004&content=rediskin&clickid=opcg4radtqjz1bgu&aurl=https://betop24.com&an=&term=5353&site
http://1.dranationius.com/index/c1?diff=1&source=og&campaign=17149&content=&clickid=sxyfhidcjh3bqphk&aurl=https://betop24.com&an=&term=&si
https://misechko.com.ua/go?url=betop24.com
http://click.localpages.com/k.php?ai=9788&url=https://betop24.com
http://massimopoletti.altervista.org/template/pages/station/redirect.php?url=https://betop24.com
http://30.wordorion.com/index/l1?diff=7&source=og&campaign=8464&content=1754&clickid=u9e3eipzxi754m2p&aurl=https://betop24.com
http://30.crouchserf.com/index/c3?diff=0&source=og&campaign=16004&content=&clickid=lqnt8jsq37o93l3p&aurl=https://betop24.com&an=o
http://www.week.co.jp/skion/cljump.php?clid=129&url=https://betop24.com
http://p.sdnl.org/gen_civilgroup_rss.php?mode=redirect&link=https://betop24.com&hid=NBmaZOPZYkvyndk2
http://go.e-frontier.co.jp/rd2.php?uri=https://betop24.com
https://forum.419eater.com/forum/ref.php?url=https://betop24.com
http://dineview.com/redirect.fwx?type=menu&id=R068134&url=https://betop24.com
http://images.ttacorp.com/linktracker.aspx?u=https://betop24.com
http://career-first.net/?page=2&board=QJF&load-url=https://betop24.com
http://urls.tsa.2mes4.com/amazon_product.php?ASIN=B07211LBSP&page=10&url=https://betop24.com
http://boltsaga.com/buy.php?book=bolt-volume-1&store=Waterstones&url=https://betop24.com
http://foreneset.no/template/plugins/windDirection/redirect.php?url=https://betop24.com
http://ssearch.jp/books/amazonUS.php?url=https://betop24.com
https://www.gazzettadellevalli.it/gdv/advredirect.php?url=https://betop24.com
http://bolt-saga.com/buy.php?url=https://betop24.com&store=iBooks&book=bolt-volume-1-ibooks-us
http://link03.net/redirect.cgi?url=https://betop24.com
https://www.thesamba.com/vw/bin/banner_click.php?redirect=betop24.com
http://meteo-cugy.ch/template/plugins/deviations/redirect.php?url=https://betop24.com
http://cryptocurrency-hikakuandsearch.net/cta/r.php?link=https://betop24.com
http://craftbeverageinsight.com/jump.php?url=https://betop24.com
http://www.oraichi.com/link/?url=https://betop24.com
http://www.doitweb.de/scripts/doitweb.exe/rasklickzaehler?https://betop24.com
http://spillarkivet.no/i.php?url=https://betop24.com
https://stara.biblioteka.jelenia-gora.pl/dalej.php?adres=https://betop24.com
https://www.uia.no/linktools/redirect?url=https://betop24.com
http://meteo-villers-bretonneux.fr/meteo_template/template/pages/station/redirect.php?url=https://betop24.com
http://www.zanzana.net/goto.asp?goto=https://betop24.com
https://shiftup.ca/view.aspx?Site=betop24.com
http://isralink.net/go/?c=https://betop24.com
https://fresh-jobs.uk/click/click_site?url=https://betop24.com
https://dinnerlust.dk/?book-now&goTo=https://betop24.com
https://www.fnnews.com/redirect?url=https://betop24.com&utm_ca
https://compedia.jp/conversion.php?type=official&url=https://betop24.com
https://ilns.ranepa.ru/bitrix/rk.php?goto=https://betop24.com
https://inva.gov.kz/ru/redirect?url=https://betop24.com
https://m.fishki.net/go/?url=https://betop24.com
https://www.rospotrebnadzor.ru/bitrix/redirect.php?event1=file&event2=download&event3=prilozheniya-k-prikazu-1018.doc&goto=https://betop24.com
http://76-rus.ru/bitrix/redirect.php?event1=catalog_out&event2=http2FEEECEBEEE3%EEEE-E5F1FBEDF0&goto=https://betop24.com
http://cenproxy.mnpals.net/login?url=https://betop24.com
http://oca.ucsc.edu/login?url=https://betop24.com
http://www.hyiphistory.com/visit.php?url=https://betop24.com
http://www.liveinternet.ru/journal_proc.php?action=redirect&url=https://betop24.com
https://old.fishki.net/go/?url=https://betop24.com
https://www.banki.ru/away/?url=https://betop24.com
https://www.institutoquinquelamartin.edu.ar/Administracion/top-10-cuadros-mas-famosos6-1/?unapproved=10807https://betop24.com
https://mcpedl.com/leaving/?url=https%3A%2F%2Fwww.statusvideosongs.in%2F&cookie_check=1https://betop24.com
http://gelendzhik.org/bitrix/redirect.php?event1=&event2=&event3=&goto=https://betop24.com
http://sasisa.ru/forum/out.php?link=%3F&yes=1https://betop24.com
http://usolie.info/bitrix/redirect.php?event1=&event2=&event3=&goto=https://betop24.com
http://vologda-portal.ru/bitrix/redirect.php?event1=news_out&event2=farsicontent.blogspot.com&event3=C1CEAB8CEBE5F1AAFFF2EAA0F8E0C2A5F120EAAEFBEAF1B1E2F0E8A4FF29&goto=https://betop24.com
http://vstu.ru/bitrix/rk.php?goto=https://betop24.com
http://www.bsaa.edu.ru/bitrix/rk.php?goto=https://betop24.com
http://www.geogr.msu.ru/bitrix/rk.php?goto=https://betop24.com
https://academy.1c-bitrix.ru/bitrix/redirect.php?event1=acsdemy&event2=usable&event3=&goto=https://betop24.com
https://adamb-bartos.blog.idnes.cz/redir.aspx?url=https://betop24.com
https://adamburda.blog.idnes.cz/redir.aspx?url=https://betop24.com
https://adammikulasek.blog.idnes.cz/redir.aspx?url=https://betop24.com
https://adamvanek.blog.idnes.cz/redir.aspx?url=https://betop24.com
https://adamvasina.blog.idnes.cz/redir.aspx?url=https://betop24.com
https://agalarov.blog.idnes.cz/redir.aspx?url=https://betop24.com
https://alenapekarova.blog.idnes.cz/redir.aspx?url=https://betop24.com
https://alenapitrova.blog.idnes.cz/redir.aspx?url=https://betop24.com
https://alesbeseda.blog.idnes.cz/redir.aspx?url=https://betop24.com
https://alesmerta.blog.idnes.cz/redir.aspx?url=https://betop24.com
https://alexova.blog.idnes.cz/redir.aspx?url=https://betop24.com
https://andreanovotna1.blog.idnes.cz/redir.aspx?url=https://betop24.com
https://community.cypress.com/external-link.jspa?url=http://https://betop24.com
https://community.rsa.com/external-link.jspa?url=https://betop24.com
http://www.pasco.k12.fl.us/?URL=https://betop24.com
https://www.fuzokubk.com/cgi-bin/LinkO.cgi?u=https://betop24.com
http://images.google.com.pr/url?q=https://betop24.com
https://legacy.aom.org/verifymember.asp?nextpage=http://https://betop24.com
http://www.novalogic.com/remote.asp?NLink=https://betop24.com
http://www.orthodoxytoday.org/?URL=https://betop24.com
https://bukkit.org/proxy.php?link=https://betop24.com
http://www.searchdaimon.com/?URL=https://betop24.com
http://icecap.us/?URL=https://betop24.com
https://www.adminer.org/redirect/?url=https://betop24.com
http://www.arakhne.org/redirect.php?url=https://betop24.com
https://www.raincoast.com/?URL=https://betop24.com
http://4vn.eu/forum/vcheckvirus.php?url=https://betop24.com
http://holidaykitchens.com/?URL=https://betop24.com
http://www.adhub.com/cgi-bin/webdata_pro.pl?cgifunction=clickthru&url=https://betop24.com
https://client.paltalk.com/client/webapp/client/External.wmt?url=https://betop24.com
http://www.virtual-egypt.com/framed/framed.cgi?url==https://betop24.com
http://www.webclap.com/php/jump.php?url=https://betop24.com
http://urlxray.com/display.php?url=https://betop24.com
http://daidai.gamedb.info/wiki/?cmd=jumpto&r=https://betop24.com
https://www.hobowars.com/game/linker.php?url=https://betop24.com
http://www.clevelandbay.com/?URL=https://betop24.com
https://www.wheretoskiandsnowboard.com/?URL=https://betop24.com
http://archive.paulrucker.com/?URL=https://betop24.com
http://openroadbicycles.com/?URL=https://betop24.com
http://www.onesky.ca/?URL=https://betop24.com
https://www.sjpcommunications.org/?URL=https://betop24.com
https://www.stmarysbournest.com/?URL=https://betop24.com
http://jc-log.jmirus.de/?URL=https://betop24.com
http://www.shamelesstraveler.com/?URL=https://betop24.com
http://2ch.io/washburnvalley.org/?URL=betop24.com/
https://smmry.com/crspublicity.com.au/?URL=betop24.com/
http://www.allods.net/redirect/vectechnologies.com/?URL=betop24.com/
https://smmry.com/troxellwebdesign.com/?URL=betop24.com/
https://jump.5ch.net/?jacobberger.com/?URL=betop24.com/feft/ref/xiswi/
http://www.ut2.ru/redirect/oncreativity.tv/?URL=betop24.com
http://www.allods.net/redirect/ww2.torahlab.org/?URL=betop24.com/
http://2ch.io/essencemusicagency.com/?URL=betop24.com
http://www.ut2.ru/redirect/livingtrustplus.com/?URL=betop24.com/
https://cwcab.com/?URL=giruna.hu/redirect.php?url=betop24.com/
http://www.nwnights.ru/redirect/cssdrive.com/?URL=betop24.com/feft/ref/xiswi/
http://bios.edu/?URL=basebusiness.com.au/?URL=betop24.com
http://www.allods.net/redirect/2ch.io/betop24.com/ http://2ch.io/slrc.org/?URL=betop24.com
http://www.nwnights.ru/redirect/life-church.com.au/?URL=betop24.com/
http://bios.edu/?URL=precisioncomponents.com.au/?URL=betop24.com/
http://www.nwnights.ru/redirect/okellymoylan.ie/?URL=betop24.com/
http://ime.nu/sc.hkexnews.hk/TuniS/betop24.com/
http://www.allods.net/redirect/davidcouperconsulting.com/?URL=betop24.com
https://jump.5ch.net/?morrowind.ru/redirect/betop24.com
http://www.morrowind.ru/redirect/ucrca.org/?URL=betop24.com/
https://jump.5ch.net/?wagyu.org/?URL=betop24.com/
https://jump.5ch.net/?unbridledbooks.com/?URL=betop24.com/feft/ref/xiswi/
http://www.allods.net/redirect/jongeriuslab.com/?URL=betop24.com
https://smmry.com/woodforestcharitablefoundation.org/?URL=betop24.com/
https://cwcab.com/?URL=judiisrael.com/?URL=betop24.com
http://bios.edu/?URL=roserealty.com.au/?URL=betop24.com
http://www.morrowind.ru/redirect/wdvstudios.be/?URL=betop24.com/feft/ref/xiswi/
https://jump.5ch.net/?frienddo.com/out.php?url=betop24.com
https://jump.5ch.net/?ctlimo.com/?URL=betop24.com/feft/ref/xiswi/
http://www.ut2.ru/redirect/bvilpcc.com/?URL=betop24.com
https://cwcab.com/?URL=reedring.com/?URL=betop24.com/
http://www.ut2.ru/redirect/lbaproperties.com/?URL=betop24.com/feft/ref/xiswi/
http://ime.nu/kingswelliesnursery.com/?URL=betop24.com/
https://smmry.com/miloc.hr/?URL=betop24.com/
https://smmry.com/nslgames.com/?URL=betop24.com/
http://bios.edu/?URL=thebigmo.nl/?URL=betop24.com/
http://www.nwnights.ru/redirect/steamcommunity.com/linkfilter/?url=betop24.com
http://2ch.io/barrypopik.com/index.php?URL=betop24.com/
https://cwcab.com/?URL=batterybusiness.com.au/?URL=betop24.com/
https://smmry.com/blingguard.com/?URL=betop24.com/feft/ref/xiswi/
https://cwcab.com/?URL=professor-murmann.info/?URL=betop24.com
http://www.allods.net/redirect/burkecounty-ga.gov/?URL=betop24.com/
http://www.morrowind.ru/redirect/grillages-wunschel.fr/?URL=betop24.com/feft/ref/xiswi/
https://smmry.com/xn-herzrhythmusstrungen-hbc.biz/goto.php?site=betop24.com/
http://www.ut2.ru/redirect/slrc.org/?URL=betop24.com/
https://jump.5ch.net/?blingguard.com/?URL=betop24.com
https://jump.5ch.net/?ponsonbyacupunctureclinic.co.nz/?URL=betop24.com
http://bios.edu/?URL=puttyandpaint.com/?URL=betop24.com
https://cwcab.com/?URL=eaglesgymnastics.com/?URL=betop24.com
http://www.ut2.ru/redirect/weburg.net/redirect?url=betop24.com/
http://2ch.io/assertivenorthwest.com/?URL=betop24.com/
http://www.morrowind.ru/redirect/slighdesign.com/?URL=betop24.com
http://ime.nu/gumexslovakia.sk/?URL=betop24.com/
http://www.morrowind.ru/redirect/roserealty.com.au/?URL=betop24.com/
http://www.allods.net/redirect/magenta-mm.com/?URL=betop24.com/
http://bios.edu/?URL=shavermfg.com/?URL=betop24.com
http://www.allods.net/redirect/healthyeatingatschool.ca/?URL=betop24.com/feft/ref/xiswi/
http://www.gta.ru/redirect/dcfossils.org/?URL=betop24.com
https://jump.5ch.net/?pro-net.se/?URL=betop24.com/
http://bios.edu/?URL=civicvoice.org.uk/?URL=betop24.com
https://jump.5ch.net/?arbor-tech.be/?URL=betop24.com
http://www.allods.net/redirect/theaustonian.com/?URL=betop24.com/
http://ime.nu/basebusiness.com.au/?URL=betop24.com/
https://cwcab.com/?URL=hfw1970.de/redirect.php?url=betop24.com
http://www.ut2.ru/redirect/firma.hr/?URL=betop24.com/
http://www.nwnights.ru/redirect/giruna.hu/redirect.php?url=betop24.com
http://bios.edu/?URL=weburg.net/redirect?url=betop24.com/
http://www.gta.ru/redirect/emotional.ro/?URL=betop24.com/
http://www.gta.ru/redirect/couchsrvnation.com/?URL=betop24.com/feft/ref/xiswi/
http://www.allods.net/redirect/turbo-x.hr/?URL=betop24.com/
http://www.gta.ru/redirect/albins.com.au/?URL=betop24.com/
http://www.ut2.ru/redirect/emophilips.com/?URL=betop24.com
http://bios.edu/?URL=pcrnv.com.au/?URL=betop24.com
http://2ch.io/md-technical.com/?URL=betop24.com/feft/ref/xiswi/
http://www.ut2.ru/redirect/stcroixblades.com/?URL=betop24.com/
https://jump.5ch.net/?sassyj.net/?URL=betop24.com/
http://www.nwnights.ru/redirect/applicationadvantage.com/?URL=betop24.com
http://www.ut2.ru/redirect/hotyoga.co.nz/?URL=betop24.com/
http://bios.edu/?URL=boc-ks.com/speedbump.asp?link=betop24.com
http://www.morrowind.ru/redirect/accord.ie/?URL=betop24.com/
http://ime.nu/s79457.gridserver.com/?URL=betop24.com/
http://2ch.io/morrowind.ru/redirect/betop24.com/feft/ref/xiswi/
https://smmry.com/centre.org.au/?URL=betop24.com/
http://ime.nu/pulaskiticketsandtours.com/?URL=betop24.com/
https://smmry.com/promoincendie.com/?URL=betop24.com/feft/ref/xiswi/
http://www.nwnights.ru/redirect/hs-events.nl/?URL=betop24.com
http://www.ut2.ru/redirect/chivemediagroup.com/?URL=betop24.com/feft/ref/xiswi/
http://www.nwnights.ru/redirect/horizon-environ.com/?URL=betop24.com/
http://www.morrowind.ru/redirect/yesfest.com/?URL=betop24.com/
http://bios.edu/?URL=cssanz.org/?URL=betop24.com
http://bios.edu/?URL=roserealty.com.au/?URL=betop24.com/
http://www.morrowind.ru/redirect/t.me/iv?url=betop24.com
http://www.allods.net/redirect/boosterblog.com/vote-815901-624021.html?adresse=betop24.com/
http://www.ut2.ru/redirect/client.paltalk.com/client/webapp/client/External.wmt?url=betop24.com
http://www.morrowind.ru/redirect/minecraft-galaxy.ru/redirect/?url=betop24.com
http://www.nwnights.ru/redirect/rescuetheanimals.org/?URL=betop24.com/
http://ime.nu/foosball.com/?URL=betop24.com
http://www.ut2.ru/redirect/supertramp.com/?URL=betop24.com
http://www.allods.net/redirect/gmmdl.com/?URL=betop24.com/feft/ref/xiswi/
http://2ch.io/icecap.us/?URL=betop24.com/feft/ref/xiswi/
http://www.nwnights.ru/redirect/labassets.com/?URL=betop24.com/
https://cwcab.com/?URL=acceleweb.com/register?aw_site_id=betop24.com/
http://www.allods.net/redirect/cim.bg/?URL=betop24.com/
http://ime.nu/rawseafoods.com/?URL=betop24.com
http://2ch.io/2ch.io/betop24.com
http://www.nwnights.ru/redirect/mikropul.com/?URL=betop24.com/
https://cwcab.com/?URL=bytecheck.com/results?resource=betop24.com
http://www.nwnights.ru/redirect/youtube.com/redirect?q=betop24.com
http://www.nwnights.ru/redirect/salonfranchise.com.au/?URL=betop24.com
https://cwcab.com/?URL=couchsrvnation.com/?URL=betop24.com/
http://ime.nu/usich.gov/?URL=betop24.com
http://www.nwnights.ru/redirect/sostrategic.com.au/?URL=betop24.com/
http://www.allods.net/redirect/boosterblog.net/vote-146-144.html?adresse=betop24.com/
http://www.allods.net/redirect/wilsonlearning.com/?URL=betop24.com/
http://ime.nu/nerida-oasis.com/?URL=betop24.com/feft/ref/xiswi/
http://2ch.io/aldonauto.com/?URL=betop24.com/
http://www.allods.net/redirect/spot-car.com/?URL=betop24.com
http://ime.nu/hornbeckoffshore.com/?URL=betop24.com/
http://bios.edu/?URL=anzela.edu.au/?URL=betop24.com
http://bios.edu/?URL=lbast.ru/zhg_img.php?url=betop24.com
https://cwcab.com/?URL=dentalcommunity.com.au/?URL=betop24.com/
http://www.morrowind.ru/redirect/peter.murmann.name/?URL=betop24.com
http://www.morrowind.ru/redirect/firma.hr/?URL=betop24.com
https://jump.5ch.net/?labassets.com/?URL=betop24.com/feft/ref/xiswi/
http://ime.nu/progressprinciple.com/?URL=betop24.com
http://www.nwnights.ru/redirect/mbcarolinas.org/?URL=betop24.com/
https://jump.5ch.net/?fotka.com/link.php?u=betop24.com
http://bios.edu/?URL=restaurant-zahnacker.fr/?URL=betop24.com
https://cwcab.com/?URL=accord.ie/?URL=betop24.com
http://www.nwnights.ru/redirect/morrisparks.net/?URL=betop24.com
https://cwcab.com/?URL=fishidy.com/go?url=betop24.com
http://www.nwnights.ru/redirect/blingguard.com/?URL=betop24.com/feft/ref/xiswi/
http://www.ut2.ru/redirect/ria-mar.com/?URL=betop24.com/
https://jump.5ch.net/?batterybusiness.com.au/?URL=betop24.com/
http://bios.edu/?URL=ocmdhotels.com/?URL=betop24.com/
http://www.gta.ru/redirect/healthyeatingatschool.ca/?URL=betop24.com/feft/ref/xiswi/
https://cwcab.com/?URL=ntltyres.com.au/?URL=betop24.com/
https://jump.5ch.net/?romanodonatosrl.com/?URL=betop24.com
http://www.morrowind.ru/redirect/pcrnv.com.au/?URL=betop24.com/feft/ref/xiswi/
http://bios.edu/?URL=wup.pl/?URL=betop24.com/
https://jump.5ch.net/?bluewatergrillri.com/?URL=betop24.com
akvaforum.no/go.cfml?id=1040&uri=https://betop24.com
www.kamphuisgroep.nl/r.php?cid=2314&site=https://betop24.com
sns.51.ca/link.php?url=https://betop24.com
http://newsrankey.com/view.html?url=https://betop24.com
www.minibuggy.net/forum/redirect-to/?redirect=https://betop24.com
www.wagersmart.com/top/out.cgi?id=bet2gold&url=https://betop24.com
www.global-autonews.com/shop/bannerhit.php?bn_id=307&url=https://betop24.com
pnevmopodveska-club.ru/index.php?app=core&module=system&controller=redirect&do=redirect&url=https://betop24.com
www.darussalamciamis.or.id/redirect/?alamat=http%3A%2F%2Fbetop24.com
agama.su/go.php?url=https://betop24.com
bas-ip.ru/bitrix/rk.php?goto=https://betop24.com
college.captainu.com/college_teams/1851/campaigns/51473/tracking/click?contact_id=1154110&email_id=1215036&url=https://betop24.com
www.oldfold.com/g?u=https://betop24.com
www.anibox.org/go?https://betop24.com
https://acejobs.net/jobclick/?RedirectURL=http%3A%2F%2Fbetop24.com&Domain=acejobs.net
www.m.mobilegempak.com/wap_api/get_msisdn.php?URL=https://www.betop24.com/
sitesdeapostas.co.mz/track/odd?url-id=11&game-id=1334172&odd-type=draw&redirect=https://betop24.com
www.autaabouracky.cz/plugins/guestbook/go.php?url=https://www.betop24.com/
www.escapers-zone.net/ucp.php?mode=logout&redirect=http%3A%2F%2Fbetop24.com
members.practicegreenhealth.org/eweb/Logout.aspx?RedirectURL=https://betop24.com
http://fiinpro.com/Home/ChangeLanguage?lang=vi-VN&returnUrl=https://betop24.com
https://visit-thassos.com/index.php/language/en?redirect=https://betop24.com
adserverv6.oberberg.net/adserver/www/delivery/ck.php?ct=1&oaparams=2bannerid=2zoneid=35cb=88915619faoadest=https://betop24.com
www.homuta.co.jp/link/?link=http%3A%2F%2Fbetop24.com
klvr.link/redirect/venividivici/spotify?linkUrl=http%3A%2F%2Fbetop24.com
www.pcstore.com.tw/adm/act.htm?src=vipad_click&store_type=SUP_TOP&big_exh=STOREAD-%A7%E950&reurl=http%3A%2F%2Fbetop24.com
http://baantawanchandao.com/change_language.asp?language_id=th&MemberSite_session=site_47694_&link=https://betop24.com
grannyfuck.in/cgi-bin/atc/out.cgi?id=139&u=https://betop24.com
www.joserodriguez.info/?wptouch_switch=desktop&redirect=https://betop24.com
https://navigraph.com/redirect.ashx?url=https://betop24.com
edu54.ru/bitrix/redirect.php?goto=https://betop24.com
https://honolulufestival.com/ja/?wptouch_switch=desktop&redirect=http%3A%2F%2Fbetop24.com
www.perinosboilingpot.com/site.php?pageID=1&bannerID=19&vmoment=1430132758&url=http%3A%2F%2Fbetop24.com
www.hardcoreoffice.com/tp/out.php?link=txt&url=https://www.betop24.com/
best.amateursecrets.net/cgi-bin/out.cgi?ses=onmfsqgs6c&id=318&url=https://betop24.com
elitesm.ru/bitrix/rk.php?id=102&site_id=ru&event1=banner&event2=click&event3=1+%2F+%5B102%5D+%5Bright_group_bot%5D+%DD%CA%CE+3%C4&goto=https://betop24.com
www.iasb.com/sso/login/?userToken=Token&returnURL=https://betop24.com
prominentjobs.co.uk/jobclick/?RedirectURL=http%3A%2F%2Fbetop24.com
http://workshopweekend.net/er?url=https://betop24.com
go.pnuna.com/go.php?url=https://betop24.com
https://przyjazniseniorom.com/language/en/?returnUrl=http%3A%2F%2Fbetop24.com
motorrad-stecki.de/trigger.php?r_link=http%3A%2F%2Fbetop24.com
news.animravel.fr/retrolien.aspx?id_dest=1035193&id_envoi=463&url=betop24.com/
http://aldenfamilyonline.com/KathySite/MomsSite/MOM_SHARE_MEMORIES/msg_system/go.php?url=https://betop24.com
www.sports-central.org/cgi-bin/axs/ax.pl?https://betop24.com
shop.mediaport.cz/redirect.php?action=url&goto=betop24.com
adlogic.ru/?goto=jump&url=https://betop24.com
www.waters.com/waters/downloadFile.htm?lid=134799103&id=134799102&fileName=Download&fileUrl=http%3A%2F%2Fbetop24.com
www.bari91.com/tz.php?zone=Pacific/Niue&r=http%3A%2F%2Fbetop24.com
www.xfdq123.com/url.aspx?url=https://betop24.com
www.ignicaodigital.com.br/affiliate/?idev_id=270&u=https://betop24.com
www.mirogled.com/banner-clicks/10?url=https://betop24.com
www.avilas-style.com/shop/affiche.php?ad_id=132&from=&uri=betop24.com
www.hentaicrack.com/cgi-bin/atx/out.cgi?s=95&u=https://betop24.com
www.voxlocalis.net/enlazar/?url=https://betop24.com
https://christchurchcitylibraries.com/Databases/GVRL/jumpto.asp?url=http%3A%2F%2Fbetop24.com
www.ferrosystems.com/setLocale.jsp?language=en&url=https://betop24.com
test.healinghealth.com/?wptouch_switch=desktop&redirect=https://betop24.com
www.lastdates.com/l/?betop24.com
kaimono-navi.jp/rd?u=http%3A%2F%2Fbetop24.com
www.shop-bell.com/out.php?id=kibocase&category=ladies&url=https://betop24.com
https://richmonkey.biz/go/?https://betop24.com
https://online-knigi.com/site/getlitresurl?url=http%3A%2F%2Fbetop24.com
karir.imslogistics.com/language/en?return=https://www.betop24.com/
yun.smartlib.cn/widgets/fulltext/?url=https://betop24.com
www.okhba.org/clicks.php?bannerid=51&url=http%3A%2F%2Fbetop24.com
www.all1.co.il/goto.php?url=https://www.betop24.com/
https://jipijapa.net/jobclick/?RedirectURL=http%3A%2F%2Fbetop24.com&Domain=jipijapa.net&rgp_m=co3&et=4495
chaku.tv/i/rank/out.cgi?url=https://betop24.com
www.mendocino.com/?id=4884&url=betop24.com
doc.enervent.com/op/op.SetLanguage.php?lang=de_DE&referer=http%3A%2F%2Fbetop24.com
www.feg-jena.de/link/?link=https://betop24.com
b2b.psmlighting.be/en-GB/Base/ChangeCulture?currentculture=de-DE¤turl=http%3A%2F%2Fbetop24.com¤turl=http%3A%2F%2Fbatmanapollo.ru
http://dstats.net/redir.php?url=https://betop24.com
crescent.netcetra.com/inventory/military/dfars/?saveme=MS51957-42*&redirect=https://betop24.com
r5.dir.bg/rem.php?word_id=0&place_id=9&ctype=mp&fromemail=&iid=3770&aid=4&cid=0&url=https://betop24.com
www.store-datacomp.eu/Home/ChangeLanguage?lang=en&returnUrl=http%3A%2F%2Fbetop24.com
http://hotgrannyworld.com/cgi-bin/crtr/out.cgi?id=41&l=toplist&u=https://betop24.com
t.wxb.com/order/sourceUrl/1894895?url=betop24.com/
shop.merchtable.com/users/authorize?return_url=https://betop24.com
zharpizza.ru/bitrix/rk.php?goto=https://betop24.com
elinks.qp.land.to/link.php?url=https://betop24.com
www.powerflexweb.com/centers_redirect_log.php?idDivision=25&nameDivision=Homepage&idModule=m551&nameModule=myStrength&idElement=298&nameElement=Provider%20Search&url=https://betop24.com
rbs-crm.ru/?redirect_url=http%3A%2F%2Fbetop24.com
www.theukhighstreet.com/perl/jump.cgi?ID=12&URL=https://betop24.com
ekonomka.dn.ua/out.php?link=http://www.betop24.com/
www.perpetuumsoft.com/Out.ashx?href=https://betop24.com
digital.fijitimes.com/api/gateway.aspx?f=https://www.betop24.com/
https://amateurdorado.com/wp-content/plugins/AND-AntiBounce/redirector.php?url=https://betop24.com
www.medicumlaude.de/index.php/links/index.php?url=https://betop24.com
www.figurama.eu/cz/redirect.php?path=https://betop24.com
nagranitse.ru/url.php?q=https://betop24.com
www.wien-girls.at/out-link?url=https://betop24.com
www.blackpictures.net/jcet/tiov.cgi?cvns=1&s=65&u=https://betop24.com
https://athleticforum.biz/redirect/?to=http%3A%2F%2Fbetop24.com
www.telehaber.com/redir.asp?url=https://betop24.com
efir-kazan.ru/bitrix/rk.php?id=367&site_id=s1&event1=banner&event2=click&event3=47+/367[Main_middle1]%D0%90%D0%BA%D0%91%D0%B0%D1%80%D1%81+%D0%A1%D0%BF%D0%BE%D1%80%D1%82&goto=https://betop24.com
yiwu.0579.com/jump.asp?url=https://betop24.com
t.goadservices.com/optout?url=https://betop24.com
auth.philpapers.org/login?service=https://betop24.com
forsto.ru/bitrix/redirect.php?goto=https://betop24.com
www.etslousberg.be/ViewSwitcher/SwitchView?mobile=False&returnUrl=http%3A%2F%2Fbetop24.com
www.slavenibas.lv/bancp/www/delivery/ck.php?ct=1&oaparams=2bannerid=82zoneid=2cb=008ea50396oadest=http%3A%2F%2Fbetop24.com
neso.r.niwepa.com/ts/i5536875/tsc?tst=!&amc=con.blbn.490450.485278.164924&pid=6508&rmd=3&trg=https://betop24.com
italiantrip.it/information_about_cookie_read.php?url=https%3A%2F%2Fbetop24.com
cgi1.bellacoola.com/adios.cgi/630?https://betop24.com
adengine.old.rt.ru/go.jsp?to=https://betop24.com
www.simpleet.lu/Home/ChangeCulture?lang=de-DE&returnUrl=http%3A%2F%2Fbetop24.com
enseignants.flammarion.com/Banners_Click.cfm?ID=86&URL=betop24.com/
content.sixflags.com/news/director.aspx?gid=0&iid=72&cid=3714&link=https://betop24.com
www.offendorf.fr/spip_cookie.php?url=https://betop24.com
suche6.ch/count.php?url=https://betop24.com
shiftlink.ca/AbpLocalization/ChangeCulture?cultureName=de&returnUrl=http%3A%2F%2Fbetop24.com
www.canakkaleaynalipazar.com/advertising.php?r=3&l=https://betop24.com
www.tascher-de-la-pagerie.org/fr/liens.php?l=https://betop24.com
youngpussy.ws/out.php?https://betop24.com
www.hartje.name/go?r=1193&jumpto=https://betop24.com
www.yplf.com/cgi-bin/a2/out.cgi?id=141&l=toplist&u=https://betop24.com
www.joblinkapply.com/Joblink/5972/Account/ChangeLanguage?lang=es-MX&returnUrl=https://betop24.com
smedia.ru/bitrix/rk.php?goto=https://betop24.com
navitrinu.ru/redirect/?go=http%3A%2F%2Fbetop24.com
https://hatboroalive.com/abnrs/countguideclicks.cfm?targeturl=http%3A%2F%2Fbetop24.com&businessid=29277
www.irrigationnz.co.nz/ClickThru?mk=5120.0&Redir=https://betop24.com
api.buu.ac.th/getip/?url=https://betop24.com
buecher-teneues.de/mlm/lm/lm.php?tk=CQkJRkRhdW1AdGVuZXVlcy5jb20JU3BlY2lhbCBPZmZlcnMgYmVpIHRlTmV1ZXMgCTM3CQkzNzQ1CWNsaWNrCXllcwlubw==&url=https://betop24.com
www.elmore.ru/go.php?to=https://betop24.com
www.tido.al/vazhdo.php?url=https://betop24.com
os-company.ru/bitrix/redirect.php?goto=https://betop24.com
duma-slog.ru/bitrix/redirect.php?event1=file&event2=betop24.com/&event3=29.01.2015_312_rd.doc&goto=https://betop24.com
www.interempresas.net/estadisticas/r.asp?idsector=129&e=221083&c=195&d=https://betop24.com
pravoslavieru.trckmg.com/app/click/30289/561552041/?goto_url=betop24.com
jump.fan-site.biz/rank.cgi?mode=link&id=342&url=https://betop24.com
http://anti-kapitalismus.org/sites/all/modules/pubdlcnt/pubdlcnt.php?file=https://betop24.com&nid=435
rubyconnection.com.au/umbraco/newsletterstudio/tracking/trackclick.aspx?nid=207065033113056034011005043041220243180024215107&e=011204127253056232044128247253046214192002250116195220062107112232157159227010159247231011081075001197133136091194134170178051032155159001112047&url=https://betop24.com
video.childsheroes.com/Videos/SetCulture?culture=en-US&returnURL=http%3A%2F%2Fbetop24.com
winehall.ru/bitrix/rk.php?goto=https://betop24.com
www.veloxbox.us/link/?h=http%3A%2F%2Fbetop24.com
www.adult-plus.com/ys/rank.php?mode=link&id=592&url=https://betop24.com
mobilize.org.br/handlers/anuncioshandler.aspx?anuncio=55&canal=2&redirect=https://www.betop24.com/
sparktime.justclick.ru/lms/api-login/?hash=MO18szcRUQdzpT%2FrstSCW5K8Gz6ts1NvTJLVa34vf1A%3D&authBhvr=1&email=videotrend24%40mail.ru&expire=1585462818&lms%5BrememberMe%5D=1&targetPath=http%3A%2F%2Fbetop24.com
redirect.icurerrors.com/http/betop24.com
http://vcteens.com/cgi-bin/at3/out.cgi?trade=https://betop24.com
www.bquest.org/Links/Redirect.aspx?ID=164&url=https://betop24.com
www.stipendije.info/phpAdsNew/adclick.php?bannerid=129&zoneid=1&source=&dest=https://betop24.com
today.od.ua/redirect.php?url=https://betop24.com
laskma.megastart-slot.ru/redirect/?g=https://betop24.com
mightypeople.asia/link.php?id=M0ZGNHFISkd2bFh0RmlwSFU4bDN4QT09&destination=https://betop24.com
www.chinaleatheroid.com/redirect.php?url=https://betop24.com
i.s0580.cn/module/adsview/content/?action=click&bid=5&aid=163&url=http%3A%2F%2Fbetop24.com&variable=&source=https%3A%2F%2Fcutepix.info%2Fsex%2Friley-reyes.php
jsv3.recruitics.com/redirect?rx_cid=506&rx_jobId=39569207&rx_url=https://betop24.com
https://jobinplanet.com/away?link=betop24.com
www.supermoto8.com/sidebanner/62?href=https://betop24.com
presse.toyota.dk/login.aspx?returnurl=https://betop24.com
www.uktrademarkregistration.co.uk/JumpTo.aspx?url=https://betop24.com
www.mir-stalkera.ru/go?https://betop24.com
duhocphap.edu.vn/?wptouch_switch=desktop&redirect=http%3A%2F%2Fbetop24.com
www.millerovo161.ru/go?https://betop24.com
www.naturaltranssexuals.com/cgi-bin/a2/out.cgi?id=97&l=toplist&u=https://betop24.com
https://amanaimages.com/lsgate/?lstid=pM6b0jdQgVM-Y9ibFgTe6Zv1N0oD2nYuMA&lsurl=https://betop24.com
planszowkiap.pl/trigger.php?r_link=http%3A%2F%2Fbetop24.com
http://covenantpeoplesministry.org/cpm/wp/sermons/?show&url=https://betop24.com
www.sporteasy.net/redirect/?url=https://betop24.com
getwimax.jp/st-manager/click/track?id=3894&type=raw&url=https://betop24.com&source_url=https://getwimax.jp/&source_title=GetWiMAX.jp%EF%BD%9CWiMAX%EF%BC%88%E3%83%AF%E3%82%A4%E3%83%9E%E3%83%83%E3%82%AF%E3%82%B9%EF%BC%89%E6%AF%94%E8%BC%83%EF%BC%81%E3%81%8A%E3%81%99%E3%81%99%E3%82%81%E3%83%97%E3%83%AD%E3%83%90%E3%82%A4%E3%83%803%E9%81%B8
mobo.osport.ee/Home/SetLang?lang=cs&returnUrl=https://betop24.com
materinstvo.ru/forward?link=http%3A%2F%2Fbetop24.com
http://computer-chess.org/lib/exe/fetch.php?media=https://betop24.com
https://enchantedcottageshop.com/shop/trigger.php?r_link=http%3A%2F%2Fbetop24.com
https://buist-keatch.org/sphider/include/click_counter.php?url=http%3A%2F%2Fbetop24.com
www.mistress-and-slave.com/cgi-bin/out.cgi?id=123crush&url=https://betop24.com
rel.chubu-gu.ac.jp/soumokuji/cgi-bin/go.cgi?https://betop24.com
fallout3.ru/utils/ref.php?url=https://betop24.com
www.hschina.net/ADClick.aspx?SiteID=206&ADID=1&URL=https://betop24.com
cipresso.ru/bitrix/redirect.php?goto=https://betop24.com
www.vacacionartravel.com/DTCSpot/public/banner_redirect.aspx?idca=286&ids=75665176&cp=167&idcli=0&ci=2&p=https://betop24.com
www.mydosti.com/Advertisement/updateadvhits.aspx?adid=48&gourl=https://betop24.com
www.malles-bertault.com/?change_langue=en&url=http%253a%252f%252fbetop24.com
www.accesslocksmithatlantaga.com/?wptouch_switch=mobile&redirect=http%3A%2F%2Fbetop24.com
www.beeicons.com/redirect.php?site=https://betop24.com
hirlevel.pte.hu/site/redirect?newsletter_id=UFV1UG5yZ3hOaWFyQVhvSUFoRmRQUT09&recipient=Y25zcm1ZaGxvR0xJMFNtNmhwdmpPNFlVSzlpS2c4ZnA1NzRPWjJKY3QrND0=&address=betop24.com
www.cccowe.org/lang.php?lang=en&url=https://betop24.com
www.mytokachi.jp/index.php?type=click&mode=sbm&code=2981&url=https://betop24.com
apiv2.nextgenshopping.com/api/click?domainName=betop24.com&partnerTag4=portal&partnerTag2=coupon&clickId=A499UMEpK&partnerWebsiteKey=QatCO22&syncBack=true
www.wqketang.com/logout?goto=https://betop24.com
access.bridges.com/externalRedirector.do?url=betop24.com/
www.cossa.ru/bitrix/redirect.php?event1=click&event2=&event3=&goto=https://betop24.com
bot.buymeapie.com/recipe?url=https://betop24.com
www.frodida.org/BannerClick.php?BannerID=29&LocationURL=https://betop24.com
extremaduraempresarial.juntaex.es/cs/c/document_library/find_file_entry?p_l_id=47702&noSuchEntryRedirect=http%3A%2F%2Fbetop24.com
rtb-asiamax.tenmax.io/bid/click/1462922913409/e95f2c30-1706-11e6-a9b4-a9f6fe33c6df/3456/5332/?rUrl=https://betop24.com
www.joeshouse.org/booking?link=http%3A%2F%2Fbetop24.com&ID=1112
hanhphucgiadinh.vn/ext-click.php?url=https://betop24.com
www.gmwebsite.com/web/redirect.asp?url=https://betop24.com
www.nymfer.dk/atc/out.cgi?s=60&l=topgallery&c=1&u=https://betop24.com
https://seocodereview.com/redirect.php?url=https://betop24.com
swra.backagent.net/ext/rdr/?http%3A%2F%2Fbetop24.com
namiotle.pl/?wptouch_switch=mobile&redirect=https://betop24.com
gfb.gameflier.com/func/actionRewriter.aspx?pro=http&url=betop24.com
golfpark.jp/banner/counter.aspx?url=https://betop24.com
www.mexicolore.co.uk/click.php?url=https://betop24.com
www.tiersertal.com/clicks/uk_banner_click.php?url=https://betop24.com
www.invisalign-doctor.in/api/redirect?url=https://betop24.com
www.isadatalab.com/redirect?clientId=ee5a64e1-3743-9b4c-d923-6e6d092ae409&appId=69&value=[EMV%20FIELD]EMAIL[EMV%20/FIELD]&cat=Techniques+culturales&url=https://betop24.com
www.immunallergo.ru/bitrix/redirect.php?goto=https://www.betop24.com/
dort.brontosaurus.cz/forum/go.php?url=https://betop24.com
eatart.dk/Home/ChangeCulture?lang=da&returnUrl=http%3A%2F%2Fbetop24.com
trackingapp4.embluejet.com/Mod_Campaigns/tracking.asp?idem=31069343&em=larauz@untref.edu.ar&ca=73143&ci=0&me=72706&of=581028&adirecta=0&url=https://betop24.com
smils.ru/bitrix/redirect.php?goto=https://betop24.com
www.wave24.net/cgi-bin/linkrank/out.cgi?id=106248&cg=1&url=betop24.com/
www.tssweb.co.jp/?wptouch_switch=mobile&redirect=http%253a%252f%252fbetop24.com
e.ourger.com/?c=scene&a=link&id=47154371&url=https://betop24.com
zh-hk.guitarians.com/home/redirect/ubid/1015?r=http%3A%2F%2Fbetop24.com
www.mastercleaningsupply.com/trigger.php?r_link=http%3A%2F%2Fbetop24.com
www.cumshoter.com/cgi-bin/at3/out.cgi?id=98&tag=top&trade=https://betop24.com
shp.hu/hpc_uj/click.php?ml=5&url=https://www.betop24.com/
lrnews.ru/xgo.php?url=betop24.com
https://indonesianmma.com/modules/mod_jw_srfr/redir.php?url=https://betop24.com
www.themza.com/redirect.php?r=betop24.com
lambda.ecommzone.com/lz/srr/00as0z/06e397d17325825ee6006c3c5ee495f922/actions/redirect.aspx?url=http://betop24.com
v.wcj.dns4.cn/?c=scene&a=link&id=8833621&url=https://betop24.com
spb-medcom.ru/redirect.php?https://betop24.com
forest.ru/links.php?go=http%3A%2F%2Fbetop24.com
reefcentral.ru/bitrix/rk.php?goto=https://betop24.com
bsau.ru/bitrix/redirect.php?event1=news_out&event2=2Fiblock9CB0%D1D0D0D0%B0BB87B0%D1D1D0D1%82B5%D1D0%B8B0%D0D1D0D1%81828C+2.pdf&goto=https://betop24.com
https://trackdaytoday.com/redirect-out?url=http%3A%2F%2Fbetop24.com
空の最安値.travel.jp/smart/pc.asp?url=https://betop24.com
https://bigjobslittlejobs.com/jobclick/?RedirectURL=http%3A%2F%2Fbetop24.com&Domain=bigjobslittlejobs.com&rgpm=title23&et=4495
ekovjesnik.hr/ads/www/delivery/ck.php?ct=1&oaparams=2bannerid=4zoneid=4cb=68dbdae1d1oadest=http%3A%2F%2Fbetop24.com
www.obertaeva.com/include/get.php?go=https://betop24.com
https://studiohire.com/admin-web-tel-process.php?memberid=4638&indentifier=weburl&websitelinkhitnumber=7&telnumberhitnumber=0&websiteurl=https://betop24.com
www.quanmama.com/t/goto.aspx?url=https://betop24.com
quartiernetz-friesenberg.ch/links-go.php?to=https://betop24.com
www.maultalk.com/url.php?to=https://betop24.com
www.infohakodate.com/ps/ps_search.cgi?act=jump&url=https://betop24.com
www.e-expo.net/category/click_url.html?url=https://betop24.com
www.chitaitext.ru/bitrix/redirect.php?event1=utw&event2=utw1&event3=&goto=https://betop24.com
www.realsubliminal.com/newsletter/t/c/11098198/c?dest=http%3A%2F%2Fbetop24.com
http://getdatasheet.com/url.php?url=https://betop24.com
www.rechnungswesen-portal.de/bitrix/redirect.php?event1=KD37107&event2=https2F/www.universal-music.de2880%25-100%25)(m/w/d)&goto=https://betop24.com
https://kirei-style.info/st-manager/click/track?id=7643&type=raw&url=http%3A%2F%2Fbetop24.com
www.aldolarcher.com/tools/esstat/esdown.asp?File=http%3A%2F%2Fbetop24.com
embed.gabrielny.com/embedlink?key=f12cc3d5-e680-47b0-8914-a6ce19556f96&width=100%25&height=1200&division=bridal&no_chat=1&domain=http%3A%2F%2Fbetop24.com
http://blackwhitepleasure.com/cgi-bin/atx/out.cgi?trade=https://betop24.com
www.knet-web.net/m/pRedirect.php?uID=2&iID=259&iURL=http%3A%2F%2Fbetop24.com
azlan.techdata.com/InTouch/GUIBnrT3/BnrTrackerPublic.aspx?CountryCode=18&BannerLangCulture=nl-nl&URL=https://betop24.com&Target=2&BannerId=41919&Zoneid=281&Parameters=&cos=Azlan
www.mintmail.biz/track/clicks/v2/?messageid=1427&cid=54657&url=https://betop24.com
www.lzmfjj.com/Go.asp?URL=https://betop24.com
http://alexmovs.com/cgi-bin/atx/out.cgi?id=148&tag=topatx&trade=https://betop24.com
marciatravessoni.com.br/revive/www/delivery/ck.php?ct=1&oaparams=2bannerid=40zoneid=16cb=fc1d72225coadest=https://betop24.com
psylive.ru/success.aspx?id=0&goto=betop24.com/
https://sohodiffusion.com/mod/mod_langue.asp?action=francais&url=https://betop24.com
www.mybunnies.net/te3/out.php?u=https://betop24.com
lubaczowskie.pl/rdir/?l=http%3A%2F%2Fbetop24.com&lid=1315
www.kowaisite.com/bin/out.cgi?id=kyouhuna&url=https://betop24.com
www.ieslaasuncion.org/enlacesbuscar/clicsenlaces.asp?Idenlace=411&url=https://betop24.com
www.168web.com.tw/in/front/bin/adsclick.phtml?Nbr=114_02&URL=https://betop24.com
asstomouth.guru/out.php?url=https://betop24.com
advtest.exibart.com/adv/adv.php?id_banner=7201&link=http%3A%2F%2Fbetop24.com
https://thairesidents.com/l.php?b=85&p=2,5&l=http%3A%2F%2Fbetop24.com
www.latestnigeriannews.com/link_channel.php?channel=http%3A%2F%2Fbetop24.com
www.haogaoyao.com/proad/default.aspx?url=betop24.com/
globalmedia51.ru/bitrix/redirect.php?goto=https://betop24.com
citysafari.nl/Home/setCulture?language=en&returnUrl=http%3A%2F%2Fbetop24.com
es.catholic.net/ligas/ligasframe.phtml?liga=https://betop24.com
https://slashwrestling.com/cgi-bin/redirect.cgi?https://betop24.com
lorena-kuhni.kz/redirect?link=betop24.com/
www.webshoptrustmark.fr/Change/en?returnUrl=http%3A%2F%2Fbetop24.com
www.widgetinfo.net/read.php?sym=FRA_LM&url=http%3A%2F%2Fbetop24.com
www.sdam-snimu.ru/redirect.php?url=https://betop24.com
school.mosreg.ru/soc/moderation/abuse.aspx?link=https://betop24.com
affiliates.kanojotoys.com/affiliate/scripts/click.php?a_aid=widdi77&desturl=http%3A%2F%2Fbetop24.com
www.gotomypctech.com/affiliates/scripts/click.php?a_aid=ed983915&a_bid=&desturl=https://betop24.com
www.my-sms.ru/ViewSwitcher/SwitchView?mobile=False&returnUrl=http%3A%2F%2Fbetop24.com&rel=external
www.genderpsychology.com/http/betop24.com/
http://chtbl.com/track/118167/betop24.com/
www.360wichita.com/amp-banner-tracking?adid=192059&url=http%3A%2F%2Fbetop24.com
https://fishki.net/click?https://betop24.com
https://zerlong.com/bitrix/redirect.php?goto=https://betop24.com
catalog.flexcom.ru/go?z=36047&i=55&u=https://betop24.com
www.wellvit.nl/response/forward/c1e41491e30c5af3c20f80a2af44e440.php?link=0&target=http%3A%2F%2Fbetop24.com
go.flx1.com/click?id=1&m=11&pl=113&dmcm=16782&euid=16603484876&out=https://betop24.com
moba-hgh.de/link2http.php?href=betop24.com/
https://gazetablic.com/ads/www/delivery/ck.php?ct=1&oaparams=2bannerid=34zoneid=26cb=0e0dfef92boadest=http%3A%2F%2Fbetop24.com
watchvideo.co/go.php?url=https://betop24.com
www.todoku.info/gpt/rank.cgi?mode=link&id=29649&url=https://betop24.com
www.fotochki.com/redirect.php?go=betop24.com/
bayerwald.tips/plugins/bannerverwaltung/bannerredirect.php?bannerid=1&url=http%3A%2F%2Fbetop24.com
www.ident.de/adserver/www/delivery/ck.php?ct=1&oaparams=2bannerid=76zoneid=2cb=8a18c95a9eoadest=http%3A%2F%2Fbetop24.com
shop-uk.fmworld.com/Queue/Index?url=https://betop24.com
nieuws.rvent.nl/bitmailer/statistics/mailstatclick/42261?link=https://betop24.com
https://jobanticipation.com/jobclick/?RedirectURL=http%3A%2F%2Fbetop24.com&Domain=jobanticipation.com
www.xsbaseball.com/tracker/index.html?t=ad&pool_id=3&ad_id=5&url=https://betop24.com
eos.ru/bitrix/redirect.php?goto=https://betop24.com
b.sm.su/click.php?bannerid=56&zoneid=10&source=&dest=https://betop24.com
https://paspn.net/default.asp?p=90&gmaction=40&linkid=52&linkurl=https://betop24.com
www.dialogportal.com/Services/Forward.aspx?link=https://betop24.com
www.poddebiczak.pl/?action=set-desktop&url=http%3A%2F%2Fbetop24.com
ant53.ru/file/link.php?url=https://betop24.com
www.docin.com/jsp_cn/mobile/tip/android_v1.jsp?forward=https://betop24.com
old.magictower.ru/cgi-bin/redir/redir.pl?https://betop24.com
c.yam.com/srh/wsh/r.c?https://betop24.com
www.jolletorget.no/J/l.php?l=http%3A%2F%2Fbetop24.com
www.bobclubsau.com/cmshome/WebsiteAuditor/6744?url=betop24.com
www.moonbbs.com/dm/dmlink.php?dmurl=https://betop24.com
www.sparetimeteaching.dk/forward.php?link=https://betop24.com
www.bmwfanatics.ru/goto.php?l=https://betop24.com
www.saabsportugal.com/forum/index.php?thememode=full;redirect=https://betop24.com
www.interecm.com/interecm/tracker?op=click&id=5204.db2&url=https://betop24.com
cms.sive.it/Jump.aspx?gotourl=http%3A%2F%2Fbetop24.com
largusladaclub.ru/go/url=https:/betop24.com
https://bethlehem-alive.com/abnrs/countguideclicks.cfm?targeturl=http%3A%2F%2Fbetop24.com&businessid=29579
www.bookmark-favoriten.com/?goto=https://betop24.com
shop.yuliyababich.eu/RU/ViewSwitcher/SwitchView?mobile=False&returnUrl=http%3A%2F%2Fbetop24.com
www.depmode.com/go.php?https://betop24.com
https://urgankardesler.com/anasayfa/yonlen?link=http%3A%2F%2Fbetop24.com
www.metalindex.ru/netcat/modules/redir/?&site=https://betop24.com
www.rprofi.ru/bitrix/redirect.php?goto=https://betop24.com
https://darudar.org/external/?link=https://betop24.com
www.postsabuy.com/autopost4/page/generate/?link=http%3A%2F%2Fbetop24.com&list=PL9d7lAncfCDSkF4UPyhzO59Uh8cOoD-8q&fb_node=942812362464093&picture&name=%E0%B9%82%E0%B8%9B%E0%B8%A3%E0%B9%81%E0%B8%81%E0%B8%A3%E0%B8%A1%E0%B9%82%E0%B8%9E%E0%B8%AA%E0%B8%82%E0%B8%B2%E0%B8%A2%E0%B8%AA%E0%B8%B4%E0%B8%99%E0%B8%84%E0%B9%89%E0%B8%B2%E0%B8%AD%E0%B8%AD%E0%B8%99%E0%B9%84%E0%B8%A5%E0%B8%99%E0%B9%8C+&caption=%E0%B9%80%E0%B8%A5%E0%B8%82%E0%B8%B2%E0%B8%AA%E0%B9%88%E0%B8%A7%E0%B8%99%E0%B8%95%E0%B8%B1%E0%B8%A7+%E0%B8%97%E0%B8%B5%E0%B8%84%E0%B8%B8%E0%B8%93%E0%B8%A5%E0%B8%B7%E0%B8%A1%E0%B9%84%E0%B8%A1%E0%B9%88%E0%B8%A5%E0%B8%87+Line+%40postsabuy&description=%E0%B8%A3%E0%B8%B2%E0%B8%84%E0%B8%B2%E0%B8%96%E0%B8%B9%E0%B8%81%E0%B8%97%E0%B8%B5%E0%B9%88%E0%B8%AA%E0%B8%B8%E0%B8%94%E0%B9%83%E0%B8%99+3+%E0%B9%82%E0%B8%A5%E0%B8%81+%E0%B8%AD%E0%B8%B4%E0%B8%AD%E0%B8%B4
www.perimeter.org/track.pdf?url=http%3A%2F%2Fbetop24.com
forum.darievna.ru/go.php?https://betop24.com
techlab.rarus.ru/bitrix/rk.php?goto=https://betop24.com
www.spiritualforums.com/vb/redir.php?link=https://betop24.com
www.review-mag.com/cdn/www/delivery/view.php?ct=1&oaparams=2bannerid=268zoneid=1cb=8c1317f219oadest=http%3A%2F%2Fbetop24.com
belantara.or.id/lang/s/ID?url=https://betop24.com
ele-market.ru/consumer.php?url=https://betop24.com
https://www.хорошие-сайты.рф/r.php?r=https://betop24.com
https://jobsflagger.com/jobclick/?RedirectURL=http%3A%2F%2Fbetop24.com
https://gpoltava.com/away/?go=betop24.com
www.cardexchange.com/index.php/tools/packages/tony_mailing_list/services/?mode=link&mlm=62&mlu=0&u=2&url=http%3A%2F%2Fbetop24.com
services.nfpa.org/Authentication/GetSSOSession.aspx?return=https://betop24.com
http://spaceup.org/?wptouch_switch=mobile&redirect=https://betop24.com
yarko-zhivi.ru/redirect?url=https://betop24.com
https://kekeeimpex.com/Home/ChangeCurrency?urls=http%3A%2F%2Fbetop24.com&cCode=GBP&cRate=77.86247
mycounter.com.ua/go.php?https://betop24.com
l2base.su/go?https://betop24.com
www.duomodicagliari.it/reg_link.php?link_ext=http%3A%2F%2Fbetop24.com&prov=1
assine.hostnet.com.br/cadastro/?rep=17&url=https://betop24.com
www.dvnlp.de/profile/gruppe/redirect/5?url=betop24.com
www.smkn5pontianak.sch.id/redirect/?alamat=https://betop24.com
www.cheapdealuk.co.uk/go.php?url=https://betop24.com
bilometro.brksedu.com.br/tracking?url=betop24.com&zorigem=hotsite-blackfriday
tramplintk.ru/bitrix/redirect.php?goto=https://betop24.com
cnc.extranet.gencat.cat/treball_cnc/AppJava/FileDownload.do?pdf=http%3A%2F%2Fbetop24.com&codi_cnv=9998045
www.gamecollections.co.uk/search/redirect.php?retailer=127&deeplink=https://betop24.com
bearcong.no1.sexy/hobby-delicious/rank.cgi?mode=link&id=19&url=https://betop24.com
www.omschweiz.ch/select-your-country?publicUrl=http%3A%2F%2Fbetop24.com
https://anacolle.net/?wptouch_switch=desktop&redirect=http%3A%2F%2Fbetop24.com
www.cubamusic.com/Home/ChangeLanguage?lang=es-ES&returnUrl=http%3A%2F%2Fbetop24.com
expoclub.ru/bitrix/redirect.php?goto=https://betop24.com
365sekretov.ru/redirect.php?action=url&goto=betop24.com%20
www.sgdrivingtest.com/redirect.php?page=betop24.com/
www.jxren.com/news/link/link.asp?id=7&url=https://betop24.com
particularcareers.co.uk/jobclick/?RedirectURL=http%3A%2F%2Fbetop24.com
https://bsaonline.com/MunicipalDirectory/SelectUnit?unitId=411&returnUrl=http%3A%2F%2Fbetop24.com&sitetransition=true
www.elit-apartament.ru/go?https://betop24.com
sendai.japansf.net/rank.cgi?mode=link&id=1216&url=http%3A%2F%2Fbetop24.com
www.dresscircle-net.com/psr/rank.cgi?mode=link&id=14&url=https://betop24.com
www.counterwelt.com/charts/click.php?user=14137&link=https://betop24.com
fms.csonlineschool.com.au/changecurrency/1?returnurl=https://betop24.com
www.v-archive.ru/bitrix/rk.php?goto=https://betop24.com
www.jagat.co.jp/analysis/analysis.php?url=http%3A%2F%2Fbetop24.com
https://vse-doski.com/redirect/?go=https://betop24.com
www.karatetournaments.net/link7.asp?LRURL=https://betop24.com&LRTYP=O
simracing.su/go/?https://betop24.com
click.cheshi.com/go.php?proid=218&clickid=1393306648&url=https://betop24.com
fdeam.finanzen-partnerprogramm.de/tracking/?as_id=9257&c_id=595&url=https://betop24.com
flypoet.toptenticketing.com/index.php?url=https://betop24.com
www.horsesmouth.com/LinkTrack.aspx?u=https://betop24.com
d-click.fiemg.com.br/u/18081/131/75411/137_0/82cb7/?url=https://betop24.com
www.winxuan.com/page/cps/eqifacookieinterface.jsp?from=yiqifa&wid=8&url=https://betop24.com
www.packmage.net/uc/goto/?url=https://betop24.com
my.9991.com/login_for_index_0327.php?action=logout&forward=https://betop24.com
www.sdchamber.biz/admin/mod_newsletter/redirect.aspx?message_id=986&redirect=https://betop24.com
www.naturum.co.jp/ad/linkshare/?siteID=p_L785d6UQY-V4Fh4Rxs7wNzOPgtzv95Tg&lsurl=http%3A%2F%2Fbetop24.com
www.d-e-a.eu/newsletter/redirect.php?link=https://betop24.com
www.bom.ai/goweburl?go=http%3A%2F%2Fbetop24.com
enews2.sfera.net/newsletter/redirect.php?id=sabricattani@gmail.com_0000006566_144&link=https://betop24.com
underwater.com.au/redirect_url/id/7509/?redirect=https://betop24.com
https://eqsoftwares.com/languages/setlanguage?languagesign=en&redirect=https://betop24.com
www.jagdambasarees.com/Home/ChangeCurrency?urls=http%3A%2F%2Fbetop24.com&cCode=MYR&cRate=14.554
www.priegeltje.nl/gastenboek/go.php?url=https://betop24.com
www.serie-a.ru/bitrix/redirect.php?goto=https://betop24.com
www.rz114.cn/url.html?url=https://betop24.com
www.greatdealsindia.com/redirects/infibeam.aspx?url=https://betop24.com
rs.345kei.net/rank.php?id=37&mode=link&url=https://betop24.com
webapp.jgz.la/?c=scene&a=link&id=8665466&url=https://betop24.com
www.erotiikkalelut.com/url.php?link=https://betop24.com
vicsport.com.au/analytics/outbound?url=https://betop24.com
https://fachowiec.com/zliczanie-bannera?id=24&url=https://betop24.com
ieea.ir/includes/change_lang.php?lang=en&goto=https://betop24.com
scribe.mmonline.io/click?evt_nm=Clicked+Registration+Completion&evt_typ=clickEmail&app_id=m4marry&eml_sub=Registration+Successful&usr_did=4348702&cpg_sc=NA&cpg_md=email&cpg_nm=&cpg_cnt=&cpg_tm=NA&link_txt=Live+Chat&em_type=Notification&url=https://betop24.com
polo-v1.feathr.co/v1/analytics/crumb?flvr=email_link_click&rdr=https://betop24.com
sintesi.provincia.mantova.it/portale/LinkClick.aspx?link=https://betop24.com
www.surinenglish.com/backend/conectar.php?url=https://betop24.com
www.reference-cannabis.com/interface/sortie.php?adresse=https://betop24.com
login.0×69416d.co.uk/sso/logout?tenantId=tnl&gotoUrl=http%3A%2F%2Fbetop24.com&domain=0×69416d.co.uk
blog.link-usa.jp/emi?wptouch_switch=mobile&redirect=https://betop24.com
http://damki.net/go/?https://betop24.com
opensesame.wellymulia.zaxaa.com/b/66851136?s=1&redir=https://betop24.com
ism3.infinityprosports.com/ismdata/2009100601/std-sitebuilder/sites/200901/www/en/tracker/index.html?t=ad&pool_id=1&ad_id=112&url=https://betop24.com
apps.cancaonova.com/ads/www/delivery/ck.php?ct=1&oaparams=2bannerid=149zoneid=20cb=87d2c6208doadest=http%3A%2F%2Fbetop24.com
www.lespritjardin.be/?advp_click_bimage_id=19&url=http%253a%252f%252fbetop24.com&shortcode_id=10
https://careerchivy.com/jobclick/?RedirectURL=http%3A%2F%2Fbetop24.com
shinsekai.type.org/?wptouch_switch=desktop&redirect=https://betop24.com
https://maned.com/scripts/lm/lm.php?tk=CQkJZWNuZXdzQGluZm90b2RheS5jb20JW05ld3NdIE1FSSBBbm5vdW5jZXMgUGFydG5lcnNoaXAgV2l0aCBUd2l4bCBNZWRpYQkxNjcyCVBSIE1lZGlhIENvbnRhY3RzCTI1OQljbGljawl5ZXMJbm8=&url=https://betop24.com
www.etaigou.com/turn2.php?ad_id=276&link=https://betop24.com
moscowdesignmuseum.ru/bitrix/rk.php?goto=https://betop24.com
www.cheek.co.jp/location/location.php?id=keibaseminar&url=https://betop24.com
www.quantixtickets3.com/php-bin-8/kill_session_and_redirect.php?redirect=https://betop24.com
www.photokonkurs.com/cgi-bin/out.cgi?url=https://betop24.com
crewroom.alpa.org/SAFETY/LinkClick.aspx?link=https://betop24.com&mid=12872
www.pcreducator.com/Common/SSO.aspx?returnUrl=https://betop24.com
go.eniro.dk/lg/ni/cat-2611/http:/betop24.com
www.fisherly.com/redirect?type=website&ref=listing_detail&url=https://betop24.com
fid.com.ua/redirect/?go=https://betop24.com
www.modernipanelak.cz/?b=618282165&redirect=https://betop24.com
h5.hbifeng.com/index.php?c=scene&a=link&id=14240604&url=https://betop24.com
www.bkdc.ru/bitrix/redirect.php?event1=news_out&event2=32reg.roszdravnadzor.ru/&event3=A0A0B5A09180D0%A09582A0BBA1A085%D0E2A084D0D1C2D0%A085+A0A0B5A182B0A0%C2D0D0D096+A1A0BBA0B180D0%A09795+A0A0B0A09582A1%D1D0D0D0A182B5+A0A091A08695A0%D1D0A6A185A0A085%D0D1D0D082A1A085%D0D0D1D0A095B1A0%C2D0D0D091&goto=https://betop24.com
record.affiliatelounge.com/WS-jvV39_rv4IdwksK4s0mNd7ZgqdRLk/7/?deeplink=https://betop24.com
d-click.artenaescola.org.br/u/3806/290/32826/1416_0/53052/?url=https://betop24.com
www.morroccoaffiliate.com/aff.php?id=883&url=https://betop24.com
www.omegon.eu/de/?r=http%3A%2F%2Fbetop24.com
www.flooble.com/cgi-bin/clicker.pl?id=grabbadl&url=https://betop24.com
gameshock.jeez.jp/rank.cgi?mode=link&id=307&url=https://betop24.com
https://tripyar.com/go.php?https://betop24.com
www.floridafilmofficeinc.com/?goto=https://betop24.com
tsvc1.teachiworld.com/bin/checker?mode=4&module=11&mailidx=19130&dmidx=0&emidx=0&service=0&cidx=&etime=20120328060000&seqidx=3&objidx=22&encoding=0&url=https://betop24.com
rechner.atikon.at/lbg.at/newsletter/linktracking?subscriber=&delivery=38116&url=http%3A%2F%2Fbetop24.com
www.sportsbook.ag/ctr/acctmgt/pl/openLink.ctr?ctrPage=https://betop24.com
www.ra2d.com/directory/redirect.asp?id=596&url=https://betop24.com
www.anorexicnudes.net/cgi-bin/atc/out.cgi?u=https://betop24.com
www.zjjiajiao.com.cn/ad/adredir.asp?url=https://betop24.com
https://hakobo.com/wp/?wptouch_switch=desktop&redirect=http%3A%2F%2Fbetop24.com
t.agrantsem.com/tt.aspx?cus=216&eid=1&p=216-2-71016b553a1fa2c9.3b14d1d7ea8d5f86&d=https://betop24.com
www.tagirov.org/out.php?url=betop24.com/
startlist.club/MSF/Language/Set?languageIsoCode=en&returnUrl=http%3A%2F%2Fbetop24.com
www.tetsumania.net/search/rank.cgi?mode=link&id=947&url=https://betop24.com
https://imperial-info.net/link?idp=125&url=https://betop24.com
www.brainlanguage-sa.com/setcookie.php?lang=en&file=https://betop24.com
www.asensetranslations.com/modules/babel/redirect.php?newlang=en_US&newurl=https://betop24.com
https://www.nbda.org/?URL=betop24.com/
https://evoautoshop.com/?wptouch_switch=mobile&redirect=http%3A%2F%2Fwww.betop24.com
http://beautycottageshop.com/change.php?lang=cn&url=https://betop24.com
http://1000love.net/lovelove/link.php?url=https://betop24.com
https://www.contactlenshouse.com/currency.asp?c=CAD&r=http%3A%2F%2Fwww.betop24.com
https://www.bartaz.lt/wp-content/plugins/clikstats/ck.php?Ck_id=70&Ck_lnk=https://www.betop24.com
https://sogo.i2i.jp/link_go.php?url=https://betop24.com
https://malehealth.ie/redirect/?age=40&part=waist&illness=obesity&refer=https://betop24.com
https://magicode.me/affiliate/go?url=https://betop24.com
forum.marillion.com/forum/index.php?thememode=full;redirect=https://www.betop24.com
https://jobregistry.net/jobclick/?RedirectURL=http%3A%2F%2Fwww.betop24.com&Domain=jobregistry.net&rgp_m=title13&et=4495
https://www.goatzz.com/adredirect.aspx?adType=SiteAd&ItemID=9595&ReturnURL=https://betop24.com
https://www.thislife.net/cgi-bin/webcams/out.cgi?id=playgirl&url=https://betop24.com
https://www.dans-web.nu/klick.php?url=https://betop24.com
https://voobrajulya.ru/bitrix/redirect.php?goto=https://www.betop24.com
www.resnichka.ru/partner/go.php?https://www.betop24.com
www.nafta-him.com/bitrix/redirect.php?goto=https://betop24.com
www.kyoto-osaka.com/search/rank.cgi?mode=link&id=9143&url=https://betop24.com
www.findingfarm.com/redir?url=https://betop24.com
www.fairpoint.net/~jensen1242/gbook/go.php?url=https://betop24.com
www.cnainterpreta.it/redirect.asp?url=https://www.betop24.com
red.ribbon.to/~zkcsearch/zkc-search/rank.cgi?mode=link&id=156&url=https://betop24.com
https://edcommunity.ru/bitrix/rk.php?goto=https://betop24.com
https://www.gudarjavalambre.com/sections/miscelany/link.php?url=https://www.betop24.com
akademik.tkyd.org/Home/SetCulture?culture=en-US&returnUrl=https://www.betop24.com
www.interracialhall.com/cgi-bin/atx/out.cgi?trade=https://www.betop24.com
https://www.tumimusic.com/link.php?url=https://betop24.com
www.glorioustronics.com/redirect.php?link=https://betop24.com
mail.resen.gov.mk/redir.hsp?url=https://betop24.com
https://www.pompengids.net/followlink.php?id=495&link=https://www.betop24.com
https://www.hirforras.net/scripts/redir.php?url=https://betop24.com
http://3dcreature.com/cgi-bin/at3/out.cgi?id=187&trade=https://betop24.com
https://nowlifestyle.com/redir.php?k=9a4e080456dabe5eebc8863cde7b1b48&url=https://www.betop24.com
http://slipknot1.info/go.php?url=https://www.betop24.com
www.acutenet.co.jp/cgi-bin/lcount/lcounter.cgi?link=https://www.betop24.com
http://news-matome.com/method.php?method=1&url=https://betop24.com
https://lifecollection.top/site/gourl?url=https://www.betop24.com
https://www.toscanapiu.com/web/lang.php?lang=DEU&oldlang=ENG&url=http%3A%2F%2Fwww.betop24.com
speakrus.ru/links.php?go=https://betop24.com
https://lens-club.ru/link?go=https://betop24.com
https://t.raptorsmartadvisor.com/.lty?url=https://betop24.com&loyalty_id=14481&member_id=b01bbee6-4592-4345-a0ee-5d71ed6f1929
iphoneapp.impact.co.th/i/r.php?u=https://www.betop24.com
www.rencai8.com/web/jump_to_ad_url.php?id=642&url=https://betop24.com
http://crackstv.com/redirect.php?bnn=CabeceraHyundai&url=https://www.betop24.com
https://www.baby22.com.tw/Web/turn.php?adid=160&link=http%3A%2F%2Fwww.betop24.com
https://www.kichink.com/home/issafari?uri=https://betop24.com
https://blogranking.fc2.com/out.php?id=1032500&url=https://betop24.com
5cfxm.hxrs6.servertrust.com/v/affiliate/setCookie.asp?catId=1180&return=https://betop24.com
https://www.morhipo.com/shared/partnercookie?k=gort&url=https://betop24.com
https://www.luckyplants.com/cgi-bin/toplist/out.cgi?id=rmontero&url=https://betop24.com
https://webankety.cz/dalsi.aspx?site=https://betop24.com
https://www.rexart.com/cgi-rexart/al/affiliates.cgi?aid=872&redirect=https://betop24.com
https://ulfishing.ru/forum/go.php?https://betop24.com
https://www.ab-search.com/rank.cgi?mode=link&id=107&url=https://betop24.com
https://www.studyrama.be/tracking.php?origine=ficheform5683&lien=http://www.betop24.com/
https://experts.richdadworld.com/assets/shared/php/noabp.php?oaparams=2bannerid=664zoneid=5cb=0902f987cboadest=http%3A%2F%2Fbetop24.com
https://miyagi.lawyer-search.tv/details/linkchk.aspx?type=o&url=https://betop24.com
https://www.snwebcastcenter.com/event/page/count_download_time.php?url=https://betop24.com
https://go.onelink.me/v1xd?pid=Patch&c=Mobile%20Footer&af_web_dp=https%3A%2F%2Fbetop24.com
https://runkeeper.com/apps/authorize?redirect_uri=https://betop24.com
https://www.emiratesvoice.com/footer/comment_like_dislike_ajax/?code=like&commentid=127&redirect=https://betop24.com
https://envios.uces.edu.ar/control/click.mod.php?id_envio=8147&email=gramariani@gmail.com&url=http://www.betop24.com/
https://www.weather.net/cgi-bin/redir?https://betop24.com
https://gaggedtop.com/cgi-bin/top/out.cgi?ses=sBZFnVYGjF&id=206&url=https://betop24.com
https://e-bike-test.net/wp-content/plugins/AND-AntiBounce/redirector.php?url=https://betop24.com
https://www.cheerunion.org/tracker/index.html?t=ad&pool_id=2&ad_id=5&url=https://betop24.com
https://area51.to/go/out.php?s=100&l=site&u=https://betop24.com
https://games4ever.3dn.ru/go?https://betop24.com
https://de.reasonable.shop/SetCurrency.aspx?currency=CNY&returnurl=https://betop24.com
https://www.pcbheaven.com/forum/index.php?thememode=full;redirect=https://betop24.com
https://www.podcastone.com/site/rd?satype=40&said=4&aaid=email&camid=-4999600036534929178&url=https://betop24.com
https://www.rechnungswesen-portal.de/bitrix/redirect.php?event1=KD37107&event2=https2F/www.universal-music.de2880%25-100%25)(m/w/d)&goto=https://betop24.com
https://monarchbeachmembers.play18.com/ViewSwitcher/SwitchView?mobile=False&returnUrl=https://betop24.com
https://wayi.com.tw/wayi_center.aspx?flag=banner&url=https://betop24.com&idno=443
https://d.agkn.com/pixel/2389/?che=2979434297&col=22204979,1565515,238211572,435508400,111277757&l1=https://betop24.com
https://www.pcreducator.com/Common/SSO.aspx?returnUrl=https://betop24.com
https://horsesmouth.com/LinkTrack.aspx?u=https://betop24.com
https://soom.cz/projects/get2mail/redir.php?id=c2e52da9ad&url=https://betop24.com
https://www.iaai.com/VehicleInspection/InspectionProvidersUrl?name=AA%20Transit%20Pros%20Inspection%20Service&url=https://betop24.com
https://shop.merchtable.com/users/authorize?return_url=https://betop24.com
https://nudewwedivas.forumcommunity.net/m/ext.php?url=https://betop24.com
https://cztt.ru/redir.php?url=https://betop24.com
https://ageoutloud.gms.sg/visit.php?item=54&uri=https://betop24.com
https://multimedia.inrap.fr/redirect.php?li=287&R=https://betop24.com
https://mobo.osport.ee/Home/SetLang?lang=cs&returnUrl=https://betop24.com
https://www.shop-bell.com/out.php?id=kibocase&category=ladies&url=https://betop24.com
https://m.addthis.com/live/redirect/?url=https://betop24.com
https://mobilize.org.br/handlers/anuncioshandler.aspx?anuncio=55&canal=2&redirect=https://betop24.com
https://bemidji.bigdealsmedia.net/include/sort.php?return_url=https://betop24.com&sort=a:3:{s:9:%E2%80%9Ddirection%E2%80%9D;s:3:%E2%80%9DASC%E2%80%9D;s:5:%E2%80%9Dfield%E2%80%9D;s:15:%E2%80%9DItems.PriceList%E2%80%9D;s:5:%E2%80%9Dlabel%E2%80%9D;s:9:%E2%80%9Dvalue_asc%E2%80%9D;}
https://hslda.org/content/a/LinkTracker.aspx?id=4015475&appeal=385&package=36&uri=https://betop24.com
https://www.sign-in-china.com/newsletter/statistics.php?type=mail2url&bs=88&i=114854&url=https://betop24.com
https://panarmenian.net/eng/tofv?tourl=https://betop24.com
http://mientaynet.com/advclick.php?o=textlink&u=15&l=https://betop24.com
https://atlanticleague.com/tracker/index.html?t=ad&pool_id=11&ad_id=5&url=https://betop24.com
https://www.castellodivezio.it/lingua.php?lingua=EN&url=https://betop24.com
https://www.kvinfo.dk/visit.php?linkType=2&linkValue=https://betop24.com
https://lavoro.provincia.como.it/portale/LinkClick.aspx?link=https://betop24.com&mid=935
https://www.dodeley.com/?action=show_ad&url=https://betop24.com
https://www.ignicaodigital.com.br/affiliate/?idev_id=270&u=https://betop24.com
http://chtbl.com/track/118167/https://betop24.com
https://www.tremblant.ca/Shared/LanguageSwitcher/ChangeCulture?culture=en&url=https://betop24.com
https://www.winxuan.com/page/cps/eqifacookieinterface.jsp?from=yiqifa&wid=8&url=https://betop24.com
https://moscowdesignmuseum.ru/bitrix/rk.php?goto=https://betop24.com
https://igert2011.videohall.com/to_client?target=https://betop24.com
https://sete.gr/app_plugins/newsletterstudio/pages/tracking/trackclick.aspx?nid=218221206039243162226109144018149003034132019130&e=000220142174231130224127060133189018075115154134&url=https://betop24.com
https://ovatu.com/e/c?url=https://betop24.com
https://primepartners.globalprime.com/afs/wcome.php?c=427|0|1&e=GP204519&url=https://betop24.com
https://ltp.org/home/setlocale?locale=en&returnUrl=https://betop24.com
https://www.morhipo.com/shared/partnercookie?k=gort&url=https://betop24.com
https://rs.businesscommunity.it/snap.php?u=https://betop24.com
https://www.aiac.world/pdf/October-December2015Issue?pdf_url=https://betop24.com
https://union.591.com.tw/stats/event/redirect?e=eyJpdiI6IjdUd1B5Z2FPTmNWQzBmZk1LblR2R0E9PSIsInZhbHVlIjoiQTI4TnVKMzdjMkxrUjcrSWlkcXdzbjRQeGRtZ0ZGbXdNSWxkSkVieENwNjQ1cHF5aDZmWmFobU92ZGVyUk5jRTlxVnI2TG5pb0dJVHZSUUlHcXFTbGo3UDliYWU5UE5MSjlMY0xOQnFmbVRQSFNoZDRGd2dqVDZXZEU4WFoyajJ0S0JITlQ2XC9SXC9jRklPekdmcnFGb09vRllqNHVtTHlYT284ZmN3d0ozOHFkclRYYnU5UlY2NTFXSGRheW5SbGxJb3BmYjQ2Mm9TWUFCTEJuXC9iT25nYkg4QXpOd2pHVlBWTWxWXC91aWRQMVhKQmVJXC9qMW9IdlZaVVlBdWlCYW4rS0JualhSMElFeVZYN3NnUW1qcUdxcWUrSlFROFhKbWttdkdvMUJ3aWVRa2I3MVV5TXpER3doa2ZuekFWNWd3OGpuQ1VSczFDREVKaklaUks0TTRIY2pUeXYrQmdZYUFTK1F4RWpTY0RRaW5Nc0krdVJ2N2VUT1wvSUxVVWVKN3hnQU92QmlCbjQyMUpRdTZKVWJcL0RCSVFOcWl0azl4V2pBazBHWmVhdWptZGREVXh0VkRNWWxkQmFSYXhBRmZtMHA5dTlxMzIzQzBVaWRKMEFqSG0wbGkxME01RDBaaElTaU5QKzIxbSswaUltS0FYSzViZlFmZjZ1XC9Yclg0U2VKdHFCc0pTNndcL09FWklUdjlQM2dcL2RuN0szQ3plWmcyYWdpQzJDQ2NIcWROczVua3dIM1Q3OXpJY3Z0XC93MVk3SHUyODZHU3Z5aHFVbWEwRFU1ZFdyMGt0YWpsb3BkQitsZER5aWk4YWMrZWYzSFNHNERhOGdDeUJWeEtoSm9wQ0hQb2EzOHZ3eHFGVTQ2Mk1QSEZERzlXZWxRRTJldjJkdnZUM0ZwaW1KcEVVc3ZXWjRHaTZWRDJOK0YxR3d4bXhMR3BhWmZBNkJ6eUYxQjR4ODVxc0d0YkFpYU8yZ2tuWGdzelBpU3dFUjJVYUVtYUlpZllSUTVpaHZMbjhySFp4VEpQR3EyYnRLTmdcLzRvKzQwRmtGNUdWWnQ0VjFpcTNPc0JubEdWenFiajRLRFg5a2dRZFJOZ1wvaUEwVHR3ZnYzakpYVmVtT294aFk1TXBUZ3FmVnF2dnNSVWJ5VEE0WGZpV3o3Y0k2SjJhM2RDK2hoQ0FvV2YrSW9QWnhuZG5QN1hlOEFaTVZrcFZ3c0pXVHhtNkRTUkpmenpibG8zdTM0cGF6Q3oxTEJsdDdiOUgwWXFOUkNHWjlEbTBFYzdIRUcyalYrcW4wYklFbnlGYlZJUG00R1VDQTZLZEVJRklIbFVNZFdpS3RkeCt5bVpTNUkrOXE3dDlxWmZ2bitjSGlSeE9wZTg5Yk9wS0V6N1wvd1EzUTNVenNtbjlvQUJhdGsxMzNkZTdjTU1LNkd4THJMYTBGUEJ4elEycFNTNGZabEJnalhJc0pYZit1c1wvWDBzSm1JMzRad3F3PT0iLCJtYWMiOiI4MjNhNDJlYTMwOTlmY2VlYzgxNmU1N2JiM2QzODk5YjI5MDFhYThhMDBkYzNhODljOTRmMTMzMzk0YTM5OGIzIn0=&source=BANNER.2913&url=https://betop24.com
https://fdeam.finanzen-partnerprogramm.de/tracking/?as_id=9257&c_id=595&url=https://betop24.com
https://pdcn.co/e/https://betop24.com
https://www.swipeclock.com/sc/cookie.asp?sitealias=79419397&redirect=https://betop24.com
https://home.uceusa.com/Redirect.aspx?r=https://betop24.com
https://www.seankenney.com/include/jump.php?num=https://betop24.com
https://runningcheese.com/go?url=https://betop24.com
https://cingjing.fun-taiwan.com/AdRedirector.aspx?padid=303&target=https://betop24.com
https://rtb-asiamax.tenmax.io/bid/click/1462922913409/e95f2c30-1706-11e6-a9b4-a9f6fe33c6df/3456/5332/?rUrl=https://betop24.com
https://campaign.unitwise.com/click?emid=31452&emsid=ee720b9f-a315-47ce-9552-fd5ee4c1c5fa&url=https://betop24.com
https://api.webconnex.com/v1/postmaster/track/click/4f8036d14ee545798599c8921fbfcd22/db005310dba511e89fb606f49a4ee876?url=https://betop24.com
https://www.lecake.com/stat/goto.php?url=https://betop24.com
https://www.im-harz.com/counter/counter.php?url=https://betop24.com
https://pzz.to/click?uid=8571&target_url=https://betop24.com
https://m.17ll.com/apply/tourl/?url=https://betop24.com
https://crewroom.alpa.org/SAFETY/LinkClick.aspx?link=https://betop24.com&mid=12872
https://jump2.bdimg.com/mo/q/checkurl?url=https://betop24.com
https://cse.google.com/url?sa=t&url=https://betop24.com
https://blogranking.fc2.com/out.php?id=414788&url=https://betop24.com
https://wtk.db.com/777554543598768/optout?redirect=https://betop24.com
https://community.rsa.com/t5/custom/page/page-id/ExternalRedirect?url=https%3A%2F%2Fbetop24.com/
https://click.alamode.com/?adcode=CPEMAQM0913_1&url=https://betop24.com
https://images.google.sk/url?q=https://betop24.com
https://images.google.gr/url?q=https://betop24.com
https://click.alamode.com/?adcode=CPEMAQM0913_1&url=https://betop24.com%20
https://images.google.lv/url?sa=t&url=https%3A%2F%2Fbetop24.com/
https://m.caijing.com.cn/member/logout?referer=https://betop24.com
https://jamesattorney.agilecrm.com/click?u=https://betop24.com
https://wikimapia.org/external_link?url=https://betop24.com
https://www.google.co.jp/url?q=https://betop24.com
https://images.google.de/url?q=https://betop24.com
https://images.google.bg/url?sa=t&url=https%3A%2F%2Fbetop24.com/
https://maps.google.ca/url?q=https://betop24.com
https://za.zalo.me/v3/verifyv2/pc?token=OcNsmjfpL0XY2F3BtHzNRs4A-hhQ5q5sPXtbk3O&continue=https://betop24.com%20
https://cse.google.cz/url?q=https://betop24.com
https://scanmail.trustwave.com/?c=8510&d=4qa02KqxZJadHuhFUvy7ZCUfI_2L10yeH0EeBz7FGQ&u=https://betop24.com
https://images.google.co.kr/url?sa=t&url=https%3A%2F%2Fbetop24.com/
https://rsv.nta.co.jp/affiliate/set/af100101.aspx?site_id=66108024&redi_url=https://betop24.com
https://adengine.old.rt.ru/go.jsp?to=https://betop24.com
https://thediplomat.com/ads/books/ad.php?i=4&r=https://betop24.com
https://mitsui-shopping-park.com/lalaport/iwata/redirect.html?url=https://betop24.com
https://toolbarqueries.google.lt/url?q=http%3A%2F%2Fbetop24.com/
https://hr.pecom.ru/bitrix/rk.php?goto=https://betop24.com
https://cse.google.ru/url?q=https://betop24.com
https://severeweather.wmo.int/cgi-bin/goto?where=https://betop24.com
https://beam.jpn.org/rank.cgi?mode=link&url=https://betop24.com
https://ditu.google.com/url?q=http%3A%2F%2Fwww.betop24.com/
https://ditu.google.com/url?q=http%3A%2F%2Fbetop24.com/
http://www.aurki.com/jarioa/redirect?id_feed=510&url=https://betop24.com
http://www.cnainterpreta.it/redirect.asp?url=https://betop24.com
http://www.qlt-online.de/cgi-bin/click/clicknlog.pl?link=https://betop24.com
http://ww.sdam-snimu.ru/redirect.php?url=https://betop24.com
http://www.uktrademarkregistration.co.uk/JumpTo.aspx?url=https://betop24.com
http://www.macro.ua/out.php?link=https://betop24.com
http://congovibes.com/index.php?thememode=full;redirect=https://betop24.com
http://www.humaniplex.com/jscs.html?hj=y&ru=https://betop24.com
http://www.site-navi.net/sponavi/rank.cgi?mode=link&id=890&url=https://betop24.com
https://www.mattias.nu/cgi-bin/redirect.cgi?https://betop24.com
http://teenstgp.us/cgi-bin/out.cgi?u=https://betop24.com
http://getmethecd.com/?URL=betop24.com
http://goldankauf-oberberg.de/out.php?link=https://betop24.com
http://distributors.hrsprings.com/?URL=betop24.com
http://dorf-v8.de/url?q=https://betop24.com
http://excitingperformances.com/?URL=betop24.com
http://familie-huettler.de/link.php?link=betop24.com
http://forum.vizslancs.hu/lnks.php?uid=net&url=https://betop24.com
http://forum.wonaruto.com/redirection.php?redirection=https://betop24.com
http://fosteringsuccessmichigan.com/?URL=betop24.com
http://fotos24.org/url?q=https://betop24.com
http://fouillez-tout.com/cgi-bin/redirurl.cgi?betop24.com
http://frag-den-doc.de/index.php?s=verlassen&url=https://betop24.com
http://freethailand.com/goto.php?url=https://betop24.com
http://doverwx.com/template/pages/station/redirect.php?url=https://betop24.com
http://dr-guitar.de/quit.php?url=https://betop24.com
http://drdrum.biz/quit.php?url=https://betop24.com
http://ds-media.info/url?q=https://betop24.com
http://freshcannedfrozen.ca/?URL=betop24.com
http://funkhouse.de/url?q=https://betop24.com
http://ga.naaar.nl/link/?url=https://betop24.com
http://gb.poetzelsberger.org/show.php?c453c4=betop24.com
https://www.fairsandfestivals.net/?URL=https://betop24.com
http://conny-grote.de/url?q=https://betop24.com
http://crazyfrag91.free.fr/?URL=https://betop24.com
http://crewe.de/url?q=https://betop24.com
http://dayviews.com/externalLinkRedirect.php?url=https://betop24.com
http://db.cbservices.org/cbs.nsf/forward?openform&https://betop24.com
http://chatx2.whocares.jp/redir.jsp?u=https://betop24.com
http://chuanroi.com/Ajax/dl.aspx?u=https://betop24.com
http://data.allie.dbcls.jp/fct/rdfdesc/usage.vsp?g=https://betop24.com
http://data.linkedevents.org/describe/?url=https://betop24.com
http://club.dcrjs.com/link.php?url=https://betop24.com
http://cwa4100.org/uebimiau/redir.php?https://betop24.com
http://d-quintet.com/i/index.cgi?id=1&mode=redirect&no=494&ref_eid=33&url=https://betop24.com
https://meguro.keizai.biz/banner.php?type=image_banner&position=right&id=13&uri=https://betop24.com
http://ads.cars.cz/adclick.php?bannerid=333&zoneid=237&source=&dest=https://betop24.com
https://spb-medcom.ru/redirect.php?https://betop24.com
http://simvol-veri.ru/xp/?goto=https://betop24.com
http://www.skladcom.ru/(S(qdiwhk55jkcyok45u4ti0a55))/banners.aspx?url=https://betop24.com
https://stroim100.ru/redirect?url=https://betop24.com
https://www.moneydj.com/ads/adredir.aspx?bannerid=39863&url=https://betop24.com
https://uk.kindofbook.com/redirect.php/?red=https://betop24.com
http://m.17ll.com/apply/tourl/?url=https://betop24.com
https://www.usjournal.com/go.php?campusID=190&url=https://betop24.com
https://temptationsaga.com/buy.php?url=https://betop24.com
https://www.info-realty.ru/bitrix/rk.php?goto=https://betop24.com
http://www.sermemole.com/public/serbook/redirect.php?url=https://betop24.com
https://www.hradycz.cz/redir.php?b=445&t=https://betop24.com
https://kakaku-navi.net/items/detail.php?url=https://betop24.com
http://www.paladiny.ru/go.php?url=https://betop24.com
http://tido.al/vazhdo.php?url=https://betop24.com
http://smile.wjp.am/link-free/link3.cgi?mode=cnt&no=8&hpurl=https://betop24.com
http://tech-universes.blog.idnes.cz/redir.aspx?url=https://betop24.com
http://littleboy.blog.idnes.cz/redir.aspx?url=https://betop24.com
http://correctinspiration.blog.idnes.cz/redir.aspx?url=https://betop24.com
http://weallfreieds.blog.idnes.cz/redir.aspx?url=https://betop24.com
http://shanmegurad.blog.idnes.cz/redir.aspx?url=https://betop24.com
http://manualmfuctional.blog.idnes.cz/redir.aspx?url=https://betop24.com
http://verybeayurifull.blog.idnes.cz/redir.aspx?url=https://betop24.com
http://lejano.blog.idnes.cz/redir.aspx?url=https://betop24.com
http://jotumko.blog.idnes.cz/redir.aspx?url=https://betop24.com
http://auyttrv.blog.idnes.cz/redir.aspx?url=https://betop24.com
http://bartos.blog.idnes.cz/redir.aspx?url=https://betop24.com
http://cllfather.blog.idnes.cz/redir.aspx?url=https://betop24.com
http://littlejohnny.blog.idnes.cz/redir.aspx?url=https://betop24.com
http://semesmemos.blog.idnes.cz/redir.aspx?url=https://betop24.com
http://faultypirations.blog.idnes.cz/redir.aspx?url=https://betop24.com
http://anupam-bestprice89.blog.idnes.cz/redir.aspx?url=https://betop24.com
http://bhrepublica.blog.idnes.cz/redir.aspx?url=https://betop24.com
http://allinspirations.blog.idnes.cz/redir.aspx?url=https://betop24.com
http://bestandroid.blog.idnes.cz/redir.aspx?url=https://betop24.com
http://discoverable.blog.idnes.cz/redir.aspx?url=https://betop24.com
http://puriagatratt.blog.idnes.cz/redir.aspx?url=https://betop24.com
http://azizlemon.blog.idnes.cz/redir.aspx?url=https://betop24.com
http://chandancomputers.blog.idnes.cz/redir.aspx?url=https://betop24.com
http://bingshopping.blog.idnes.cz/redir.aspx?url=https://betop24.com
http://ptritam.blog.idnes.cz/redir.aspx?url=https://betop24.com
http://prasat.blog.idnes.cz/redir.aspx?url=https://betop24.com
http://meri.blog.idnes.cz/redir.aspx?url=https://betop24.com
http://prabu.blog.idnes.cz/redir.aspx?url=https://betop24.com
http://easehipranaam.blog.idnes.cz/redir.aspx?url=https://betop24.com
http://nidatyi.blog.idnes.cz/redir.aspx?url=https://betop24.com
http://krodyit.blog.idnes.cz/redir.aspx?url=https://betop24.com
http://naine.blog.idnes.cz/redir.aspx?url=https://betop24.com
http://breajwasi.blog.idnes.cz/redir.aspx?url=https://betop24.com
http://beithe.blog.idnes.cz/redir.aspx?url=https://betop24.com
http://tumari.blog.idnes.cz/redir.aspx?url=https://betop24.com
http://hariomm.blog.idnes.cz/redir.aspx?url=https://betop24.com
http://usafunworldt.blog.idnes.cz/redir.aspx?url=https://betop24.com
http://financialallorner.blog.idnes.cz/redir.aspx?url=https://betop24.com
http://mjghouthernmatron.blog.idnes.cz/redir.aspx?url=https://betop24.com
http://katihfmaxtron.blog.idnes.cz/redir.aspx?url=https://betop24.com
http://ikkemandar.blog.idnes.cz/redir.aspx?url=https://betop24.com
http://googlejfgdlenewstoday.blog.idnes.cz/redir.aspx?url=https://betop24.com
http://bhrecadominicana.blog.idnes.cz/redir.aspx?url=https://betop24.com
http://mmurugesamnfo.blog.idnes.cz/redir.aspx?url=https://betop24.com
http://esujkamien.blog.idnes.cz/redir.aspx?url=https://betop24.com
http://ujkaeltnx.blog.idnes.cz/redir.aspx?url=https://betop24.com
http://ausnangck2809.blog.idnes.cz/redir.aspx?url=https://betop24.com
http://supermu.blog.idnes.cz/redir.aspx?url=https://betop24.com
http://buyfcyclingteam.blog.idnes.cz/redir.aspx?url=https://betop24.com
http://allthingnbeyondblog.blog.idnes.cz/redir.aspx?url=https://betop24.com
http://charanraj.blog.idnes.cz/redir.aspx?url=https://betop24.com
http://pream.blog.idnes.cz/redir.aspx?url=https://betop24.com
http://sang.blog.idnes.cz/redir.aspx?url=https://betop24.com
http://pasas.blog.idnes.cz/redir.aspx?url=https://betop24.com
http://kanchan.blog.idnes.cz/redir.aspx?url=https://betop24.com
http://dilip.blog.idnes.cz/redir.aspx?url=https://betop24.com
http://avinasg.blog.idnes.cz/redir.aspx?url=https://betop24.com
http://virat.blog.idnes.cz/redir.aspx?url=https://betop24.com
http://hsadyttk.blog.idnes.cz/redir.aspx?url=https://betop24.com
http://ashu-quality.blog.idnes.cz/redir.aspx?url=https://betop24.com
http://tinko.blog.idnes.cz/redir.aspx?url=https://betop24.com
http://konkaruna.blog.idnes.cz/redir.aspx?url=https://betop24.com
http://ptrfsiitan.blog.idnes.cz/redir.aspx?url=https://betop24.com
http://boardgame-breking.blog.idnes.cz/redir.aspx?url=https://betop24.com
http://flowwergulab.blog.idnes.cz/redir.aspx?url=https://betop24.com
http://bingcreater-uk.blog.idnes.cz/redir.aspx?url=https://betop24.com
http://skinnyskin.blog.idnes.cz/redir.aspx?url=https://betop24.com
http://amil.blog.idnes.cz/redir.aspx?url=https://betop24.com
http://mohan.blog.idnes.cz/redir.aspx?url=https://betop24.com
http://bopal.blog.idnes.cz/redir.aspx?url=https://betop24.com
http://gwl.blog.idnes.cz/redir.aspx?url=https://betop24.com
http://delhi.blog.idnes.cz/redir.aspx?url=https://betop24.com
http://gopi.blog.idnes.cz/redir.aspx?url=https://betop24.com
http://kripa.blog.idnes.cz/redir.aspx?url=https://betop24.com
http://udavhav.blog.idnes.cz/redir.aspx?url=https://betop24.com
http://matura.blog.idnes.cz/redir.aspx?url=https://betop24.com
http://patana.blog.idnes.cz/redir.aspx?url=https://betop24.com
http://actontv.org/?URL=betop24.com/
http://albertaaerialapplicators.com/?URL=betop24.com/
http://alexanderroth.de/url?q=https://betop24.com
http://alt.baunetzwissen.de/rd/nl-track/?obj=bnw&cg1=redirect&cg2=wissen-newsletter:beton&cg3=partner&datum=2017-01&titel=partnerklick-beton&firma=informationszentrumbeton&link=https://betop24.com
http://andreasgraef.de/url?q=https://betop24.com
http://app.espace.cool/ClientApi/SubscribeToCalendar/1039?url=https://betop24.com
http://archives.midweek.com/?URL=betop24.com/
http://armdrag.com/mb/get.php?url=https://betop24.com
http://asai-kota.com/acc/acc.cgi?REDIRECT=https://betop24.com
http://ass-media.de/wbb2/redir.php?url=https://betop24.com
http://assadaaka.nl/?URL=betop24.com/
http://atchs.jp/jump?u=https://betop24.com
http://away3d.com/?URL=betop24.com/
http://baseballpodcasts.net/Feed2JS/feed2js.php?src=https://betop24.com
http://bbs.mottoki.com/index?bbs=hpsenden&act=link&page=94&linkk=https://betop24.com
http://bernhardbabel.com/url?q=https://betop24.com
http://bigbarganz.com/g/?https://betop24.com
http://blackberryvietnam.net/proxy.php?link=https://betop24.com
http://boogiewoogie.com/?URL=betop24.com/
http://bsumzug.de/url?q=https://betop24.com
http://business.eatonton.com/list?globaltemplate=https://betop24.com
http://cdiabetes.com/redirects/offer.php?URL=https://betop24.com
https://padletcdn.com/cgi/fetch?disposition=attachment&url=https://betop24.com
http://cdn.iframe.ly/api/iframe?url=https://betop24.com
http://centuryofaction.org/?URL=betop24.com/
http://www.interempresas.net/estadisticas/r.asp?idsector=129&e=221083&c=195&d=https://betop24.com
http://fishbiz.seagrant.uaf.edu/click-thru.html?url=https://betop24.com
http://community.nxp.com/t5/custom/page/page-id/ExternalRedirect?url=https://betop24.com
http://foro.infojardin.com/proxy.php?link=https://betop24.com
http://kupiauto.zr.ru/bitrix/rk.php?goto=https://betop24.com
http://ipx.bcove.me/?url=https://betop24.com
http://ceskapozice.lidovky.cz/redir.aspx?url=https://betop24.com
http://mitsui-shopping-park.com/lalaport/ebina/redirect.html?url=https://betop24.com
http://client.paltalk.com/client/webapp/client/External.wmt?url=https://betop24.com
https://www.google.to/url?q=https://betop24.com
https://maps.google.bi/url?q=https://betop24.com
http://www.nickl-architects.com/url?q=https://betop24.com
https://www.ocbin.com/out.php?url=https://betop24.com
http://www.lobenhausen.de/url?q=https://betop24.com
https://image.google.bs/url?q=https://betop24.com
http://redirect.me/?https://betop24.com
http://kank.o.oo7.jp/cgi-bin/ys4/rank.cgi?mode=link&id=569&url=https://betop24.com
http://ruslog.com/forum/noreg.php?https://betop24.com
http://forum.ahigh.ru/away.htm?link=https://betop24.com
https://toolbarqueries.google.td/url?sa=j&source=web&rct=j&url=https://betop24.com
https://home.guanzhuang.org/link.php?url=https://betop24.com
http://dvd24online.de/url?q=https://betop24.com
http://twindish-electronics.de/url?q=https://betop24.com
http://www.beigebraunapartment.de/url?q=https://betop24.com
http://www.mix-choice.com/yomi/rank.cgi?mode=link&id=391&url=https://betop24.com
https://cse.google.fm/url?q=https://betop24.com
http://www.1soft-tennis.com/search/rank.cgi?mode=link&id=17&url=https://betop24.com
http://go.e-frontier.co.jp/rd2.php?uri=https://betop24.com
http://www.reddotmedia.de/url?q=https://betop24.com
https://10ways.com/fbredir.php?orig=https://betop24.com
https://emailtrackerapi.leadforensics.com/api/URLOpen?EmailSentRecordID=17006&URL=https://betop24.com
http://search.haga-f.net/rank.cgi?mode=link&url=https://betop24.com
http://7ba.ru/out.php?url=https://betop24.com
http://big-data-fr.com/linkedin.php?lien=https://betop24.com
http://reg.kost.ru/cgi-bin/go?https://betop24.com
http://www.kirstenulrich.de/url?q=https://betop24.com
http://www.inkwell.ru/redirect/?url=https://betop24.com
https://cse.google.co.je/url?q=https://betop24.com
http://click-navi.jp/cgi/service-search/rank.cgi?mode=link&id=121&url=https://betop24.com
https://n1653.funny.ge/redirect.php?url=https://betop24.com
https://www.livecmc.com/?lang=fr&id=Ld9efT&url=https://betop24.com
https://images.google.ee/url?sa=j&source=web&rct=j&url=https://betop24.com
http://www.arndt-am-abend.de/url?q=https://betop24.com
https://maps.google.com.vc/url?q=https://betop24.com
http://maxnetworks.org/searchlink/rank.cgi?mode=link&id=321&url=https://betop24.com
https://image.google.com.ng/url?rct=j&sa=t&url=https://betop24.com
https://www.kenzai-navi.com/location/location_topbanner.php?bs=238&m=899&href=https://betop24.com
https://www.anybeats.jp/jump/?https://betop24.com
http://url-collector.appspot.com/positiveVotes?topic=Hate%20speech&url=https://betop24.com
https://cse.google.com.cy/url?q=https://betop24.com
https://maps.google.be/url?sa=j&url=https://betop24.com
https://top.hange.jp/linkdispatch/dispatch?targetUrl=https://betop24.com
http://www.51queqiao.net/link.php?url=https://betop24.com
https://cse.google.dm/url?q=https://betop24.com
https://rsyosetsu.bookmarks.jp/ys4/rank.cgi?mode=link&id=3519&url=https://betop24.com
http://www.wildner-medien.de/url?q=https://betop24.com
http://www.tifosy.de/url?q=https://betop24.com
https://image.google.co.ck/url?sa=j&source=web&rct=j&url=https://betop24.com
http://ads.icorp.ro/others/STS/?t=CeNortjKxUjK0NDFVsgZcMBADAm4-&g=https://betop24.com
http://deai-ranking.org/search/rank.cgi?mode=link&id=28&url=https://betop24.com
https://izispicy.com/go.php?url=https://betop24.com
http://demo.vieclamcantho.vn/baohiemthatnghiep/Redirect.aspx?sms=90bb20bb20tbb20thc3%B4ng&link=https://betop24.com
http://www.city-fs.de/url?q=https://betop24.com
http://p.profmagic.com/urllink.php?url=https://betop24.com
https://www.google.md/url?q=https://betop24.com
https://maps.google.com.pa/url?q=https://betop24.com
http://www.link.gokinjyo-eikaiwa.com/rank.cgi?mode=link&id=5&url=https://betop24.com
http://www.air-dive.com/au/mt4i.cgi?mode=redirect&ref_eid=697&url=https://betop24.com
http://okozukai.j-web.jp/j-web/okozukai/ys4/rank.cgi?mode=link&id=6817&url=https://betop24.com
https://sfmission.com/rss/feed2js.php?src=https://betop24.com
https://www.watersportstaff.co.uk/extern.aspx?src=https://betop24.com&cu=60096&page=1&t=1&s=42"
http://siamcafe.net/board/go/go.php?https://betop24.com
http://www.whitening-navi.info/cgi/search-smartphone/rank.cgi?mode=link&id=1431&url=https://betop24.com
http://es.catholic.net/ligas/ligasframe.phtml?liga=https://betop24.com
http://login.mediafort.ru/autologin/mail/?code=14844×02ef859015x290299&url=https://betop24.com
https://www.sports-central.org/cgi-bin/axs/ax.pl?https://betop24.com
http://dot.boss.sk/o/rs.php?ssid=1&szid=4&dsid=12&dzid=32&url=https://betop24.com
http://www.americanstylefridgefreezer.co.uk/go.php?url=https://betop24.com
https://www.newzealandgirls.co.nz/auckland/escorts/clicks.php?click_id=NavBar_AF_AdultDirectory&target=https://betop24.com
https://wdesk.ru/go?https://betop24.com
https://www.snek.ai/redirect?url=https://betop24.com
http://gals.graphis.ne.jp/mkr/out.cgi?id=01019&go=https://betop24.com
http://www.capitalbikepark.se/bok/go.php?url=https://betop24.com
http://cooltgp.org/tgp/click.php?id=370646&u=https://betop24.com
https://joomlinks.org/?url=https://betop24.com
https://managementportal.de/modules/mod_jw_srfr/redir.php?url=https://betop24.com
http://www.green-cross.pro/bitrix/redirect.php?goto=https://betop24.com
http://chrison.net/ct.ashx?id=dad2849a-8862-4a6d-b842-ef628cbfd3c3&url=https://betop24.com
http://datasheetcatalog.biz/url.php?url=https://betop24.com
http://minlove.biz/out.html?id=nhmode&go=https://betop24.com
http://www.diwaxx.ru/win/redir.php?redir=https://betop24.com
http://request-response.com/blog/ct.ashx?url=https://betop24.com
https://turbazar.ru/url/index?url=https://betop24.com
http://members.asoa.org/sso/logout.aspx?returnurl=https://betop24.com
https://clients1.google.al/url?q=https://betop24.com
https://cse.google.al/url?q=https://betop24.com
https://images.google.al/url?q=https://betop24.com
http://toolbarqueries.google.al/url?q=https://betop24.com
https://www.google.al/url?q=https://betop24.com
http://uvbnb.ru/go?https://betop24.com
https://skibaza.ru/bitrix/rk.php?goto=https://betop24.com
https://smartservices.ru/bitrix/rk.php?goto=https://betop24.com
http://www.topkam.ru/gtu/?url=https://betop24.com
http://torgi-rybinsk.ru/bitrix/rk.php?goto=https://betop24.com
http://tpprt.ru/bitrix/rk.php?goto=https://betop24.com
http://m.adlf.jp/jump.php?l=https://betop24.com
https://www.moonbbs.com/dm/dmlink.php?dmurl=https://betop24.com
http://www.mac52ipod.cn/urlredirect.php?go=https://betop24.com
https://ulfishing.ru/forum/go.php?https://betop24.com
https://underwood.ru/away.html?url=https://betop24.com
https://unicom.ru/links.php?go=https://betop24.com
http://www.unifin.ru/bitrix/redirect.php?goto=https://betop24.com
https://globalmedia51.ru/bitrix/redirect.php?goto=https://betop24.com
https://ramset.com.au/document/url/?url=https://betop24.com
https://www.vicsport.com.au/analytics/outbound?url=https://betop24.com
http://www.interfacelift.com/goto.php?url=https://betop24.com
https://good-surf.ru/r.php?g=https://betop24.com
http://mbrf.ae/knowledgeaward/language/ar/?redirect_url=https://betop24.com
https://gektor-nsk.ru/bitrix/redirect.php?goto=https://betop24.com
https://lekoufa.ru/banner/go?banner_id=4&link=https://betop24.com
http://www.global-flat.com/mobile/mobile_switch.php?dir=tofull&url=https://betop24.com
https://golden-resort.ru/out.php?out=https://betop24.com
http://avalon.gondor.ru/away.php?link=https://betop24.com
http://www.laosubenben.com/home/link.php?url=https://betop24.com
http://www.lifeshow.com.tw/show.php?ty5_id=1599&url=https://betop24.com
https://forsto.ru/bitrix/redirect.php?goto=https://betop24.com
https://www.cossa.ru/bitrix/redirect.php?event1=click&event2=&event3=&goto=https://betop24.com
http://www.gigatran.ru/go?url=https://betop24.com
http://www.gigaalert.com/view.php?h=&s=https://betop24.com
http://www.jkes.tyc.edu.tw/dyna/webs/gotourl.php?id=357&url=https://betop24.com
http://www.laopinpai.com/gourl.asp?url=/gourl.asp?url=https://betop24.com
http://www.humanbrainmapping.org/i4a/etrack/track.cfm?rType=2&campaignID=3572&contactID=4524&origURL=https://betop24.com
http://www.cyprus-net.com/banner_click.php?banid=4&link=https://betop24.com
http://a.gongkong.com/db/adredir.asp?id=16757&url=https://betop24.com
http://gfaq.ru/go?https://betop24.com
http://gbi-12.ru/links.php?go=https://betop24.com
https://gcup.ru/go?https://betop24.com
http://www.gearguide.ru/phpbb/go.php?https://betop24.com
https://es.catholic.net/ligas/ligasframe.phtml?liga=https://betop24.com
https://passport.sfacg.com/LoginOut.aspx?Returnurl=https://betop24.com
https://offers.sidex.ru/stat_ym_new.php?redir=https://betop24.com&hash=1577762
http://edcommunity.ru/bitrix/rk.php?goto=https://betop24.com
http://page.yicha.cn/tp/j?url=https://betop24.com
http://www.internettrafficreport.com/cgi-bin/cgirdir.exe?https://betop24.com
http://cityprague.ru/go.php?go=https://betop24.com
https://www.hachimantaishi.com/click3/click3.cgi?cnt=c5&url=https://betop24.com
http://www.careerbuilder.com.cn/cn/tallyredirector.aspx?task=Ushi&objName=SnsShare&redirectUrl=https://betop24.com&methodName=SetSnsShareLink
http://banners.knollenstein.com/adnetwork/servlet/advertBeans.TrackingServlet?seid=27709655&t=100&redirectTo=betop24.com&cid=DECONL&vid=986809&externalsource=jobbsquare_ppc
https://meyeucon.org/ext-click.php?url=https://betop24.com
http://www.cnmhe.fr/spip.php?action=cookie&url=https://betop24.com
http://tsugarubrand.jp/blog/?wptouch_switch=mobile&redirect=https://betop24.com
http://blackhistorydaily.com/black_history_links/link.asp?link_id=5&URL=https://betop24.com
http://www.kitchencabinetsdirectory.com/redirect.asp?url=https://betop24.com
https://perezvoni.com/blog/away?url=https://betop24.com
https://www.ciymca.org/af/register-redirect/71104?url=https://betop24.com
https://whizpr.nl/tracker.php?u=https://betop24.com
http://bw.irr.by/knock.php?bid=252583&link=https://betop24.com
http://games.cheapdealuk.co.uk/go.php?url=https://betop24.com
https://www.netwalkerstore.com/redirect.asp?accid=18244&adcampaignid=2991&adcampaigntype=2&affduration=30&url=https://betop24.com
http://hansolav.net/blog/ct.ashx?id=0af6301b-e71f-44be-838f-905709eee792&url=https://betop24.com
http://bitrix.adlr.ru/bitrix/rk.php?goto=https://betop24.com
https://m.snek.ai/redirect?url=https://betop24.com
http://www.officeservice.com.br/trackMKT/trackerFolha.aspx?DESCRIPTION=HotSiteEcrmContabil&FROM=Workshop&DESTINATION=https://betop24.com
https://www.arbsport.ru/gotourl.php?url=https://betop24.com
http://earnupdates.com/goto.php?url=https://betop24.com
http://www.strana.co.il/finance/redir.aspx?site=https://betop24.com
http://www.actuaries.ru/bitrix/rk.php?goto=https://betop24.com
http://www.isadatalab.com/redirect?clientId=ee5a64e1-3743-9b4c-d923-6e6d092ae409&appId=69&value=[EMVFIELD]EMAIL[EMV/FIELD]&cat=Techniquesculturales&url=https://betop24.com
https://www.jukujo.gs/bin/out.cgi?id=kimiomof&url=https://betop24.com
http://gals.graphis.ne.jp/mkr/out.cgi?id=04489&go=https://betop24.com
http://dir.tetsumania.net/search/rank.cgi?mode=link&id=3267&url=https://betop24.com
http://www.project24.info/mmview.php?dest=https://betop24.com
http://tfads.testfunda.com/TFServeAds.aspx?strTFAdVars=4a086196-2c64-4dd1-bff7-aa0c7823a393,TFvar,00319d4f-d81c-4818-81b1-a8413dc614e6,TFvar,GYDH-Y363-YCFJ-DFGH-5R6H,TFvar,https://betop24.com
http://www.beeicons.com/redirect.php?site=https://betop24.com
http://www.diwaxx.ru/hak/redir.php?redir=https://betop24.com
http://www.kyoto-osaka.com/search/rank.cgi?mode=link&url=https://betop24.com
http://metalist.co.il/redirect.asp?url=https://betop24.com
http://i-marine.eu/pages/goto.aspx?link=https://betop24.com
http://www.teenlove.biz/cgibin/atc/out.cgi?id=24&u=https://betop24.com
http://www.altoona.com/newsletter/click.php?volume=52&url=https://betop24.com
http://www.katjushik.ru/link.php?to=https://betop24.com
http://gondor.ru/go.php?url=https://betop24.com
http://proekt-gaz.ru/go?https://betop24.com
https://www.tricitiesapartmentguide.com/MobileDefault.aspx?reff=https://betop24.com
http://www.vietnamsingle.com/vn/banners/redirect.asp?url=https://betop24.com
https://www.tourplanisrael.com/redir/?url=https://betop24.com
http://www.mutualgravity.com/archangel/webcontact/d_signinsimple.php?action=signup&CID=240&EID=&S=default.css&return=https://betop24.com
http://buildingreputation.com/lib/exe/fetch.php?media=https://betop24.com
http://moscowdesignmuseum.ru/bitrix/rk.php?goto=https://betop24.com
http://www.fairpoint.net/~jensen1242/gbook/go.php?url=https://betop24.com
https://lirasport.com.ar/bloques/bannerclick.php?id=7&url=https://betop24.com
http://www.knabstrupper.se/guestbook/go.php?url=https://betop24.com
https://www.voxlocalis.net/enlazar/?url=https://betop24.com
http://no-smok.net/nsmk/InterWiki?action=goto&oe=EUC-KR&url=https://betop24.com
http://www.stalker-modi.ru/go?https://betop24.com
https://www.pba.ph/redirect?url=https://betop24.com&id=3&type=tab
https://bondage-guru.net/bitrix/rk.php?goto=https://betop24.com
http://www.westbloomfieldlibrary.org/includes/statistics.php?StatType=Link&StatID=Facebook&weblink=https://betop24.com
https://tenisnews.com.br/clickTracker/clickTracker.php?u=https://betop24.com
http://www.stevestechspot.com/ct.ashx?id=9fdcf4a4-6e09-4807-bc31-ac1adf836f6c&url=https://betop24.com
http://rcoi71.ru/bitrix/redirect.php?goto=https://betop24.com
http://www.laselection.net/redir.php3?cat=int&url=betop24.com
http://www.request-response.com/blog/ct.ashx?id=d827b163-39dd-48f3-b767-002147c94e05&url=https://betop24.com
http://www.cooltgp.org/tgp/click.php?id=370646&u=https://betop24.com
http://sdchamber.biz/admin/mod_newsletter/redirect.aspx?message_id=785&redirect=https://betop24.com
http://www.p1-uranai.com/rank.cgi?mode=link&id=538&url=https://betop24.com
http://earthsciencescanada.com/modules/babel/redirect.php?newlang=en_us&newurl=https://betop24.com
http://psykodynamiskt.nu/?wptouch_switch=desktop&redirect=https://betop24.com
http://www.pcbheaven.com/forum/index.php?thememode=full;redirect=https://betop24.com
http://www.castellodivezio.it/lingua.php?lingua=EN&url=https://betop24.com
http://ads.pukpik.com/myads/click.php?banner_id=316&banner_url=https://betop24.com
http://www.masai-mara.com/cgi-bin/link2.pl?grp=mm&link=https://betop24.com
http://evenemangskalender.se/redirect/?id=15723&lank=https://betop24.com
http://anifre.com/out.html?go=https://betop24.com
http://hobbyplastic.co.uk/trigger.php?r_link=https://betop24.com
https://naviking.localking.com.tw/about/redirect.aspx?mid=7&url=https://betop24.com
http://sms-muzeji.si/Home/ChangeCulture?lang=sl&returnUrl=https://betop24.com
http://r.emeraldexpoinfo.com/s.ashx?ms=EXI2:125462_115115&e=krubin723@aol.com&eId=440186886&c=h&url=https://betop24.com
https://apps.firstrain.com/service/openurl.jsp?action=titleclick&src=rss&u=https://betop24.com
http://cdp.thegoldwater.com/click.php?id=101&url=https://betop24.com
http://www.appenninobianco.it/ads/adclick.php?bannerid=159&zoneid=8&source=&dest=https://betop24.com
https://www.eduplus.hk/special/emailalert/goURL.jsp?clickURL=https://betop24.com
http://www.japan.road.jp/navi/navi.cgi?jump=226&url=https://betop24.com
http://www.arch.iped.pl/artykuly.php?id=1&cookie=1&url=https://betop24.com
http://hirlevelcenter.eu/click.php?hirlevel_id=13145441085508&url=https://betop24.com
https://birds.cz/avif/redirect.php?from=avif.obs.php&url=https://betop24.com
https://www.adminer.org/redirect/?sa=t&url=https%3A%2F%2Fbetop24.com%2F
http://www.bigblackmamas.com/cgi-bin/sites/out.cgi?url=https://betop24.com
https://www.yeaah.com/disco/DiscoGo.asp?ID=3435&Site=https://betop24.com
https://primorye.ru/go.php?id=19&url=https://betop24.com
https://www.123gomme.it/it/ViewSwitcher/SwitchView?mobile=True&returnUrl=https://betop24.com
http://youmydaddy.com/cgi-bin/at3/out.cgi?id=88&trade=https://betop24.com
http://barykin.com/go.php?betop24.com
http://www.bigblackbootywatchers.com/cgi-bin/sites/out.cgi?url=https://betop24.com
http://imaginingourselves.globalfundforwomen.org/pb/External.aspx?url=https://betop24.com
https://forum.everleap.com/proxy.php?link=https://betop24.com
http://www.mosig-online.de/url?q=https://betop24.com
http://www.hccincorporated.com/?URL=https://betop24.com
http://fatnews.com/?URL=https://betop24.com
http://110.164.66.211/ULIB6//dublin.linkout.php?url=https://betop24.com
http://110.164.92.12/ULIB//dublin.linkout.php?url=https://betop24.com
http://198.54.125.86.myopenlink.net/describe/?url=https://betop24.com
http://202.144.225.38/jmp?url=https://betop24.com
http://2cool2.be/url?q=https://betop24.com
https://csirealty.com/?URL=https://betop24.com
http://asadi.de/url?q=https://betop24.com
http://treblin.de/url?q=https://betop24.com
https://kentbroom.com/?URL=https://betop24.com
http://0845.boo.jp/cgi/mt3/mt4i.cgi?id=24&mode=redirect&no=15&ref_eid=3387&url=https://betop24.com
http://www.cercasostituto.it/index.php?name=GestBanner&file=counter&idbanner=40&dir_link=https://betop24.com
http://www.meteo-leran.fr/meteotemplate/template/plugins/deviations/redirect.php?url=https://betop24.com
https://www.eurobichons.com/fda%20alerts.php?url=https://betop24.com
https://mydojo.at/de_AT/karate/weiterleitung?redirect=https://betop24.com
http://click.phosphodiesterase4.com/k.php?ai=&url=https://betop24.com
http://www.mariahownersclub.com/forum/redirect-to/?redirect=https://betop24.com
http://www.wildromance.com/buy.php?url=https://betop24.com&store=iBooks&book=omk-ibooks-us
http://mapleriverweather.com/mobile/pages/station/redirect.php?url=https://betop24.com
http://www.archijob.co.il/index/comp_website.asp?companyId=1469&website=https://betop24.com
https://student-helpr.rminds.dev/redirect?redirectTo=https://betop24.com
http://www.kalinna.de/url?q=https://betop24.com
http://www.hartmanngmbh.de/url?q=https://betop24.com
https://www.the-mainboard.com/proxy.php?link=https://betop24.com
http://4coma.net/cgi/mt4/mt4i.cgi?cat=12&mode=redirect&ref_eid=3231&url=https://betop24.com
http://4travel.jp/dynamic/redirect.php?mode=dm_tour&url=https://betop24.com
http://search.pointcom.com/k.php?ai=&url=https://betop24.com
https://s-p.me/template/pages/station/redirect.php?url=https://betop24.com
http://ww.thesteelbrothers.com/buy.php?store=iBooks&url=https://betop24.com
http://thdt.vn/convert/convert.php?link=https://betop24.com
http://www.doitweb365.de/scripts/doitweb.exe/rasklickzaehler2?https://betop24.com
http://www.sprang.net/url?q=https://betop24.com
https://img.2chan.net/bin/jump.php?https://betop24.com
http://www.is.kyusan-u.ac.jp/htmllint/htmllint.cgi?ViewSource=on;URL=https://betop24.com
http://local.rongbachkim.com/rdr.php?url=https://betop24.com
http://bachecauniversitaria.it/link/frm_top.php?url=https://betop24.com
http://www.fimmgviterbo.org/mobfimmgviterbo/index.php?nametm=counter&idbanner=4&dir_link=https://betop24.com
http://www.mckinneyfarm.com/template/plugins/stationExtremes/redirect.php?url=https://betop24.com
https://www.stcwdirect.com/redirect.php?url=https://betop24.com
http://forum.vcoderz.com/externalredirect.php?url=https://betop24.com
https://www.momentumstudio.com/?URL=https://betop24.com
https://www.betamachinery.com/?URL=https://betop24.com
http://nishiyama-takeshi.com/mobile2/mt4i.cgi?id=3&mode=redirect&no=67&ref_eid=671&url=https://betop24.com
https://www.guadamur.eu/template/pages/station/redirect.php?url=https://betop24.com
https://weather.cube.com.gr/pages/station/redirect.php?url=https://betop24.com
http://www.evrika41.ru/redirect?url=https://betop24.com
https://facto.ru/bitrix/rk.php?goto=https://betop24.com
http://fallout3.ru/utils/ref.php?url=https://betop24.com
http://forum-region.ru/forum/away.php?s=https://betop24.com
http://forumdate.ru/redirect-to/?redirect=https://betop24.com
http://shckp.ru/ext_link?url=https://betop24.com
https://shinglas.ru/bitrix/redirect.php?goto=https://betop24.com
https://sibran.ru/bitrix/redirect.php?goto=https://betop24.com
http://sintez-oka.ru/bitrix/redirect.php?goto=https://betop24.com
https://utmagazine.ru/r?url=https://betop24.com
http://ivvb.de/url?q=https://betop24.com
http://j.lix7.net/?https://betop24.com
http://jacobberger.com/?URL=www.betop24.com/
http://jahn.eu/url?q=https://betop24.com
http://jamesvelvet.com/?URL=www.betop24.com/
http://jla.drmuller.net/r.php?url=https://betop24.com
http://jump.pagecs.net/https://betop24.com
http://karkom.de/url?q=https://betop24.com
http://kens.de/url?q=https://betop24.com
http://www.hainberg-gymnasium.com/url?q=https://betop24.com
https://befonts.com/checkout/redirect?url=https://betop24.com
https://www.usap.gov/externalsite.cfm?https://betop24.com
https://maps.google.com.ua/url?rct=j&sa=t&url=https://betop24.com
http://imagelibrary.asprey.com/?URL=www.betop24.com/
http://ime.nu/https://betop24.com
http://interflex.biz/url?q=https://betop24.com
https://app.espace.cool/clientapi/subscribetocalendar/974?url=https://betop24.com
http://111056.net/yomisearch/rank.cgi?mode=link&id=6205&url=https://betop24.com
http://stanko.tw1.ru/redirect.php?url=https://betop24.com
http://www.sozialemoderne.de/url?q=https://betop24.com
http://www.showb.com/search/ranking.cgi?mode=link&id=7083&url=https://betop24.com
http://kinderundjugendpsychotherapie.de/url?q=https://betop24.com
http://kinhtexaydung.net/redirect/?url=https://betop24.com
http://neoromance.info/link/rank.cgi?mode=link&id=26&url=https://betop24.com
https://seoandme.ru/bitrix/redirect.php?goto=https://betop24.com
https://s-online.ru/bitrix/redirect.php?goto=https://betop24.com
https://rssfeeds.wtsp.com/~/t/0/0/wtsp/home/~betop24.com/
https://rev1.reversion.jp/redirect?url=https://betop24.com
https://strelmag.ru/bitrix/rk.php?goto=https://betop24.com
https://spb90.ru/bitrix/redirect.php?goto=https://betop24.com
https://spartak.ru/bitrix/redirect.php?goto=https://betop24.com
https://sovaisova.ru/bitrix/redirect.php?event1=2009_mainpage&event2=go_www&event3=&goto=https://betop24.com
https://slashwrestling.com/cgi-bin/redirect.cgi?https://betop24.com
http://old.roofnet.org/external.php?link=https://betop24.com
http://mosprogulka.ru/go?https://betop24.com
https://uniline.co.nz/Document/Url/?url=https://betop24.com
https://tracker.onrecruit.net/api/v1/redirect/?redirect_to=https://betop24.com
http://stopcran.ru/go?https://betop24.com
http://studioad.ru/go?https://betop24.com
http://swepub.kb.se/setattribute?language=en&redirect=https://betop24.com
https://www.licnioglasi.org/index.php?thememode=full;redirect=https://betop24.com
http://www.rexart.com/cgi-rexart/al/affiliates.cgi?aid=872&redirect=https://betop24.com
http://www2.smartmail.com.ar/tl.php?p=hqf/f94/rs/1fp/4c0/rs//https://betop24.com
http://staldver.ru/go.php?go=https://betop24.com
http://slipknot1.info/go.php?url=https://betop24.com
https://www.samovar-forum.ru/go?https://betop24.com
https://www.star174.ru/redir.php?url=https://betop24.com
https://staten.ru/bitrix/rk.php?goto=https://betop24.com
https://justpaste.it/redirect/172fy/https://betop24.com
https://jt-pr-dot-yamm-track.appspot.com/Redirect?ukey=1iXi3dF8AuzUIsgifbcVnqqx-anF4B8R-9PC3UGhHO3E-1131306248&key=YAMMID-79725512&link=https://betop24.com
https://ipv4.google.com/url?q=https://betop24.com
https://de.flavii.de/index.php?flavii=linker&link=https://betop24.com
https://dakke.co/redirect/?url=https://betop24.com
https://creativecommons.org/choose/results-one?q_1=2&q_1=1&field_attribute_to_url=https://betop24.com
https://contacts.google.com/url?sa=t&url=https://betop24.com
https://community.nxp.com/external-link.jspa?url=https://betop24.com
https://posts.google.com/url?q=https://betop24.com
https://plus.google.com/url?q=https://betop24.com
https://naruto.su/link.ext.php?url=https://betop24.com
https://www.flyingsamaritans.net/Startup/SetupSite.asp?RestartPage=https://betop24.com
https://www.ewind.cz/index.php?page=home/redirect&url=https://betop24.com
https://www.eas-racing.se/gbook/go.php?url=https://betop24.com
https://www.direkt-einkauf.de/includes/refer.php?id=170&url=https://betop24.com
https://www.dialogportal.com/Services/Forward.aspx?link=https://betop24.com
https://www.curseforge.com/linkout?remoteUrl=https://betop24.com
https://www.counterwelt.com/charts/click.php?user=14137&link=https://betop24.com
https://cdn.iframe.ly/api/iframe?url=https://betop24.com
https://branch.app.link/?$deeplink_path=article%2Fjan%2F123&$fallback_url=https%3A%2F%2Fbetop24.com/&channel=facebook&feature=affiliate
https://boowiki.info/go.php?go=https://betop24.com
https://blaze.su/bitrix/redirect.php?event1=&event2=&event3=&goto=https://betop24.com
https://bbs.pku.edu.cn/v2/jump-to.php?url=https://betop24.com
https://foro.infojardin.com/proxy.php?link=https://betop24.com
https://ditu.google.com/url?q=https://betop24.com
https://www.art-prizes.com/AdRedirector.aspx?ad=MelbPrizeSculpture_2017&target=https://betop24.com
https://wirelessestimator.com/advertise/newsletter_redirect.php?url=https://betop24.com
https://wasitviewed.com/index.php?href=https://betop24.com
https://tvtropes.org/pmwiki/no_outbounds.php?o=https://betop24.com
https://trello.com/add-card?source=mode=popup&name=click+here&desc=https://betop24.com
http://www.rss.geodles.com/fwd.php?url=https://betop24.com
http://www.nuttenzone.at/jump.php?url=https://betop24.com
http://www.myhottiewife.com/cgi-bin/arpro/out.cgi?id=Jojo&url=https://betop24.com
http://www.mistress-and-slave.com/cgi-bin/out.cgi?id=123crush&url=https://betop24.com
http://www.johnvorhees.com/gbook/go.php?url=https://betop24.com
https://bares.blog.idnes.cz/redir.aspx?url=https://betop24.com
https://community.esri.com/external-link.jspa?url=https://betop24.com
https://community.cypress.com/external-link.jspa?url=https://betop24.com
https://club.panasonic.jp/member/terms/?siteId=B1&returnURL=https://betop24.com
http://www.chungshingelectronic.com/redirect.asp?url=https://betop24.com
http://www.bdsmandfetish.com/cgi-bin/sites/out.cgi?id=mandymon&url=https://betop24.com
http://visits.seogaa.ru/redirect/?g=https://betop24.com
http://tharp.me/?url_to_shorten=https://betop24.com
http://speakrus.ru/links.php?go=https://betop24.com
http://spbstroy.ru/bitrix/redirect.php?goto=https://betop24.com
http://solo-center.ru/links.php?go=https://betop24.com
http://www.sv-mama.ru/shared/go.php?url=https://betop24.com
http://www.sofion.ru/banner.php?r1=41&r2=2234&goto=https://betop24.com
https://www.bing.com/news/apiclick.aspx?ref=FexRss&aid=&tid=9BB77FDA801248A5AD23FDBDD5922800&url=https://betop24.com
https://www.autopartskart.com/buyfromamzon.php?url=https://betop24.com
https://www.autoandrv.com/linkout.aspx?websiteurl=https://betop24.com
http://markiza.me/bitrix/rk.php?goto=https://betop24.com
http://jump.5ch.net/?https://betop24.com
http://imperialoptical.com/news-redirect.aspx?url=https://betop24.com
http://hellothai.com/wwwlink/wwwredirect.asp?hp_id=1242&url=https://betop24.com
http://guru.sanook.com/?URL=https://betop24.com
https://www.talgov.com/Main/exit.aspx?url=https://betop24.com
https://www.serie-a.ru/bitrix/redirect.php?goto=https://betop24.com
https://www.russianrobotics.ru/bitrix/rk.php?goto=https://betop24.com
https://www.ruchnoi.ru/ext_link?url=https://betop24.com
https://www.rprofi.ru/bitrix/rk.php?goto=https://betop24.com
https://www.roccotube.com/cgi-bin/at3/out.cgi?id=27&tag=toplist&trade=https://betop24.com
https://www.nyl0ns.com/cgi-bin/a2/out.cgi?id=43&l=btop&u=https://betop24.com
https://www.meetme.com/apps/redirect/?url=https://betop24.com
https://sutd.ru/links.php?go=https://betop24.com
https://abiznes.com.ua/bitrix/redirect.php?event1=&event2=&event3=&goto=https://betop24.com
http://www.glorioustronics.com/redirect.php?link=https://betop24.com
http://www.etis.ford.com/externalURL.do?url=https://betop24.com
https://www.hentainiches.com/index.php?id=derris&tour=https://betop24.com
https://www.gudarjavalambre.com/sections/miscelany/link.php?url=https://betop24.com
https://www.greencom.ru/catalog/irrigation_systems.html?jump_site=2008&url=https://betop24.com
https://www.girlznation.com/cgi-bin/atc/out.cgi?id=50&l=side&u=https://betop24.com
https://www.funeralunion.org/delete-company?nid=39&element=https://betop24.com
https://www.fudbal91.com/tz.php?zone=America/Iqaluit&r=https://betop24.com
https://www.frodida.org/BannerClick.php?BannerID=29&LocationURL=https://betop24.com
http://2010.russianinternetweek.ru/bitrix/rk.php?goto=https://betop24.com
https://xat.com/web_gear/chat/linkvalidator.php?link=https://betop24.com
https://www.yeaah.com/disco/DiscoGo.asp?ID=3435&Site=https://betop24.com
https://www.woodlist.us/delete-company?nid=13964&element=https://betop24.com
https://www.viecngay.vn/go?to=https://betop24.com
https://www.uts.edu.co/portal/externo.php?id=https://betop24.com
http://sennheiserstore.ru/bitrix/rk.php?goto=https://betop24.com
http://school364.spb.ru/bitrix/rk.php?goto=https://betop24.com
http://sc.sie.gov.hk/TuniS/betop24.com/
http://rzngmu.ru/go?https://betop24.com
http://rostovklad.ru/go.php?https://betop24.com
http://portalnp.snauka.ru/bitrix/redirect.php?goto=https://betop24.com
http://www.imsnet.at/LangChange.aspx?uri=https://betop24.com
http://www.hon-cafe.net/cgi-bin/re.cgi?lid=hmw&url=https://betop24.com
https://www.hottystop.com/cgi-bin/at3/out.cgi?id=12&trade=https://betop24.com
http://fr.knubic.com/redirect_to?url=https://betop24.com
https://www.kath-kirche-kaernten.at/pfarren/pfarre/C3014?URL=https://betop24.com
https://www.interecm.com/interecm/tracker?op=click&id=5204.db2&url=https://betop24.com
http://branch.app.link/?$deeplink_path=article/jan/123&$fallbackurl=https://betop24.com
https://www.fca.gov/?URL=https://betop24.com
https://savvylion.com/?bmDomain=betop24.com/
https://www.soyyooestacaido.com/betop24.com/
https://www.gta.ru/redirect/www.betop24.com/
https://directx10.org/go?https://betop24.com
https://mejeriet.dk/link.php?id=betop24.com/
https://ezdihan.do.am/go?https://betop24.com
https://fishki.net/click?https://betop24.com
https://hiddenrefer.com/?https://betop24.com
https://romhacking.ru/go?https://betop24.com
https://turion.my1.ru/go?https://betop24.com
https://weburg.net/redirect?url=betop24.com/
https://tw6.jp/jump/?url=https://betop24.com
https://www.spainexpat.com/?URL=betop24.com/
https://www.fotka.pl/link.php?u=betop24.com/
https://www.lolinez.com/?https://betop24.com
https://nanos.jp/jmp?url=https://betop24.com
https://www.pasco.k12.fl.us/?URL=betop24.com/
https://anolink.com/?link=https://betop24.com
https://www.questsociety.ca/?URL=betop24.com/
https://www.disl.edu/?URL=https://betop24.com
https://holidaykitchens.com/?URL=betop24.com/
https://www.mbcarolinas.org/?URL=betop24.com/
https://www.anibox.org/go?https://betop24.com
https://google.info/url?q=https://betop24.com
https://world-source.ru/go?https://betop24.com
https://mail2.mclink.it/SRedirect/betop24.com/
https://www.swleague.ru/go?https://betop24.com
https://nazgull.ucoz.ru/go?https://betop24.com
https://www.rosbooks.ru/go?https://betop24.com
https://beskuda.ucoz.ru/go?https://betop24.com
https://richmonkey.biz/go/?https://betop24.com
https://vlpacific.ru/?goto=https://betop24.com
https://google.co.ck/url?q=https://betop24.com
https://kassirs.ru/sweb.asp?url=betop24.com/
https://www.allods.net/redirect/betop24.com/
https://icook.ucoz.ru/go?https://betop24.com
https://sec.pn.to/jump.php?https://betop24.com
https://www.earth-policy.org/?URL=betop24.com/
https://www.silverdart.co.uk/?URL=betop24.com/
https://pr-cy.ru/jump/?url=https://betop24.com
https://google.co.bw/url?q=https://betop24.com
https://google.co.id/url?q=https://betop24.com
https://google.co.in/url?q=https://betop24.com
https://google.co.il/url?q=https://betop24.com
https://pikmlm.ru/out.php?p=https://betop24.com
https://regnopol.clan.su/go?https://betop24.com
https://mss.in.ua/go.php?to=https://betop24.com
https://atlantis-tv.ru/go?https://betop24.com
https://otziv.ucoz.com/go?https://betop24.com
https://www.sgvavia.ru/go?https://betop24.com
https://element.lv/go?url=https://betop24.com
https://karanova.ru/?goto=https://betop24.com
https://789.ru/go.php?url=https://betop24.com
https://krasnoeselo.su/go?https://betop24.com
https://game-era.do.am/go?https://betop24.com
https://kudago.com/go/?to=https://betop24.com
https://kryvbas.at.ua/go?https://betop24.com
https://google.cat/url?q=https://betop24.com
https://joomluck.com/go/?https://betop24.com
https://www.anonymz.com/?https://betop24.com
https://www.de-online.ru/go?https://betop24.com
https://www.allpn.ru/redirect/?url=betop24.com/
https://click.start.me/?url=https://betop24.com
https://prizraks.clan.su/go?https://betop24.com
https://flyd.ru/away.php?to=https://betop24.com
https://risunok.ucoz.com/go?https://betop24.com
https://www.google.ca/url?q=https://betop24.com
https://www.google.fr/url?q=https://betop24.com
https://cse.google.mk/url?q=https://betop24.com
https://cse.google.ki/url?q=https://betop24.com
https://www.google.gy/url?q=https://betop24.com
https://s79457.gridserver.com/?URL=betop24.com/
https://cdl.su/redirect?url=https://betop24.com
https://www.fondbtvrtkovic.hr/?URL=betop24.com/
https://lostnationarchery.com/?URL=betop24.com/
https://www.booktrix.com/live/?URL=betop24.com/
https://www.google.ro/url?q=https://betop24.com
https://www.google.tm/url?q=https://betop24.com
https://after.ucoz.net/go?https://betop24.com
https://kinteatr.at.ua/go?https://betop24.com
https://nervetumours.org.uk/?URL=betop24.com/
https://kopyten.clan.su/go?https://betop24.com
https://www.taker.im/go/?u=https://betop24.com
https://usehelp.clan.su/go?https://betop24.com
https://sepoa.fr/wp/go.php?https://betop24.com
https://cool4you.ucoz.ru/go?https://betop24.com
https://eric.ed.gov/?redir=https://betop24.com
https://www.usich.gov/?URL=https://betop24.com
https://owohho.com/away?url=https://betop24.com
https://www.youa.eu/r.php?u=https://betop24.com
https://tagzfoods.com/blogs/news/the-law-of-attraction?comment=131845783792#comments
https://www.lomarfarms.com/blogs/news/give-the-gift-of-love-with-lomar-farms?comment=134639681841#comments
https://www.austinkeen.com/blogs/news/facebook-and-instagram-down-unexpectedly?comment=126154047685#comments
https://wildcraftbrewery.co.uk/blogs/recipes/beef-and-ale-pie-with-wild-card-blackberry-stout?comment=127784550582#comments
https://monroehouseboutique.com/blogs/daily-life-of-a-retired-rn/soul-speaking?comment=132418928870#comments
https://www.auroratights.com/blogs/news/spotlight-interview-aurora-tights-x-valon-faith-henry?comment=129539047600#Comments
https://www.lantingavita.com/blogs/from-the-journal/profit-with-a-purpose-how-b-corp-is-changing-the-game?comment=131457482817#comments
https://www.asocopi.org/en/how-journal-vol-29-no-2-july-december-2022-EV5
https://mrstone.com/blogs/articles/safety-first-types-of-safety-equipment-stone-fabricators-and-installers-use?comment=127254659146#Comments
https://www.bomajewelry.com/blogs/news/covetuer?comment=131408822488#comments
https://physiclo.com/blogs/news/mens-sizes-colors?comment=134366789709#comments
https://woodleon.com/blogs/blog/five-amazing-wooden-creations-to-behold?comment=130546368732#comments
https://eqclusive.com/blogs/news/77641665-christmas-is-coming-wondering-what-to-buy-for-a-horse-rider-and-horse-lover-we-are-here-to-help?comment=129149993015#comments
https://www.wildlandorganics.com/blogs/livelight/a-very-tiny-christmas?comment=130923528447#comments
https://www.noblemono.com/blogs/news/noblemono-x-cutts?comment=131661856924#comments
https://tournaments.spikeball.com/blogs/the-rally/sra-2019-postseason-team-rankings?comment=129539211440#comments
https://growlerbikes.com/blogs/growlerbikesblog/the-top-4-bike-maintenance-rules-to-live-by?comment=131130392865#comments
https://www.ossboardsupply.com/blogs/news/112934275-oss-glory-days-thunder-adam?comment=131222044770#Comments
https://sectsshop.com/blogs/sects-blog/sects-showcase-chanel-yui?comment=131443097833#Comments
https://judgementyard.org/blogs/news/rawpa-crawpa-reviews-sizzla-and-judgement-yard-from-the-garrison-to-the-stage?comment=128908591190#comments
https://givehersix.com/blogs/blog/60362501-welcome-to-give-her-six?comment=129566310453#comments
https://www.cctung.com/es/blogs/news/apartment-intercom-security-tips-1?comment=131222012002#comments
https://preservejournals.com/blogs/blog/valentines-entry-ideas?comment=125670654140#comments
https://www.thetroutlook.com/latest-updates/could-barriers-benefit-brook-trout
https://www.homadic.com/blogs/news/delegates-of-german-federal-ministry-of-environment-visit?comment=135917109580#comments
https://s8tattoo.com/blogs/stencil-science/stencil-science-the-s8-stencil-printer?comment=131954901191#comments
https://www.wildlandorganics.com/blogs/livelight/introducing-the-wild-ones?comment=130923692287#comments
https://sightlineprovisions.com/blogs/news/the-cone-denim-project-featured-on-the-fiberglass-manifesto-by-david-fason?comment=127932497962#comments
https://www.blackroll.com.au/blogs/exercises/preparation-recovery-regeneration-exercises?comment=119248846912#comments
http://www.yadvindermalhi.org/blog/the-ecomodernism-debate-with-mark-lynas
https://lizzie-loves.com/blogs/blog/baked-oat-berry-bars?comment=130080506019#comments
https://amyssecretkitchen.com/blogs/news/bastille-day?comment=131221979234#comments
https://fluffpetcare.com/blogs/blog/get-organized-top-10-apps-for-small-business-owners?comment=133088084219#comments
https://47skin.com/blogs/news/5-make-up-tips-for-blemishes?comment=124988293166#comments
https://fantasmamagic.com/blogs/blog/the-8-most-influential-magicians-of-the-decade-and-theyre-black?comment=130567799040#comments
https://www.shopsocialthreads.com/blogs/news/the-best-jean-shorts?comment=128742621266#comments
https://selbornepottery.co.uk/blogs/news/back-in-the-studio-for-lockdown?comment=130140471407#comments
https://www.creativeacademic.uk/blog/exploring-the-idea-of-creative-ecologies-creative-academic-magazine
https://azulhaircollection.com/blogs/trendingnow/the-top-5-trending-styles-for-2019?comment=129150222391#comments
https://hourloop.com/blogs/news/i-want-much-more-than-this-provincial-life-beauty-and-the-beast-1740-to-2017?comment=128743342138#comments
https://www.homerev.com/blogs/home-revolution/winter-drafts?comment=133215650045#comments
https://www.ultratribe.com/blogs/news/unrolling-the-mysterious-case-of-alice-in-wonderland?comment=130923659519#comments
https://halomama.com/blogs/halomama-tips-for-parenthood/pregnancy-muscle-joint-pains-should-i-use-ice-or-heat?comment=130409955569#comments
https://www.ghanzibrand.com/blogs/news-1/offshoot-project-with-remi-fargier?comment=135717749071#comments
https://fredmandigital.com/blogs/news/new-presets-for-axe-fx-kemper?comment=136154644803#comments
https://shop.nucoconut.com/blogs/recipes/moroccan-cigars-aip-paleo-keto?comment=131221946466#comments
https://meribook.com/blog/2021/05/12/three-must-have-strategies-and-tools-for-startups-to-thrive
http://www.justindoran.ie/blog/new-tutorials-added\https://oskerstore.com/blogs/news/introducing-the-new-osker-summer-fashion-campaign-in-australia?comment=135452590374#comments
https://nickhorey.com/blogs/news/how-to-buy-designer-diamond-jewelry?comment=131726278882#comments
http://www.themacroexperiment.com/blog/enjoying-food-protein-pumpkin-bread
https://www.luangisa.com/blogs/news/for-wholesalers-interested-in-african-art-african-home-decor-jewelry-and-more-contact-luangisa-art-gallery?comment=130923593983#comments
https://retreatyourself.com/blogs/news/mystery-box-brands-october-2022-edition?comment=131715760217#comments
https://rafinova.com/blogs/news/what-does-it-really-mean-to-pay-it-forward?comment=126624890928#comments
https://www.sigeeka.com/blogs/articles/skin-care-routine?comment=133726175530#comments
https://www.evogennutrition.com/blogs/fst-70/fst-70-build-3d-quads-using-3-leg-extensions-tips-with-hany-rambod?comment=121622560812#comments
https://www.babybento.com.au/blogs/recipes/sushi?comment=128742588498#comments
https://www.spicyelement.com/blogs/recipe/grilled-salmon-head?comment=125823287492#comments
https://saltypaloma.com/blogs/salty-talk/salty-paloma-holiday-party-2018?comment=133795873059#comments
https://shopfantasyguides.com/blogs/articles/buffalo-bills?comment=125408378964#comments
https://seastraws.co/blogs/news/cambria-beach-lodge-a-dreamy-and-safe-re-opening?comment=131033399470#comments
https://getgrowfit.in/blogs/grow-fit-blog/diet-best-practices-for-shredding-burning-fat-gaining-muscle?comment=131559653676#comments
https://vincita.cc/blogs/news/sponsorship-for-thailand-cycling-team?comment=131033366702#comments
https://princeandpete.com/blogs/fashion/cool-socks-for-both-work-and-play?comment=130772533363#comments
https://www.diveviz.com/blogs/daily-dive-report/saturdays-san-diego-dive-report-50?comment=126768087220#comments
https://tagzfoods.com/blogs/news/the-law-of-attraction?comment=131845816560#comments
https://www.luckydipltd.co.uk/blogs/lucky-dip-blog/christmas-and-coca-cola-the-changing-face-of-santa?comment=127918932122#comments
https://eqclusive.com/blogs/news/christmas-is-coming-wondering-what-to-buy-for-a-horse-rider-and-horse-lover-we-are-here-to-help?comment=129150156855#comments
https://www.onevillagecoffee.com/blogs/ask-steve/one-village-coffee-holiday-gift-guide?comment=131443065065#comments
https://freckbeauty.com/blogs/ooze/color-correcting-w-%F0%9D%98%8A%F0%9D%98%8F%F0%9D%98%8C%F0%9D%98%8C%F0%9D%98%92%F0%9D%98%9A%F0%9D%98%93%F0%9D%98%90%F0%9D%98%94%F0%9D%98%8C?comment=130025685178#comments
https://www.jeeperspeepers.co.uk/blogs/news/jeepers-peepers-ss17-favourite-the-shield?comment=128861765825#comments
https://gemkart.com/blogs/news/bangkok-the-epicenter-of-treated-gemstones?comment=131033333934#comments
https://rockstreet-art.com/blogs/whats-new/i-live-a-life-of-colours-do-you-artist-alina-prodan-talking-about-colours-of-childhood-and-their-impact-on-her-art?comment=130996207687#comments
https://www.wyldsmoke.com.au/blogs/news/113702214-wandering-cooks?comment=130068709446#comments
https://www.simplysavorybyrachel.com/blogs/news/breakfast-dirty-rice?comment=128742522962#comments
https://onechewthree.com.au/blogs/news/great-expectations-those-first-five-years?comment=135558234416#comments
https://www.elevatecoffee.com/blogs/elevate-coffee-blog/5-ways-to-brew-coffee-at-home?comment=131826057304#comments
https://adricewines.wine/blogs/news/first-wine-contest-and-already-winning?comment=133872156949#comments
https://www.undracelesteny.com/blogs/ucnynews/creating-while-in-quarantine?comment=130064318630#comments
https://www.theartdream.com/blog/black-panther-pop-up
https://courtneycasper.com/blogs/news/wide-margin-new-testament-tabs?comment=130632941816#comments
https://www.skintox.co/blogs/skin-tips/124833091-anti-aging-foods?comment=130213183680#comments
https://greenfoods.com/blogs/news/collagen-cashew-milk?comment=130080473251#comments
https://brandonsteiner.com/blogs/what-else/122371907-failures-of-kindness?comment=126783586476#comments
https://covenandco.com/blogs/news/flower-doughnuts?comment=122066993322#comments
https://informaltea.co.nz/blogs/news/this-week-in-tea-1?comment=129495728286#Comments
https://kenyarn.com/blogs/kenyarn-blog/find-your-astrologishawl-info?comment=133758353693#comments
https://abrazostyle.com/blogs/musings/81981441-out-of-the-box?comment=134229393690#comments
https://waterlemonkids.com/blogs/news/happy-anniversary?comment=129150091319#comments
https://merkaba.nz/blogs/hemp-blog/origin-and-evolution-of-hemp-foods?comment=138070130751#comments
https://www.baristaspace.com/blogs/baristaspace/how-to-make-good-espresso?comment=130068774982#comments
https://isakfragrances.com/en-ae/blogs/isak/why-indian-perfume?comment=130820997214#comments
https://themomstore.in/blogs/blogs-for-moms/meal-planning-for-your-baby-is-not-that-tough-know-how?comment=130026340538#comments
https://hijabparadise.com/en/blogs/novita/dimmi-come-ti-vesti-e-ti-dico-chi-sei?comment=136184299865#comments
https://hovdenwear.com/blogs/news/hovden-leather-aprons?comment=127116673208#comments
https://www.iwesabe.com/blog/odoo-15-expected-features?success=message
https://www.nfsportech.com/blogs/latest-updates/why-does-one-shop-online?comment=131422683203#comments
https://sofragrance.com/blogs/news/how-to-make-the-best-pina-colada-recipe?comment=130789212379#comments
https://resoluteboutique.com/blogs/alaska-travel/mendenhall-ice-caves-in-winter?comment=130632974584#comments
https://wineislife-store.com/blogs/wine-is-life-community-blog/ham-wine-pairings-how-to-pair-cold-meat-with-wine?comment=133122326792#comments
https://anemoscope.jp/blogs/staff/moray?comment=133706252600#comments
https://pigafurniture.com/blogs/news/el-dormitorio-que-toda-princesa-merece-tener?comment=137400156247#comments
https://agreateroutdoors.com/blogs/news/tips-to-improve-your-hook-sets-while-flyfishing?comment=128861864129#comments
https://www.platinumhealth.ca/blog/9-simple-phrases-a-thousand-benefits-to-a-more-vibrant-life-by-dr-albert-huang
https://theunchartedstudio.com/blogs/uncharted-goods/herewith-magazine-puerto-rico-unfiltered?comment=133644157212#comments
https://www.gussloan.com/blogs/gus-sloan-the-blog/capsule_packing?comment=130772664435#comments
https://mrstone.com/blogs/articles/for-all-the-natural-stone-fabricators-this-ones-for-you?comment=127254888522#Comments
https://adorit.ca/blogs/news/10-years-old-what-can-we-say?comment=127871025218#comments
https://www.threeroomstudio.com/blogs/news/design-team-announcement?comment=131715891289#Comments
https://www.historicalclimatology.com/projects/the-science-of-stifling-heat-recognising-urban-climate-change-in-the-straits-settlements
https://viensavecmoi.ca/blogs/news/macra-yay?comment=134161301817#comments
https://www.runamics.com/blogs/the-concious-runner/nachhaltige-sportkleidung-ein-erklarungsversuch-1?comment=135375683849#comments
https://hawaiianbathbody.com/blogs/news/school-kids-tour?comment=133713690904#comments
https://www.prettychicparty.com/blogs/party-inspirations/hip-hip-hooray?comment=128743768122#comments
http://www.cinemadudesert.org/news/cinema-du-desert-ngo-django-boom-festival-2016
https://www.stockandbarrelco.com/blogs/s-b-blog/how-we-make-the-no-64-wesley-shoulder-bag?comment=130068742214#comments
https://www.somata.ca/blog/rebooting-with-nutrient-therapy
https://www.raymondinnovations.com/blogs/news/portable-generators-and-soft-starters?comment=134012338310#comments
https://www.matonaturals.com/blogs/natural-comfort/binaural-beats-resonating-powerful-effects-on-the-mind-body-and-soul-by-olivia-beaudoin?comment=128068714657#comments
https://burnsandmccoy.com/blogs/recipes/mango-habanero-curry-trail-mix?comment=127870992450#comments
https://www.532yoga.com/blog/born-tough
https://ruqayasbookshelf.com/blogs/kids-activites/magnetic-paper-dolls?comment=131315433730#comments
https://www.noreciperequired.com/recipe/carrot-puree?page=16#comment-348507
https://www.littlegreenpouch.com/blogs/blog/10-homemade-baby-food-recipes-you-can-make-in-less-than-10-minutes?comment=124106539044#comments
https://lagom142.com/blogs/news/latest-furniture-in-lagom142?comment=134172180781#comments
https://www.dabnation.com/blogs/dab-nation-reads/how-to-avoid-a-chazzed-banger?comment=130213052519#comments
https://shishashop.mx/en/blogs/shishas-university/shisha-drink-perla-negra?comment=135452655910#comments
https://www.survivalknifeexperts.com/blogs/the-survival-guide-blog/49473732-gerber-lmf-ii-review?comment=128496533553#Comments
https://www.plantnmore.com/ar/blogs/news/salsa-verde?comment=132928766186#comments
https://www.vintagegrooming.com/blogs/grooming-articles-and-tutorials/does-size-matter-a-guide-to-beard-length?comment=134229721370#comments
https://mikaree.com/blogs/your-fashion-secret/how-to-dress-an-apple-shaped-body-9-tips-and-tricks
https://www.7cellars.com/blogs/7cellars/smashed-fingerling-potatoes-with-cotija-cheese?comment=130507735278#comments
https://balandlaw.com/blog/guest-blog-post-by-attorney-paul-birnberg-on-security-deposits-was-mungall-v-garry-correctly-decided
https://twowheelsbiglife.com/blogs/you-tube/what-s-the-big-deal-about-big-bend-national-park-a-lot-big-bend-motorcycle-riding?comment=129539375280#comments
https://www.jetempire.com.au/blogs/news/38424385-meet-this-is-miss-janine-the-newest-member-of-the-jet-empire-family?comment=130213413056#comments
https://www.illmindproducer.com/blogs/news/144964615-networking-how-to-win-people-over-during-conversation?comment=131457548353#comments
https://www.zwaveoutlet.com/blogs/news/email-question-of-the-week-z-wave-and-zigbee-the-same-thing-or-different?comment=134229688602#comments
https://www.samtanskitchen.com/blogs/recipes/kuih-kodok-jemput-jemput-pisang-malaysian-mashed-banana-fritters?comment=134335856939#comments
https://measina-treasures-of-samoa.myshopify.com/blogs/news/93338630-three-ways-to-use-a-lavalava?comment=130293858387#comments
https://agrotecnicimantova.jimdofree.com/libro-degli-ospiti/
http://www.arovalley.org.nz/news/book-into-our-next-school-holiday-programme-now
https://www.ski-running.com/2012/02/17/skitourenrennen-meran-2000/
https://www.warriorandwild.co.uk/blog/which-class-price-plan-is-right-for-me
https://keywesthash.com/hash-trash/hash-trash-trail-464
https://balandlaw.com/blog/what-does-a-landlord-need-to-know-about-administrative-search-warrants
https://www.dhhliteraryagency.com/news/pitch-dhh-liverpool
http://www.cinemadudesert.org/news/france24-on-our-last-tour-in-africa
https://www.franciscosupervielle.com/2012/06/24/exposition-plan-s%C3%A9quence/
https://www.thetroutlook.com/latest-updates/pros-vs-cons-of-hatchery-stocking-part-3
https://celiacosperu.org/actividades—-difusion/sbado-14-de-nov-inauguracin-caf-bodega-especializado-en-preparaciones-sin-gluten-el-trigal-la-casa-de-violeta
https://www.noreciperequired.com/technique/10-steps-perfect-pork-chop?page=20#comment-348615
https://cravenlandscaping.com/have-some-questions/first-post
https://www.cocoonfurnishings.ca/designer-spotlight-milo-baughman
https://www.theproseccoproject.com/blog/gavi-and-truffles-remembering-a-trip-to-piedmont
https://www.mattmanyplaces.com/travel-blog/tax-deadlines-quickly-approaching
https://themodushop.com/blogs/news/thanksgiving-week-sale?comment=134315376977#comments
https://www.pandoradebalthazar.com/blogs/our-diary/the-contemporary-side-of-custom-monogramming?comment=127066800318#comments
https://timelyandtimeless.com/blogs/blog/cuckoo-clocks-for-young-and-old?comment=135449346359#comments
https://warmfolk.com/blogs/news/kantha-or-hand-quilting?comment=130912682063#comments
https://bikechurch.santacruzhub.org/blog/realigning-rear-dropouts
https://hadawayassociates.com/lynns-blog/one-million-global-peripheral-iv-catheters
https://www.eggpress.com/blogs/news/shop-the-online-sample-sale?comment=129496613022#comments
https://www.jenni-smith.co.uk/blogs/news/79262465-meeting-the-aurifil-team-in-milan?comment=130999255111#comments
https://www.onevillagecoffee.com/blogs/ask-steve/one-village-coffee-holiday-gift-guide?comment=131446079721#comments
https://www.macshop.com.sg/blogs/news/the-wireless-backlit-keyboard-that-outshines-apple?comment=130999222343#comments
https://gibsgrooming.com/blogs/blog/four-must-follows-for-the-perfect-fade?comment=122067615914#comments
https://shop.interiorstoinspire.com/blogs/how-to/clean-your-paint-wax-brushes?comment=131168501984#comments
https://momentum-boards.com/blogs/news/manufacturing-and-shipping-update-10?comment=127786221750#comments
https://www.creativeacademic.uk/blog/creativity-in-the-making
https://jinmee.co.uk/blogs/news/hydrapuff-your-skincare-soulmate-is-here?comment=133152735283#comments
https://www.yumepatisserie.com/blogs/musing-of-a-marketer-turned-pastry-chef/5-things-to-know-before-starting-your-own-home-based-bakery?comment=131667656860#comments
https://gardenersorchardandbakery.com/blogs/news/u-pick-is-in-full-swing?comment=122845036589#comments
https://sewkindofwonderful.com/blogs/news/16413271-did-someone-say-pickle-dish?comment=133128814835#comments
https://keyp.mission.fo/blogs/news/17632421-keyp-kristiligar-bokur-a-netinum?comment=125658923055#comments
https://www.lomarfarms.com/blogs/news/give-the-gift-of-love-with-lomar-farms?comment=134640927025#comments
https://www.pandoradebalthazar.com/blogs/our-diary/it-s-pronto-for-parma-and-venice?comment=127066833086#comments
https://heyleeb.com/blogs/blog/15062545-4-tips-tricks-on-foundation-from-make-up-pro-heylee-achten?comment=124879962262#comments
https://www.sovol3d.com/blogs/news/3d-printed-valentines-day-gifts-in-2022-stl-file-included?comment=133661655349#comments
https://thismodernlife.co.uk/blogs/news/16899576-our-lundby-dolls-house?comment=132479353078#comments
https://www.noreciperequired.com/technique/10-steps-perfect-pork-chop?page=20#comment-348617
https://susuaccessories.com/blogs/the-susu-gal-blog/wayuu-mochila-the-only-handbag-youll-ever-need?comment=131650846875#comments
https://www.booketybookbooks.co.nz/blogs/reviews/april-bookety-club-review-of-the-midnight-library-by-matt-haig?comment=129154351159#comments
https://www.nikkiwilliams.com/blogs/news/closet-of-the-future?comment=134338019627#comments
https://www.allthebabies.co/blogs/news/mom-to-mom-with-rebekah?comment=131848634608#comments
https://duluthlabs.com/blogs/weeklymolecule/styrene-and-polystyrene?comment=131224141922#comments
https://www.onevillagecoffee.com/blogs/ask-steve/five-variables-of-brewing-coffee?comment=131446112489#comments
https://jinmee.co.uk/blogs/news/the-3-second-rule-the-korean-skincare-trend-that-improves-your-hydration?comment=133152768051#comments
https://trulygarden.com/blogs/truly-garden-blog/diy-raised-bed-using-old-redwood-deck?comment=122067648682#comments
https://www.springbreakwatches.com/blogs/dreamers/75931589-why-cultural-diversity-is-important-today?comment=131239608552#comments
https://www.owenandedwin.com/blogs/news/the-art-of-congruency?comment=125952491600#comments
https://micapeet.com/blogs/blog/celestial-gift-guide-10-must-have-moon-star-inspired-products-from-small-indie-businesses?comment=129496678558#comments
https://tournaments.spikeball.com/blogs/the-rally/west-regionals-premier-division-2017-team-results?comment=129542946992#comments
https://www.katiesplates.com/blogs/sherry-greeks-blog-katies-plates-official-registered-dietitian/bmi-as-the-best-measure-of-health?comment=131510796545#comments
https://www.evogennutrition.com/blogs/fst-7/train-with-the-pro-creator-hadi-choopan-fst-7-quads-one-week-out?comment=121625116716#comments
https://chefna.com.au/blogs/recipes-from-the-heart/massaman-curry?comment=130069954630#comments
https://www.bellawren.ca/blogs/bellas-blogs/fall-2020-lookbook?comment=130113634516#comments
https://www.ultratribe.com/blogs/news/5-levels-of-psychedelic-experience?comment=130924708095#comments
https://earthsidefarms.com/blogs/recipes/keto-cheesy-chorizo-puffs?comment=134640959793#comments
https://donalddrawbertson.com/blogs/news/excuse-me-i-arted-1?comment=131038740654#comments
https://nikaukai.com/blogs/news/nikau-kai-x-city-of-manhattan-beachs-annual-summer-movie-series?comment=138078322751#comments
https://wodfever.com/blogs/new-posts/how-to-measure-for-knee-sleeves-for-crossfit-and-weightlifting-sizing-guide?comment=131305734372#comments
https://worldofdive.com/blogs/news/when-running-in-rain?comment=128490602647#comments
https://duluthlabs.com/blogs/weeklymolecule/the-chemistry-of-barbeque?comment=131224272994#comments
https://seveskig.com/blogs/nori/vol-18-accessory?comment=128069304481#comments
https://getgrowfit.in/blogs/grow-fit-blog/love-pani-puri-but-afraid-of-the-calories-try-these-3-mouth-watering-recipes?comment=131563290924#comments
https://www.vamplondon.com/blogs/vamp-universe/win-a-day-at-the-races-6?comment=129814560853#comments
https://woollymade.com/blogs/wallet-of-the-month/erica-swanson?comment=129324843121#comments
https://rubylondon.com/blogs/news/denim-makes-the-people-come-together?comment=125509238973#comments
https://shop.interiorstoinspire.com/blogs/how-to/use-artisan-enhancements-topcoats?comment=131168534752#comments
https://www.yumepatisserie.com/blogs/musing-of-a-marketer-turned-pastry-chef/cny-special-maneko-cat-cookie?comment=131667984540#comments
https://classicprep.com/blogs/news/127535495-cpc-relaunch-at-enk-childrens-club?comment=129814528085#comments
https://theloeil.com/blogs/press/15240785-bloggerspotted-sain-lim-wearing-our-lavender-strapless-jumpsuit?comment=128069271713#comments
https://mrstone.com/blogs/articles/best-countertop-sealer?comment=127256592458#Comments
https://tabularasa-ny.com/blogs/the-chalkboard/sarah-schneider?comment=128490569879#comments
https://paz-creations.com/blogs/blog/karat-carat-or-carrot?comment=131101327612#comments
https://wholefort.com/blogs/news/yacon-the-syrup-of-health?comment=131650912411#comments
https://joyzanden.se/blogs/nyhet/samarbete-bookbindersdesign?comment=134914965838#comments
https://covenandco.com/blogs/news/dried-pineapple-flowers?comment=122067681450#comments
https://www.seawardandstearn.com/blogs/news/how-to-wear-a-summer-tie?comment=134121128217#comments
https://tagzfoods.com/blogs/news/tagz-why?comment=131848667376#comments
https://haikini.co/blogs/news/types-of-surf-breaks?comment=125486235819#comments
https://stylealertsa.com/blogs/news/win-this-valentines-day?comment=127851069521#comments
https://www.radiancestl.com/blogs/news/november-specials?comment=130876506265#comments
https://gillardhoney.co.nz/blogs/news/gillard-honeys-bees-knees-cocktail?comment=129324810353#comments
https://amyssecretkitchen.com/blogs/news/hayas-twenty-first?comment=131224240226#comments
https://voyageurs.co/blogs/the-bakehouse/the-art-of-being-a-real-bread-lover?comment=130569371904#comments
https://wildcraftbrewery.co.uk/blogs/recipes/wild-spiced-quesadilla?comment=127786287286#comments
https://renewskinsolutions.com/blogs/news/slugging?comment=129496645790#comments
https://horfawear.com/blogs/highendmensfashion/a-brief-history-of-the-sweatshirt-from-the-athletics-track-to-the-beach?comment=131717365849#comments
https://moogclips.com/blogs/news/first-post?comment=132428660966#comments
https://www.alvibeautycare.com/blogs/news/argan-oil-is-effective-as-a-sunscreen-sunburn-treatment?comment=130039873731#comments
https://orr.is/blogs/orrbyorr/orr-by-orr-blog-blog?comment=129752006753#comments
https://yatesprecision.com/blogs/from-the-breakroom/machinist-survey-with-ben-jenkinson-of-jimko-machine?comment=127923191962#comments
https://thetiredmamacollection.co.uk/blogs/news/guest-blog-the-mum-bath-experience?comment=129321959622#comments
https://www.ecovessel.com/blogs/default-blog/summer-sangria-recipe?comment=130923299065#comments
https://mfjerky.com/blogs/day2day-mfj-jerky0meatstick/2017-growing-pains?comment=131038707886#comments
https://bomondvodka.com/blogs/cocktails/fall-bahamian-sunrise?comment=126385389753#comments
https://ottoskingoods.com/blogs/news/when-we-say-ethically-made-we-mean-it?comment=134162284857#Comments
https://amyssecretkitchen.com/blogs/news/hayas-twenty-first?comment=131224174690#comments
https://www.girliegirloriginals.com/blogs/blog/want-to-dress-to-impress-this-thanksgiving-heres-how?comment=126948016201#comments
https://harkandhammer.com/blogs/news/behind-the-scenes-pajama-dressing-with-hark-hammer-by-jackie-miranne?comment=137405136983#comments
https://www.springbreakwatches.com/blogs/dreamers/75931589-why-cultural-diversity-is-important-today?comment=131239641320#comments
https://www.onevillagecoffee.com/blogs/ask-steve/recipe-legendary-pumpkin-spice-latte?comment=131446145257#comments
https://susuaccessories.com/blogs/the-susu-gal-blog/wayuu-mochila-the-only-handbag-youll-ever-need?comment=131650879643#comments
https://www.maxihome.com.sg/blogs/news/creating-your-bedroom-heaven?comment=127923159194#comments
https://rockstellstories.com/blogs/news/recognizing-god-s-love?comment=128210731077#comments
https://kenyarn.com/blogs/kenyarn-blog/find-your-astrologishawl-info?comment=133758648605#comments
https://kenyarn.com/blogs/kenyarn-blog/find-your-astrologishawl-info?comment=133758615837#comments
https://www.goldrushnuggetbucket.com/blogs/press/117144581-shark-tank-entrepreneur-goes-beyond-the-tank-consults-with-robert-herjavec-for-hiring-key-digital-role?comment=126717231298#comments
https://kreamkimchi.com/blogs/recipes/the-best-easiest-korean-bbq-marinade-you-will-thank-me-after?comment=131885859060#comments
https://bottleofwellness.com/blogs/blog/why-do-homemade-organic-natural-products-cost-more-than-conventional-over-the-counter-brands?comment=128985170079#comments
https://www.jenni-smith.co.uk/blogs/news/magazine-feature?comment=130999320647#comments
https://sofragrance.com/blogs/news/so-sorry-not-sorry-girls-night-in?comment=130056552667&page=1#comments
https://greenfoods.com/blogs/news/watermelon-beet-smoothie?comment=130083029155#comments
https://fezsalon.com.au/blogs/news/were-back?comment=127851102289#comments
https://westafdesign.com/blogs/blog/vetements-soldes-westaf-ete-mode-afrique-quebec?comment=126625513520#comments
https://www.silicagelly.com/blogs/updates/selamat-hari-raya-2022?comment=130070020166#comments
https://www.shopsocialthreads.com/blogs/news/the-best-jean-shorts?comment=128744980562#comments
https://il.gojapan.net/blogs/blog/article-1?comment=130295660627#comments
https://aquavida.com/blogs/blog/who-is-greta-besides-our-new-hero?comment=131827204184#comments
https://doddleandco.com/blogs/parenting/big-news-for-littles-introducing-the-pop-go?comment=125178478615#comments
https://eqclusive.com/blogs/news/cross-country-techniques-teaching-your-horse-to-jump-narrow-fences-blog-by-ella-vincent?comment=129154613303#comments
https://nickhorey.com/blogs/news/10-types-of-earrings-every-woman-should-have?comment=131726934242#comments
https://heyleeb.com/blogs/blog/14302509-what-in-the-world-is-a-nikibiki?comment=124880257174#comments
https://tinyrabbithole.com/blogs/news-1/pink-octopus-legend-of-the-blue-sea?comment=130790031579#comments
https://www.booketybookbooks.co.nz/blogs/reviews/the-vanishing-half-by-brit-bennett?comment=129154580535#comments
https://collectiverequest.com/blogs/blog/11413205-way-to-go-lookbook?comment=129154547767#Comments
https://hairnparis.com/blogs/news/diy-extension-dying-at-home?comment=127933448234#comments
https://www.lifeintheadk.com/blogs/life-in-the-adks-blog/life-in-the-adk-fall?comment=128497156145#comments
https://www.hometechexperts.ca/blogs/hd-antenna-blogs/how-to-connect-bell-satellite-dish-lnbs-to-the-receiver?comment=135095746662#comments
https://www.aratherat.com/blogs/home-page/the-story-of-arthur-edmund-carew?comment=130823815427#comments
https://danacavalea.com/blogs/train-like-a-pro/testing-athletes-to-prevent-injuries?comment=127120015544#comments
https://www.jetempire.com.au/blogs/news/12967677-new-look-website?comment=130215837888#comments
https://jodidee.com/blogs/news/official-announcement-new-titles-2023?comment=128998178915#comments
https://kibblewatches.co.uk/blogs/news/the-man-with-the-red-book-of-secret-nato-codes-his-tudor?comment=134206062898#comments
https://cebebelgica.es/es_ES/blog/38/la-brillante-batalla-contra-las-superbacterias.html
https://milkandhoney.com/blogs/news/zoe-kravitz-routine?comment=127788417215#comments
https://www.amphibianking.ie/blogs/training-ffor-brecca-swim-8k-run42k-and-ironman-barcelona/its-back-breaking-20-minutes-for-5k?comment=135948271945#comments
https://www.dutzishop.com/blogs/news/15073441-feliz-dia-international-del-los-pueblos-indigenas?comment=131224338530#comments
https://s8tattoo.com/blogs/stencil-science/120981953-the-stencil-thermographic-printers?comment=131956965575#comments
https://mysso.mx/blogs/starters/crab-stack?comment=126789320891#comments
https://swannies.co/blogs/digest/3-ways-to-make-your-next-round-the-best-round?comment=131056664849#comments
https://www.tomsonelectronics.com/blogs/news/arduino-uno-specification?comment=130510618862#comments
https://www.upfulblends.com/blogs/conscious-mind-alkaline-body/fever-few?comment=127119982776#comments
https://www.wilkinswalk.com/blogs/blogger/nike-air-vapormax?comment=130515927204#comments
https://lunarangellashes.com/blogs/lash-care/eye-shape?comment=127923257498#comments
https://hiendguitar.com/blogs/hiendguitar-blog/prs-doubleneck-specced-by-hiendguitar-due-october?comment=131429007427#comments
https://www.onetinytribe.com/blogs/news/christmas-15-stylish-advent-calendar-ideas-you-can-totally-diy?comment=127340052663#comments
https://www.sassiswimwear.com/blogs/news/sassis-top-10-fashion-films?comment=130999418951#comments
https://www.utzmarket.com/blogs/musings/guatemala-is-our-muse?comment=126784700588#comments
https://digclothingco.com/blogs/dig-dispatch/riding-solo-with-ptd-s-vp-of-operations-clayton-woodruff?comment=130037186746#comments
https://savonsdesiles.com/fr/blogs/every-soap-has-a-story/a-soap-making-class-for-kids?comment=125824368836#comments
https://banudesigns.com/blogs/ethnicfashion/modern-approach-to-indian-ethnic-wear-fashion-fusion?comment=134732447849#comments
https://www.melissaborrell.com/blogs/glitterandglue/art-heroes-at-mass-moca?comment=128998146147#comments
https://gotductless.com/blogs/comparisons/ductless-vs-central-air?comment=131410034904#comments
https://shoptangiebaxter.com/blogs/news/the-lily-pad-dsd-celebration-blog-hop?comment=125847732424#comments
https://www.watsonandlou.com/blogs/news/small-comforts?comment=138078388287#comments
https://www.phomi.com.sg/blogs/news/phomi-mcm-modified-clay-material?comment=125178445847#comments
https://theunchartedstudio.com/blogs/uncharted-goods/herewith-magazine-puerto-rico-unfiltered?comment=133644419356#comments
https://sammysoap.com/blogs/press/kim-hudson-ktvi-fox-news?comment=133062459570#comments
https://www.sportstakeoff.com/blogs/look-at-this/vlog-2-i-am-not-a-model-deante-battle?comment=135811531091#comments
https://www.anchoredpress.com/blogs/news/anchored52-the-heart-of-teresa-swanstrom-anderson?comment=129814659157#comments
https://www.gardensundials.com/blogs/news/antique-wood-plinths-for-sundials?comment=131717529689#comments
http://www.chaiwithpabrai.com/blog/qa-session-with-students-at-the-university-of-oxford-october-19-2021
https://trulygarden.com/blogs/truly-garden-blog/setting-up-a-backyard-fruit-tree-irrigation-system?comment=122067714218#comments
https://www.zoumzoumparty.ca/blogs/karen-kids-party/kids-party-places-vancouver-gv?comment=131352133847#comments
https://www.restaurantpm.com/fr/blogs/news/5-cash-coupon-ann308eyym4k-for-every-new-customer?comment=137405300823#comments
https://birdling.com/blogs/notes-from-the-nest/the-circle-bag?comment=133945753878#comments
https://raw-me.com/blogs/news/post-holiday-reset?comment=131717464153#comments
https://www.allthebabies.co/blogs/news/mom-to-mom-with-rebekah?comment=131848765680#comments
https://www.dazeyla.com/blogs/danidazey/dazey-lady-feature-mama-caxx?comment=130773123299#comments
https://aria-v.com/blogs/news/75793285-a-decade-of-style-and-fashion-divine-boutique?comment=136236040530#comments
https://www.madaboutpatchwork.com/blogs/news/79188545-november-newsletter?comment=135095681126#comments
https://aukey.com.my/blogs/news/most-useful-7-features-to-look-for-in-workout-earbuds?comment=134014796097#comments
https://www.bunheadwithducttape.com/blog/interactive-mobile-steam-and-literacy-kits
https://appletonpackinggasket.com/blogs/news/tips-tricks-to-clean-and-organize-your-life-and-desk?comment=134370295885#comments
https://milohshop.com/blogs/news/the-story-of-miloh?comment=130510651630#comments
https://www.unoa.co.uk/blogs/news/a-cozy-autumn-with-an-eco-wardrobe?comment=124989112366#comments
https://nauticurl.com/blogs/best-wakesurfing-products-wake-shaper-wakesurf-boards-fatsacs-best-reviews/2021-nauticurl-apparel-now-in-stock?comment=130823979102#comments
https://www.homadic.com/blogs/news/delegates-of-german-federal-ministry-of-environment-visit?comment=135917666636#comments
https://www.savvysleepers.com/blogs/the-benefits-of-satin/what-to-do-if-you-ruined-your-silk-pillowcase-live-with-it-or-replace-it?comment=124989145134#comments
https://www.ldwest.com/blogs/news/the-style-series-how-to-look-your-best-this-semester?comment=130065858726#comments
https://www.noreciperequired.com/technique/how-clean-shitake-mushrooms#comment-348621
https://www.dirtywknd.com/blogs/news/dirty-wknd-does-the-vatternrundan-cycling-challenge?comment=131429072963#comments
https://rednecklipstick.com/blogs/blog-recipes/bbq-that-food-truck-in-that-recipe-for-bbq-lobster-roll?comment=128544571561#comments
https://alamarcosmetics.com/blogs/as-seen-on/karol-g?comment=128147357771#comments
https://woodleon.com/blogs/blog/what-swag-employees-want?comment=130549154012#comments
https://neofilmshop.com/blogs/news/film-review-ready-o-r-knot-2021-hong-kong?comment=133727256874#comments
https://flopz.com/blogs/news/14497525-rock-n-horsepower?comment=127198265525#comments
https://northlandvapor.com/blogs/northland-vapor-news/new-delhi-still-trying-to-vape?comment=134722748736#comments
https://www.caulicure.com/blogs/lend-me-your-ear/over-the-counter-magnets-for-cauliflower-ear-too-good-to-be-true-and-dangerous-too?comment=133714313496#comments
https://kittensandkink.com/blogs/news/kitten-play-101-frequently-asked-questions?comment=134803325195#comments
https://www.topknotgirl.com.au/blogs/news/kmart-cubby-hack?comment=127786352822#comments
https://thenashvilleguide.com/blogs/news/2021-nashville-holiday-gift-guide?comment=134338150699#comments
https://www.theprettycult.com/blogs/news/international-womens-day-true-violet?comment=135454753062#comments
https://doddleandco.com/blogs/parenting/big-news-for-littles-introducing-the-pop-go?comment=125178544151#comments
https://ca.gleener.com/blogs/news/3-ways-dryer-dots-make-laundry-day-a-breeze?comment=128765263930#comments
https://theunchartedstudio.com/blogs/uncharted-goods/12161241-good-morning-stingray?comment=133644452124#comments
https://jodidee.com/blogs/news/official-announcement-new-titles-2023?comment=128998277219#comments
https://nicolezizistudio.com/blogs/news/ukurant-objects-exhibition-features-squishy-chair-made-from-bio-foam?comment=119392370819#comments
https://backyardsafarico.com/blogs/news/12445993-little-bunny-heirloom-vegetable-seed-garden-for-kids-in-action?comment=125486399659#comments
https://www.fdmarketplace.com/blogs/news/9585619-the-return-address-label-album-for-the-holidays?comment=130113667284#comments
https://www.utzmarket.com/blogs/musings/guatemala-is-our-muse?comment=126784733356#comments
https://www.lifeintheadk.com/blogs/life-in-the-adks-blog/life-in-the-adk-fall?comment=128497188913#comments
https://www.wilkinswalk.com/blogs/blogger/game-of-thrones-x-adidas-ultra-boost-house-targaryen-dragons?comment=130516058276#comments
https://iccwbo.uk/blogs/news/brexit-begins-some-post-election-takeaways?comment=131101524220#comments
https://gotductless.com/blogs/comparisons/ductless-vs-central-air?comment=131410133208#comments
https://themodushop.com/blogs/news/thanksgiving-week-sale?comment=134315573585#comments
https://cebebelgica.es/es_ES/blog/38/la-brillante-batalla-contra-las-superbacterias.html
https://sewkindofwonderful.com/blogs/news/16411523-blog-hop-day-9-and-the-curve-it-up-challenge-qal?comment=133129273587#comments
https://miwhitetailpursuit.com/blogs/news/15116581-8-reasons-why-northern-michigan-has-better-hunting-than-iowa?comment=126155686085#comments
https://harkandhammer.com/blogs/news/behind-the-scenes-pajama-dressing-with-hark-hammer-by-jackie-miranne?comment=137405530199#comments
https://sifrsite.com/blogs/sincerely-sifr/9275523-close-to-home?comment=133062820018#comments
https://shop.interiorstoinspire.com/blogs/how-to/how-to-apply-a-furniture-transfer?comment=131168600288#comments
https://radiateportablecampfire.com/blogs/beyond-the-campfire/fun-ways-to-soak-up-the-last-of-summer?comment=131203334391#comments
https://tournaments.spikeball.com/blogs/the-rally/sra-2019-postseason-team-rankings?comment=129543143600#comments
https://www.radiancestl.com/blogs/news/november-specials?comment=130876604569#comments
https://appletonpackinggasket.com/blogs/news/tips-tricks-to-clean-and-organize-your-life-and-desk?comment=134371115085#comments
https://physiclo.com/blogs/news/draft?comment=134371082317#comments
https://selbornepottery.co.uk/blogs/news/back-in-the-studio-for-lockdown?comment=130141192303#comments
https://www.macshop.com.sg/blogs/news/matias-apple-like-keyboards?comment=130999517255#comments
https://www.smallscalesseafood.com/blogs/news/yummy-halibut-salmon-coming?comment=127198298293#comments
https://thismodernlife.co.uk/blogs/news/15060105-sammuel-and-dixies-new-room-part-1-the-house-bed?comment=132479484150#comments
https://www.ultratribe.com/blogs/news/5-levels-of-psychedelic-experience?comment=130924806399#comments
https://www.hockeypaws.com/blogs/hockey-paws-whats-new/wbl-sports-center-grand-opening?comment=130218557543#comments
https://www.rabbitholeroasters.com/blogs/rhr-articles/a-discussion-with-korie-pickett?comment=127786418358#comments
https://www.jetempire.com.au/blogs/news/12967677-new-look-website?comment=130215903424#comments
https://measinasamoa.com.au/blogs/news/teach-your-child-to-siva-samoa?comment=130295824467#comments
https://qswimwear.com/blogs/the-q-swim-blog/welcome?comment=130319384811#comments
https://cupofte.com/blogs/news/how-much-caffeine-is-in-a-cup-of-tea?comment=130838921429#comments
https://battlebars.com/blogs/news/21-jan-sitrep-the-year-in-reflection?comment=131726999778#comments
https://nubanbeauty.com/blogs/blog-post/80712641-first-post?comment=128862945473#comments
https://milohshop.com/blogs/news/the-story-of-miloh?comment=130510749934#comments
https://tagzfoods.com/blogs/news/the-law-of-attraction?comment=131848896752#comments
https://www.drdougs.com/en-ph/blogs/news/how-can-dr-dougs-help-your-eczema?comment=131717627993#comments
https://s8tattoo.com/blogs/stencil-science/stencil-science-the-s8-stencil-printer?comment=131956998343#comments
https://www.revitasize.ca/blogs/juicy-lifestyle-blog/the-breakfast-guide-4-quick-easy-vegan-breakfasts?comment=124106997796#comments
https://covenandco.com/blogs/news/dried-pineapple-flowers?comment=122067779754#comments
https://campingwithdogs.com/blogs/news/how-to-safely-trick-or-treat-with-your-dog-on-halloween?comment=125486366891#comments
https://www.bayride.co.nz/blogs/news/altherm-jcr-yamaha-road-racing-teams-capitalise-on-getting-some-grid-time?comment=134137970975#comments
https://rubylondon.com/blogs/news/denim-makes-the-people-come-together?comment=125509271741#comments
https://stylealertsa.com/blogs/news/win-this-valentines-day?comment=127851167825#comments
https://artstandardtime.com/blogs/art/galerie-perrotin-seoul-exhibits-josh-sperlings-two-purple-tigers?comment=129674575933#comments
https://earthsidefarms.com/blogs/recipes/keto-reuben-wraps?comment=134641025329#comments
https://minimalwastegrocery.com/blogs/minim-blog/zero-waste-hair-care-to-poo-or-not-to-poo?comment=135917601115#comments
https://www.pinkfreshstudio.com/blogs/scrapbook-blog/paper-collection-reveal-keeping-it-real-giveaway?comment=131038838958#comments
https://hourloop.com/blogs/news/skating-on-thin-ice-from-the-snow-queen-to-frozen?comment=128765198394#comments
https://nominalx.com/blogs/meaningful-accessories/the-5-best-islamic-arabic-gifts-for-a-friend?comment=126789419195#comments
https://www.iimo-us.com/blogs/wing/some-amazing-benefits-of-tricycle-for-childs-development-that-you-may-not-know?comment=130937913517#comments
https://www.vaanandco.com/blogs/pioneers-in-upcycled-hand-patched-products/upcycled-leather-shop-where-no-two-bags-are-alike?comment=133945721120#comments
https://www.amphibianking.ie/blogs/training-ffor-brecca-swim-8k-run42k-and-ironman-barcelona/failed-attempt-20-50?comment=135948304713#comments
https://onechewthree.com.au/blogs/news/mother-s-day-fave-classic-waffles?comment=135564755248#comments
https://eloments.com/blogs/explore/the-journey?comment=130083127459#comments
https://bluebasket.com/en-id/blogs/bluebasket-magazine/christmas-gift-ideas-for-family-loved-ones?comment=132940628202#comments
https://bayandbox.com/blogs/blog/150396743-your-free-gift-nasturtium-cherry-rose?comment=130295791699#comments
https://trulygarden.com/blogs/truly-garden-blog/strawberry-propagation-rejuvenating-and-expanding-your-strawberry-plants?comment=122067746986#comments
https://www.reagansanai.com/blogs/news/the-difference-between-breakage-and-shedding?comment=130838888661#comments
https://www.7cellars.com/blogs/7cellars/smashed-fingerling-potatoes-with-cotija-cheese?comment=130510717166#comments
https://kreamkimchi.com/blogs/recipes/the-best-easiest-korean-bbq-marinade-you-will-thank-me-after?comment=131885957364#comments
https://www.allthebabies.co/blogs/news/mom-to-mom-with-jen?comment=131848831216#comments
https://getgrowfit.in/blogs/grow-fit-blog/diet-best-practices-for-shredding-burning-fat-gaining-muscle?comment=131563520300#comments
https://bjornhall.com/blogs/nurse-jenny/charm-rings-unboxing?comment=131717595225#comments
https://www.elevatecoffee.com/blogs/elevate-coffee-blog/5-ways-to-brew-coffee-at-home?comment=131827302488#comments
https://www.noblemono.com/blogs/news/noblemono-x-cutts?comment=131668246684#comments
https://www.blackartgraphics.com/blogs/news/engineered-art-motion-graphics?comment=128862912705#comments
https://www.couturekingdom.com/blogs/news/getting-to-know-keshia-sih-tseng?comment=133817205052#comments
https://www.sskinaus.com/blogs/news/7-tips-for-a-healthy-complexion-from-a-skin-expert?comment=125486334123#comments
https://missiohair.com/blogs/categories/reflection-on-2020-inspired-by-resilience?comment=131352166615#comments
https://greenfoods.com/blogs/news/green-magma-green-apple-smoothie?comment=130083094691#comments
https://www.treelyfe.com/blogs/real-lyfe-love-stories/i-will-be-there-to-pick-her-back-up-and-embrace-her-as-she-has-done-with-me?comment=126789386427#comments
https://www.littlegreenpouch.com/blogs/recipes/14662057-avocado-pear-smoothie?comment=124107030564#comments
https://www.coveredgoods.com/blogs/news/real-moms-share-the-sweetest-things-their-kids-have-ever-said?comment=134686179611#comments
https://orr.is/blogs/orrbyorr/edward-scissorhands?comment=129752072289#comments
https://bonkfit.com/blogs/bonk-fit-custom-punching-bags-fitness-for-kids-and-adults/86291908-how-to-love-your-military-parent-overseas?comment=133782831401#comments
https://intl.thekitchensafe.com/blogs/news/are-you-a-shark-tank-fan-check-out-these-other-great-products-that-were-featured-on-shark-tank?comment=125847765192#comments
https://www.booketybookbooks.co.nz/blogs/reviews/careless-by-kirsty-capes?comment=129154809911#comments
https://ariahomedecor.ca/blogs/news/fluff-your-pampas?comment=127851200593#comments
https://www.vintagegrooming.com/blogs/grooming-articles-and-tutorials/when-to-use-mustache-wax-for-the-first-time?comment=134230933786#comments
https://www.restaurantpm.com/fr/blogs/news/5-cash-coupon-0n2maezpzcbf-for-feb-2022-every-new-customer?comment=137405595735#comments
https://lesoleildusud.com/blogs/nouvelles/le-soleil-au-passage-dans-l-emission-dans-l-oeil-du-dragon?comment=127120277688#comments
https://www.dutzishop.com/blogs/news/15073441-feliz-dia-international-del-los-pueblos-indigenas?comment=131224436834#comments
https://www.mkulimayoung.com/blog/53/thumbs-up-for-youth-fishing-cash-from-ponds
https://www.shopsocialthreads.com/blogs/news/the-best-jean-shorts?comment=128745078866#comments
https://www.tonic-cheltenham.com/blogs/news/17th-january-2021-this-weeks-self-care-sunday?comment=130729246877#comments
https://www.topknotgirl.com.au/blogs/news/kmart-cubby-hack?comment=127786483894#comments
https://www.aimeeshoes.com/blogs/news/74720963-el-sabor-no-ocupa-lugar?comment=134435537240#comments
https://fezsalon.com.au/blogs/news/were-back?comment=127851233361#comments
https://jordandene.com/blogs/thesartorialgeek/talk-nerdy-to-me-5-favorite-late-to-the-game-tv-discoveries?comment=130684616941#comments
https://gnarwalls.com/blogs/news/snowbasin-announces-new-bavarian-fall-festival-snowwiesn?comment=134804799784#comments
https://www.rockcityoutfitters.com/blogs/news/beaker-street-cancer-fundraiser?comment=130498822367#comments
https://vinoparaprincipiantes.com/blogs/podcast/episodio-60-fraudes-en-el-mundo-del-vino?comment=135096074342#comments
https://socksoho.com/blogs/news/silicon-valley-tech-entrepreneur-socks?comment=134075482405#comments
https://ballparkblueprints.com/blogs/news/ballpark-profile-nationals-park-1?comment=132479582454#comments
https://www.stockandbarrelco.com/blogs/s-b-blog/making-an-eastwood-leather-cowboy-fast-draw-holster-and-belt-diy-video?comment=130070118470#comments
https://chicletzipline.com/blogs/news/manuel-antonio-costa-rica?comment=133782864169#comments
https://sahirajewelrydesign.com/blogs/sahiras-blog/necklace-layering-1-2-3?comment=127786516662#comments
https://www.mydachshundonline.com.au/index.php?route=pavblog/blog&id=65
https://www.sovol3d.com/blogs/news/3d-printed-valentines-day-gifts-in-2022-stl-file-included?comment=133661688117#comments
https://maivino.com/blogs/maivinopours/game-of-thrones-drinking-eating-guide?comment=130510782702#comments
https://burnsandmccoy.com/blogs/recipes/pineapple-breakfast-bowl-with-mango-habanero?comment=127872467010#comments
https://www.highhazelsacademy.org.uk/parents-and-community/parental-engagement/photo-gallery/emodule/954/eitem/287
https://moderncraftwine.com/blogs/news/this-is-us-1?comment=138078617663#comments
https://collectiverequest.com/blogs/blog/whats-your-shoe-personality?comment=129154908215#Comments
https://www.dotandlil.com/blogs/blog/87305284-were-sharing-on-snapchat-on-partage-sur-snapchat?comment=133679939863#comments
https://tzlifestyle.com/blogs/news/do-your-sunglasses-float-polarized-floating-sunglasses-are-here?comment=122218545186#comments
https://vincita.cc/blogs/news/personalize-your-bag?comment=131041394862#comments
https://missiohair.com/blogs/categories/reflection-on-2020-inspired-by-resilience?comment=131353280727#comments
https://hourloop.com/blogs/news/just-keep-swimming?comment=128780763194#comments
https://isabellacoutureshop.com/blogs/news/kyalas-parisian-fairytale?comment=127198625973#Comments
https://www.ceoemporium.com/blogs/news/spotted-tula-ring-slings-in-yan-ang-morning?comment=131432710211#comments
https://www.treelyfe.com/blogs/real-lyfe-love-stories/in-short-we-had-an-amazing-love-story?comment=126791614651#comments
https://www.goldrushnuggetbucket.com/blogs/press/117144581-shark-tank-entrepreneur-goes-beyond-the-tank-consults-with-robert-herjavec-for-hiring-key-digital-role?comment=126718312642#comments
https://www.donnasrecipe.com/blogs/donnas-blog/how-to-plop-natural-hair?comment=127160418479#comments
https://adricewines.wine/blogs/news/our-first-blog-post?comment=133872353557#comments
https://www.noreciperequired.com/recipe/carrot-puree?page=16#comment-348727
https://wheretonext.ph/blogs/stories/iceland?comment=130649194738#comments
https://earthsidefarms.com/blogs/recipes/keto-cheesy-chorizo-puffs?comment=134643155249#comments
https://www.zentesi.com/blogs/news/choosing-good-laminating-pouches-is-the-key-to-great-results?comment=127788056758#Comments
https://www.tubeclamp.com.au/blogs/news/guide-to-diy-tables?comment=134172672301#comments
https://momentum-boards.com/blogs/news/hollow-wheel-manufacturing-shipping-update-18?comment=127788089526#comments
https://tagzfoods.com/blogs/news/the-law-of-attraction?comment=131850567920#comments
https://eqclusive.com/blogs/news/palomino-and-dun-horses-review-of-eqclusive-grey-pack?comment=129157398583#comments
https://www.sskinaus.com/blogs/news/beauty-favourite-for-the-month-1?comment=125487448235#comments
https://www.vaanandco.com/blogs/pioneers-in-upcycled-hand-patched-products/upcycled-leather-shop-where-no-two-bags-are-alike?comment=133945917728#comments
https://susuaccessories.com/blogs/the-susu-gal-blog/my-interest-in-sustainable-fashion?comment=131652976795#comments
https://jinmee.co.uk/blogs/news/hydrapuff-your-skincare-soulmate-is-here?comment=133159026739#comments
https://doddleandco.com/blogs/parenting/pacifier-weaning-what-works-four-moms-share-real-stories?comment=125179822103#comments
https://banudesigns.com/blogs/ethnicfashion/different-ways-to-style-drape-a-pagdi-mens-turban?comment=134752960617#comments
https://gibsgrooming.com/blogs/blog/four-must-follows-for-the-perfect-fade?comment=122068304042#comments
https://anewall.com/blogs/anewall/office-bathroom-reno?comment=133945950496#comments
https://www.latitudejewellers.com.au/blogs/news/cooking-with-pia-my-steaka-recipe?comment=130790555867#comments
https://munkyking.com/blogs/grief-encounters/production-update-006-grief-and-boarding?comment=126595989622#comments
https://rubylondon.com/blogs/news/denim-makes-the-people-come-together?comment=125509763261#comments
https://wildcraftbrewery.co.uk/blogs/recipes/wild-spiced-quesadilla?comment=127788122294#comments
https://bjornhall.com/blogs/nurse-jenny/charm-rings-unboxing?comment=131719004249#comments
https://www.sportstakeoff.com/blogs/look-at-this/quarantine-football-drills-at-home-trainings?comment=135812415827#comments
https://www.drdougs.com/blogs/news/how-can-dr-dougs-help-your-eczema?comment=131719037017#comments
https://www.smallscalesseafood.com/blogs/news/waiting-to-launch?comment=127198658741#comments
https://cupofte.com/blogs/news/how-much-caffeine-is-in-a-cup-of-tea?comment=130839773397#comments
https://covenandco.com/blogs/news/interview-eilish-byrne-eilishbyrne?comment=122068336810#comments
https://mihamade.com/blogs/stories/oaxaca-travel-guide_pt1?comment=130602270938#comments
https://aukey.com.my/blogs/news/most-useful-7-features-to-look-for-in-workout-earbuds?comment=134015287617#comments
https://gardenersorchardandbakery.com/blogs/news/is-a-saw-dust-wood-stove-the-best-stove-for-our-greenhouse?comment=122845593645#comments
https://www.7cellars.com/blogs/7cellars/smashed-fingerling-potatoes-with-cotija-cheese?comment=130512683246#comments
https://www.ghanzibrand.com/blogs/news-1/offshoot-project-with-remi-fargier?comment=135719125327#comments
https://bamboozleroom.com/blogs/bamboozle-sydney/what-is-burlesque?comment=129157431351#comments
https://fluffpetcare.com/blogs/blog/the-a-w-beyond-burger-everything-you-need-to-know?comment=133090509051#comments
https://thismodernlife.co.uk/blogs/news/15127309-sammuel-and-dixies-new-playroom?comment=132482498806#comments
https://bottleofwellness.com/blogs/news/twilight-dec-2017?comment=128989200543#comments
https://www.jetempire.com.au/blogs/news/12967677-new-look-website?comment=130217705664#comments
https://sarahthursday.co/blogs/collaborations/zeal-hikarin-x-sarah-thursday?comment=130301296749#comments
https://www.sovol3d.com/blogs/news/sovol-3dprint-week-giveaway-2022?comment=133662834997#comments
https://resoluteboutique.com/blogs/alaska-travel/lake-swimming-in-alaska?comment=130636251384#comments
https://www.phomi.com.sg/blogs/news/phomi-mcm-modified-clay-material?comment=125179854871#comments
https://trenaryhomebakery.com/blogs/history-series/stand-out-this-holiday-season-with-trenary-home-bakery?comment=127160484015#comments
https://collectiverequest.com/blogs/blog/whats-your-shoe-personality?comment=129157464119#Comments
https://www.mygardenspade.com/blogs/blog/winter-sounds-in-the-garden?comment=127122571448#comments
https://milohshop.com/blogs/news/the-story-of-miloh?comment=130512716014#comments
https://theloeil.com/blogs/press/15240785-bloggerspotted-sain-lim-wearing-our-lavender-strapless-jumpsuit?comment=128069959841#comments
https://tournaments.spikeball.com/blogs/the-rally/2019-sra-top-40-players?comment=129545797808#comments
https://www.dirtywknd.com/blogs/news/a-beginners-guide-to-getting-into-bike-racing?comment=131432742979#comments
https://theunchartedstudio.com/blogs/uncharted-goods/herewith-magazine-puerto-rico-unfiltered?comment=133644648732#comments
https://www.wilkinswalk.com/blogs/blogger/nike-air-max-98-pastel?comment=130518155428#comments
https://eyeart.com.au/blogs/eye-art-studio-the-blog/what-is-eyebrow-microblading-tattoo?comment=131671654556#comments
https://www.thewkndhairsalon.com/blogs/mens-hair/best-hairstyles-for-round-faces-for-men?comment=131432808515#comments
https://www.delhipoetryslam.com/blogs/magazine/khuli-tijoris-jab-we-met-and-a-history-of-gendered-violence?comment=130221703271#comments
https://burnbear.com/blogs/journal/the-right-and-wrong-way-to-burn-your-candle?comment=134121488665#comments
https://timelyandtimeless.com/blogs/blog/cuckoo-clocks-for-young-and-old?comment=135454884151#comments
https://selbornepottery.co.uk/blogs/news/back-in-the-studio-for-lockdown?comment=130141323375#comments
https://www.bysamantha.net/blogs/news/2018-women-of-strength-qtr1-selina-mcgarrigle?comment=137408806999#comments
https://miwhitetailpursuit.com/blogs/news/15116581-8-reasons-why-northern-michigan-has-better-hunting-than-iowa?comment=126156701893#comments
https://www.shopsocialthreads.com/blogs/news/interview-with-the-mom-edit?comment=128746487890#comments
https://cebebelgica.es/es_ES/blog/38/la-brillante-batalla-contra-las-superbacterias.html
https://livbody.com/blogs/articles/bcaa-benefits-and-reasons-why-they-maximize-muscle-growth-and-prevent-muscle-breakdown?comment=120601772089#comments
https://gotductless.com/blogs/comparisons/fujitsu-vs-mitsubishi-mini-splits?comment=131410886872#comments
https://www.rockcityoutfitters.com/blogs/news/we-support-small-businesses-because-we-drink-local?comment=130499117279#comments
https://heyleeb.com/blogs/blog/weve-been-nominated?comment=124880683158#comments
https://tatik.ca/blogs/news/directory-of-armenian-businesses?comment=129966112982#comments
https://burnsandmccoy.com/blogs/recipes/vanilla-donuts-with-mango-habanero-glaze?comment=127873318978#comments
https://mkulimayoung.com/market/13596/maize
https://appletonpackinggasket.com/blogs/news/tips-tricks-to-clean-and-organize-your-life-and-desk?comment=134373539917#comments
https://chairloom.com/blogs/the-repeat/chairloom-x-ellen-forbes-burnie?comment=128746520658#comments
https://backyardsafarico.com/blogs/news/8484257-black-swallowtail-butterflies-and-fennel?comment=125487513771#comments
https://www.fdmarketplace.com/blogs/news/8027797-welcome-to-fd-marketplace-the-felix-doolittle-wholesale-store?comment=130114060500#comments
https://www.dropbottle.com/blogs/recipes/drop-bottle-for-your-practice?comment=131225944162#comments
https://harkandhammer.com/blogs/news/behind-the-scenes-pajama-dressing-with-hark-hammer-by-jackie-miranne?comment=137408872535#comments
https://path2inspiration.com/blogs/news/is-meditation-better-than-sex?comment=121309921417#comments
https://namatease.com/blogs/news/select-nama-tease-t-shirts-now-available-exclusively-at-beer-komachi-kyoto?comment=128069992609#comments
https://s8tattoo.com/blogs/stencil-science/stencil-science-surfactants?comment=131958898887#comments
https://sewkindofwonderful.com/blogs/news/natalie-barns-hand-maker-fabric-blog-tour-giveaway?comment=133134188787#comments
https://www.eplerhealth.com/blogs/epler-health/6059880-5-steps-to-portion-control?comment=131719135321#comments
https://orr.is/blogs/orrbyorr/orr-by-orr-blog-blog?comment=129753088097#comments
https://www.pureboardshop.com/blogs/pure-boardshop/nike-sb-mummy-dunk-low-release-info?comment=133159256115#comments
https://naattumarundhukadai.com/blogs/news/head-lice-remedy-with-homeopathy?comment=131317301506#comments
https://deskrelawanpb.bnpb.go.id/gempa-jatim/reports/view/333
https://stylealertsa.com/blogs/news/thuli-mola-on-why-she-is-focusing-on-women-clothing?comment=127851462737#comments
https://backyardsafarico.com/blogs/news/summertime-and-the-livings-easy-in-your-own-backyard?comment=125487546539#comments
https://www.infmetry.com/blogs/cool-stuffs/build-your-own-birdhouse-for-your-backyard-birding-hobby?comment=124107292708#comments
https://www.simplysavorybyrachel.com/blogs/news/creamy-garlic-chicken?comment=128746717266#comments
https://www.noreciperequired.com/technique/10-steps-perfect-pork-chop?page=21#comment-348728
https://greenfoods.com/blogs/news/the-benefits-and-side-effects-of-matcha-green-tea?comment=130085159075#comments
https://bomondvodka.com/blogs/cocktails/bomond-boss-old-fashion?comment=126385914041#comments
https://hourloop.com/blogs/news/30963009-the-jim-shore-phenomenon?comment=128780927034#comments
https://doddleandco.com/blogs/parenting/bobbi-browns-self-care-advice-for-mamas?comment=125179953175#comments
https://tagzfoods.com/blogs/news/tagz-why?comment=131850600688#comments
https://sofragrance.com/blogs/news/so-sorry-not-sorry-girls-night-in?comment=130790588635#comments
https://www.booketybookbooks.co.nz/blogs/reviews/outraged-by-ashely-dotty-charles?comment=129157660727#comments
https://givehersix.com/blogs/blog/60362501-welcome-to-give-her-six?comment=129568636981#comments
https://stylealertsa.com/blogs/news/win-this-valentines-day?comment=127851495505#comments
https://www.smallscalesseafood.com/blogs/news/boat-miracle?comment=127198691509#comments
https://rubylondon.com/blogs/news/denim-makes-the-people-come-together?comment=125509796029#comments
https://susuaccessories.com/blogs/the-susu-gal-blog/wayuu-mochila-the-only-handbag-youll-ever-need?comment=131653075099#comments
https://www.ghanzibrand.com/blogs/news-1/offshoot-project-with-remi-fargier?comment=135719158095#comments
https://thismodernlife.co.uk/blogs/news/15060105-sammuel-and-dixies-new-room-part-1-the-house-bed?comment=132482662646#comments
https://adilsons.org/blogs/anime/top-10-strongest-black-clover-characters?comment=133759009053#comments
https://milohshop.com/blogs/news/the-story-of-miloh?comment=130512748782#comments
https://tournaments.spikeball.com/blogs/the-rally/sra-2019-postseason-team-rankings?comment=129545896112#comments
https://cupofte.com/blogs/news/how-much-caffeine-is-in-a-cup-of-tea?comment=130839838933#comments
https://theloeil.com/blogs/press/15240785-bloggerspotted-sain-lim-wearing-our-lavender-strapless-jumpsuit?comment=128070025377#comments
https://jodidee.com/blogs/news/official-announcement-new-titles-2023?comment=128998801507#comments
https://zurbanoshoes.com/blogs/news/zurbano-shoes-in-polish-tv-program-pytanie-na-sniadanie?comment=134961168727#comments
https://www.eggpress.com/blogs/news/new-designs-are-here?comment=129497432222#comments
https://intl.thekitchensafe.com/blogs/news/are-you-a-shark-tank-fan-check-out-these-other-great-products-that-were-featured-on-shark-tank?comment=125848223944#comments
https://mysso.mx/blogs/starters/ahi-tuna-poke?comment=126791778491#comments
https://www.homadic.com/blogs/news/delegates-of-german-federal-ministry-of-environment-visit?comment=135918846284#comments
https://www.jetempire.com.au/blogs/news/jet-empire-jewellery-gifts?comment=130217738432#comments
https://hatimsings.com/home/blog/6172560/demo-program-win
https://pigafurniture.com/blogs/news/el-classic-blue-es-el-color-del-ano-incluyelo-en-tu-decoracion-con-estos-tips?comment=137408905303#comments
https://www.shearcraft.com/blogs/news/fringe-benefits?comment=130137620734#comments
https://www.sovol3d.com/blogs/news/3d-printed-valentines-day-gifts-in-2022-stl-file-included?comment=133662867765#comments
https://www.earlyvention.com/blogs/news/oh-glorious-painter-s-tape?comment=131958964423#comments
https://physiclo.com/blogs/news/o-d-workout-1-quick-leg-day-circuit-workout-with-physiclo?comment=134373703757#comments
https://www.midorilinea.com/blogs/midori-linea/midori-linea-trunk-show-event-at-bloomingdales-in-short-hills-nj?comment=130923659513#comments
https://westafdesign.com/blogs/blog/vetements-soldes-westaf-ete-mode-afrique-quebec?comment=126625873968#comments
https://drewpetersonmusic.com/blogs/introduction/posts/5527256/herowall-chief-joseph
https://www.tonic-cheltenham.com/blogs/news/17th-january-2021-this-weeks-self-care-sunday?comment=130730492061#comments
https://www.wilkinswalk.com/blogs/blogger/nike-air-vapormax?comment=130518286500#comments
https://cultofindividuality.com/blogs/celebrities/jack-lawless-of-dnce-shimuchan-crew-neck-tee-in-mold?comment=126596055158#comments
https://www.iridescentglassdesign.co.uk/blogs/news/tiz-the-season?comment=130085191843#comments
https://gemkart.com/blogs/news/bangkok-the-epicenter-of-treated-gemstones?comment=131041591470#comments
https://www.ketuousa.com/blogs/news/2018-usn-g10-show?comment=129326940273#comments
https://www.goldrushnuggetbucket.com/blogs/press/117144581-shark-tank-entrepreneur-goes-beyond-the-tank-consults-with-robert-herjavec-for-hiring-key-digital-role?comment=126718345410#comments
https://frostbuddy.com/blogs/frost-buddy-podcast/21-why-we-care-about-who-people-are-not-what-they-do?comment=131653173403#comments
https://www.porticoliving.ca/blogs/news/ctv-morning-live-talks-to-tracy-about-portico-indoor-outdoor-living-and-holiday-2016?comment=130297561171#Comments
https://sneakerbinge.com/blogs/news/37523969-nick-young-2-chainz-shop-for-25k-jordans-most-expensivest-shit?comment=132728422621#comments
https://www.wildlandorganics.com/blogs/livelight/stepping-into-my-own-story?comment=130925592831#comments
https://goalkicksoccer.com/blogs/news/var-in-english-premier-league?comment=134723240256#comments
https://www.booketybookbooks.co.nz/blogs/reviews/the-panic-years-by-nell-frizzell?comment=129157693495#comments
https://jordandene.com/blogs/blog/coffee-break-monstress-volume-one?comment=130685108461#comments
https://www.thejoyfulfoodco.com/blogs/blog/recipes-from-quarantine-pancetta-and-gruyere-frittata?comment=131225976930#comments
https://www.badpandashop.com/blogs/news/before-now-then-2022-indonesian-movie-aka-nana?comment=130839871701#comments
https://www.nundlenaturalskin.com.au/blogs/news/happenings-at-nundle-health-gold?comment=128781058106#Comments
https://milohshop.com/blogs/news/the-story-of-miloh?comment=130512781550#comments
https://banudesigns.com/blogs/ethnicfashion/bridal-lehengas?comment=134754664553#comments
https://hadawayassociates.com/lynns-blog/one-million-global-peripheral-iv-catheters
https://adilsons.org/blogs/anime/product-preview-2021-tin-of-ancient-battles?comment=133759041821#comments
https://timelyandtimeless.com/blogs/blog/cuckoo-clocks-for-young-and-old?comment=135454982455#comments
https://shop.interiorstoinspire.com/blogs/how-to/how-to-apply-a-furniture-transfer?comment=131169779936#comments
https://www.gochuasturcelta.org/2016/02/26/reportaje-del-gochu-en-el-programa-de-tve-espa%C3%B1a-directo/#commentForm10059841894
https://www.donnasrecipe.com/blogs/donnas-blog/difference-between-leave-in-conditioner-deep-conditioner?comment=127160680623#comments
https://trulygarden.com/blogs/truly-garden-blog/diy-raised-bed-using-old-redwood-deck?comment=122068369578#comments
https://neofilmshop.com/blogs/news/film-review-limbo-2021-hong-kong?comment=133728239914#comments
https://www.wildlandorganics.com/blogs/livelight/were-gonna-live-in-a-van?comment=130925625599#comments
https://sewkindofwonderful.com/blogs/news/patterns-by-category-a-pattern-for-every-skill-level?comment=133134418163#comments
https://www.spicyelement.com/blogs/recipe/bamboo-shoots-salad?comment=125825351876#comments
https://downtherabbitholewines.com.au/blogs/news/east-coast-australia-road-trip-sydney?comment=127788155062#comments
https://scorchmarker.com/blogs/tutorials/diy-food-safe-finish-for-wood-burnt-crafts?comment=129970635002#comments
https://covenandco.com/blogs/news/spaghetti-bolognese-recipe?comment=122068402346#comments
https://wildcraftbrewery.co.uk/blogs/recipes/wild-eye-pa-fruit-cake-recipe?comment=127788187830#comments
https://ferriswheelpress.com/blogs/how-to-videos/how-to-fill-your-brush-fountain-pen-with-ink?comment=130826600542#comments
https://allthingselderberry.com/blogs/blog/elderberry-vinaigrette-recipe?comment=130877751449#comments
https://hourloop.com/blogs/news/40945537-disney-villains-part-5-sing-sweet-nightingale?comment=128781090874#comments
https://sigiskin.com/blogs/news/signs-of-ageing-around-the-eyes?comment=133662900533#comments
https://spinncandy.com/blogs/news/17275645-website-in-spanish-version?comment=131653206171#comments
https://www.smythshomevalue.ie/blogs/news/freshen-up-your-paths-and?comment=135632191824#comments
https://www.tomsonelectronics.com/blogs/news/arduino-uno-specification?comment=130512814318#comments
https://ottoskingoods.com/blogs/news/ditch-the-holiday-stress-here-are-3-intentions-to-help-you-finally-relax-enjoy-the-season?comment=134163431737#Comments
https://xfasten.com/blogs/xfasten-blogs/wonders-of-adhesion-crafting-diy-projects-with-the-help-of-double-sided-tape?comment=130411856113#comments
https://isabellacoutureshop.com/blogs/news/royal-birthday-ball-for-sienna-capri?comment=127198724277#Comments
https://dailykairos.com/blogs/faith/why-should-we-practice-sabbath?comment=133224464637#comments
https://www.pinkfreshstudio.com/blogs/card-making-challenges/november-challenge?comment=131041624238#comments
https://prettysensitiveears.com/blogs/news/jewelry-care-convert?comment=134373802061#comments
https://zaahara.com/blogs/writers-corner/aiqah-korban-in-makkah-with-only-rm-400-per-sheep?comment=131240493288#comments
https://paz-creations.com/blogs/blog/the-nine-best-pieces-of-advice-your-mom-ever-gave-you?comment=131103457532#comments
https://www.hartsandpearls.com/blogs/news/36748036-fear-to-faith-the-harts-pearls-story-video?comment=128984547480#comments
https://cityfarmhouseantiques.com/blogs/news/find-of-the-week-rustic-vintage-style-flower-pots-for-the-garden?comment=130071494726#comments
https://woodwhirled.com/blogs/woodturning-blog/wooden-pieces-care-and-instructions?comment=135101743206#comments
https://www.bomajewelry.com/blogs/news/covetuer?comment=131410952408#comments
https://rebournebodyandhome.com/blogs/news/broadway-market-co-7-1-7-31?comment=127122702520#comments
https://greenfoods.com/blogs/news/watermelon-beet-smoothie?comment=130085257379#comments
https://www.gorgiaspress.com/author-blog-begins
https://informaltea.co.nz/blogs/news/15753260-how-to-make-tea?comment=129497497758#Comments
https://birdling.com/blogs/notes-from-the-nest/the-circle-bag?comment=133946310934#comments
https://www.revitasize.ca/blogs/juicy-lifestyle-blog/juices-vs-smoothies-from-a-guy-that-sells-both?comment=124107325476#comments
https://www.shopsocialthreads.com/blogs/news/five-star-rated-our-vegan-leather-messenger-bag?comment=128746782802#comments
https://jinmee.co.uk/blogs/news/how-to-effectively-layer-your-skincare?comment=133159682099#comments
https://theunchartedstudio.com/blogs/uncharted-goods/surfing-magazine-help-save-puerto-ricos-waves?comment=133644714268#comments
https://www.auroratights.com/blogs/news/11-tips-to-prepare-for-back-to-school?comment=129545961648#Comments
https://judgementyard.org/blogs/news/rawpa-crawpa-reviews-sizzla-and-judgement-yard-from-the-garrison-to-the-stage?comment=128914718806#comments
https://www.melissaborrell.com/blogs/glitterandglue/walker-fine-art-gallery?comment=128998834275#comments
https://katybugscollection.com/blogs/news/meet-kaitlin?comment=131410985176#comments
https://celesteoliva.com/blogs/news/power-is-back-on-at-celeste-oliva?comment=127926435994#comments
https://sightlineprovisions.com/blogs/news/the-cone-denim-project-featured-on-the-fiberglass-manifesto-by-david-fason?comment=127934234666#comments
https://www.alohateacuppuppies.com/blogs/our-puppies-dairy/find-out-about-dachshunds-charm?comment=128746815570#comments
https://www.rubinocreative.com/blogs/blog/todays-daddys-home-comic?comment=133134582003#comments
https://www.charliejohnsonfitness.com/blogs/news/staying-on-track-with-a-new-exercise-program?comment=135456325926#comments
https://www.grunt.com/blogs/news/the-story-of-the-stamp?comment=125180149783#comments
https://vidavegana.mx/blogs/vida-vegana/sopas-calientitas-para-el-frio-%EF%B8%8F?comment=134231720218#comments
https://slipins.com/blogs/news/spring-the-good-the-bad-and-the-ugly?comment=130877784217#comments
https://www.cycleprojectstore.com/blogs/projects/cheryls-surly-pack-rat?comment=133796331811#comments
https://www.bysamantha.net/blogs/news/2018-women-of-strength-qtr1-selina-mcgarrigle?comment=137410379863#comments
https://richardbrooke.com/blogs/network-marketing/heroes?comment=129133674556#comments
https://themodushop.com/blogs/news/thanksgiving-week-sale?comment=134318293329#comments
https://www.ghanzibrand.com/blogs/news-1/the-5-best-gbshots-of-the-week?comment=135719190863#comments
https://shoppassionfruit.com/blogs/news/support-queer-arts-at-the-2018-inside-out-toronto-film-festival?comment=121086902294#comments
https://lunarangellashes.com/blogs/lash-care/eye-shape?comment=127926468762#comments
https://azulberebershop.com/blogs/news/makers?comment=136741192028#comments
https://www.brixtonschool.com/2015/01/20/pronunciation-f-v-and-w/#commentForm6162036863
https://measinasamoa.com.au/blogs/news/meet-the-makers-part-5?comment=130297626707#comments
https://babymetalnewswire.jimdofree.com/2017/09/27/babymetal-saitama-s-big-fox-festival-in-japan-2-days-looked-like-a-blazing-delight/#commentForm13553495178
https://www.r-nichols.com/blogs/news/3106732-strawberry-season?comment=129753120865#comments
https://www.alatoday.org/bloghome.asp?display=24
https://russellroadracing.co.uk/blogs/news/custom-tuning-dyno-tuning-road-tuning-tuning-explained?comment=127258165322#comments
https://lagom142.com/blogs/news/latest-furniture-in-lagom142?comment=134172705069#comments
https://www.hashtagffa.ca/blogs/news/mutabazi-the-hip-hop-r-b-vocalist-based-out-of-orange-county-ca?comment=120599019576#Comments
https://pseudolabs.com/blogs/in-pseudo/phrecking-on-camera-meet-valerie-zachary?comment=130649719026#comments
https://plumdragonherbs.com/blogs/news/ep13-q-a-with-plum-dragon-founder-josh-walker?comment=130685141229#comments
https://punisherspb.com/blogs/news/first-strike-hero-air-systems?comment=126596087926#comments
https://www.thetroutlook.com/latest-updates/pros-vs-cons-of-hatchery-stocking-part-3
https://historyonashirt.com/blogs/knights-without-parachutes/remembering-kiffin-yates-rockwell-of-the-lafayette-escadrille?comment=129327005809#comments
https://www.bestmarine.com/blogs/news/when-should-we-use-metatarsal-boots?comment=129970667770#comments
https://www.alissacallen.com/2014/01/20/the-writing-process-blog-chain/
https://celiacosperu.org/actividades—-difusion/sbado-14-de-nov-inauguracin-caf-bodega-especializado-en-preparaciones-sin-gluten-el-trigal-la-casa-de-violeta
https://tucane.com/blogs/news/vi-vuela-tucane-2013?comment=129970700538#comments
http://www.thecinemasnob.com/vlog-reviews/top-10-burt-reynolds-movies
https://blackmagicalchemy.com/blogs/blog/mrm-mosquitos-resilience-mushroom-burning-stoves?comment=130685173997#comments
https://www.franrubia.com/2015/12/11/wildlife-photographer-of-the-year-2015-cuenta-con-fran-rubia-entre-sus-ganadores/
https://merkaba.nz/blogs/hemp-blog/hemp-plastics-for-the-better-good-can-hemp-replace-it?comment=138084253759#comments
https://tournaments.spikeball.com/blogs/the-rally/bud-n-boles-takes-out-the-best-of-the-west-en-route-to-west-regionals-win?comment=129546059952#comments
https://hairnparis.com/blogs/news/3-common-sew-in-mistakes-everyone-should-know?comment=127934267434#comments
https://singleneedletattookit.com/blogs/hand-poke-artists/lisa?comment=131525968101#comments
https://www.revitasize.ca/blogs/juicy-lifestyle-blog/what-where-meghan-markle-eats-in-a-day?comment=124107358244#comments
https://www.pinkfreshstudio.com/blogs/card-inspirations/november-2020-essentials-die-release-blog-hop?comment=131041657006#comments
https://anyonefortennis.sg/blogs/all-about-tennis/35256513-5-year-old-emilia-hits-34-shot-rally-with-coach-dave?comment=124989964334#comments
https://www.jimcoracing.com/blogs/jimco-racing-news/jimco-champions-finish-1-2-in-class-1500?comment=138084286527#comments
https://panafishing.com/reports—news/january-starts-the-summer-season
https://www.cycleprojectstore.com/blogs/projects/cps-boss-sherwins-cicli-bonanno-mogast?comment=133796364579#comments
https://informaltea.co.nz/blogs/news/4430162-informal-at-the-little-big-markets?comment=129497530526#Comments
https://www.creativeacademic.uk/blog/creativity-in-the-making
https://sifrsite.com/blogs/sincerely-sifr/10568725-dots?comment=133073797298#comments
https://neofilmshop.com/blogs/news/film-review-son-mother-pesar-madar-2019-iran-hkiff45?comment=133728272682#comments
https://www.nundlenaturalskin.com.au/blogs/news/coonamble-popup-shop?comment=128781287482#Comments
https://www.garmentprinterink.com/blogs/sprint/anajet-sprint-print-head-replacement?comment=130826633310#comments
https://www.randysun.com/blogs/randy-sun-blog/how-can-waterproof-socks-be-anti-odor?comment=138084581439#comments
https://www.crazybulk.in/blogs/news/4-tips-on-smart-training-goals-in-2021?comment=127615271061#comments
https://birdling.com/blogs/notes-from-the-nest/the-circle-bag?comment=133946376470#comments
https://slipins.com/blogs/news/14868935-welcome-to-our-new-website-its-opening-day?comment=130877816985#comments
https://jbskinsavvi.com/blogs/our-journal/exfoliation?comment=134231818522#comments
https://www.reagansanai.com/es/blogs/news/how-to-do-a-patch-test?comment=130839904469#comments
https://sigiskin.com/blogs/news/ingredient-spotlight-red-ginseng?comment=133662966069#comments
https://rubylondon.com/blogs/news/ruby-does-twitter?comment=125509828797#comments
https://www.wildlandorganics.com/blogs/livelight/28-day-mindful-morning-challenge?comment=130925658367#comments
https://doveoriginalstrims.com/blogs/default-blog/paraphrasing-shakespeare-a-sleeve-a-sleeve-my-kingdom-for-a-sleeve?comment=130114191572#comments
https://vani-t.com/blogs/news/celebrating-all-that-it-is-to-be-a-woman?comment=130942304429#comments
https://plushpawsproducts.com/blogs/news/dog-friendly-hiking-trails?comment=133135040755#comments
https://adilsons.org/blogs/anime/10-anime-like-attack-on-titan?comment=133759074589#comments
https://www.ktlondon.co.uk/blogs/news/what-inspired-me-to-re-launch-k-t-london?comment=125825482948#comments
https://pseudolabs.com/blogs/in-pseudo/what-has-2020-done-to-your-skin?comment=130649817330#comments
https://rubylondon.com/blogs/news/ruby-does-twitter?comment=125509861565#comments
https://thegentlepit.com/blogs/the-gentle-pit/what-does-no-kill-shelter-mean?comment=133644747036#comments
https://orientalartsupply.com/blogs/news/plum-blossom-and-bird-by-yang-o-shi?comment=130550726876#comments
https://renewskinsolutions.com/blogs/news/hair-loss-the-many-causes?comment=129497628830#comments
http://www.shimelle.com/classes/756/a-new-online-scrapbooking-class-love-your-pictures-love-your-pages/#cpreview
https://www.noblemono.com/blogs/news/3-toyosu-fish-market?comment=131672080540#comments
https://hadawayassociates.com/lynns-blog/one-million-global-peripheral-iv-catheters
https://goalkicksoccer.com/blogs/news/manchester-united-revolution-2022?comment=134723305792#comments
https://www.thegentlemansbeard.club/blogs/gbc/31713857-featured-gentleman-ricardo-rodrigues?comment=130515828798#comments
https://mrstone.com/blogs/articles/20454657-sealing-in-the-beauty-of-natural-stone-granite-marble-quartzite-more?comment=127258263626#Comments
https://milohshop.com/blogs/news/how-to-soak-your-unsanforized-denim?comment=130513043694#comments
https://lizzie-loves.com/blogs/blog/special-offer-twin-pack-9-99?comment=130085453987#comments
https://cityfarmhouseantiques.com/blogs/news/collectible-folk-art-makes-for-great-conversation-pieces-to-display-in-the-home?comment=130071593030#comments
https://www.loopflyfishing.co.nz/blogs/news/12190549-on-location?comment=131226075234#comments
https://dondihk.com/blogs/dondi/iseul-1?comment=126625972272#comments
https://biggamesteel.com/blogs/trophy-talk/hunt-of-a-lifetime-3-questions-you-need-to-ask?comment=127926534298#comments
https://www.reagansanai.com/es/blogs/news/how-to-do-a-patch-test?comment=130839937237#comments
https://www.blackhistorybuff.com/blogs/podcast/imhotep-father-of-medicine?comment=128914882646#comments
https://goodwipes.com/blogs/vlog/austin-vibes?comment=131433234499#comments
https://www.austinkeen.com/blogs/news/ak-s-triumphant-return-to-kswc?comment=126156964037#comments
https://adorit.ca/blogs/news/10896077-12-days-of-christmas-at-adorit-day-9-100-cruelty-free-jewlery-by-bullets-and-bones?comment=127873351746#comments
https://www.jeeperspeepers.co.uk/blogs/news/jeepers-peepers-ss17-favourite-the-shield?comment=128864092353#comments
https://freckbeauty.com/blogs/ooze/at-home-express-facial?comment=130045444282#comments
https://www.sablebeauty.com/blogs/news/new-year-get-on-with-these-5-easy-tweaks-for-even-better-skin-in-2018?comment=138085302335#comments
https://www.nortonhousequilting.com/blogs/news/february-quilting-your-legacy-monthly-theme-ufo-projects-finish-them-or-beam-them-away?comment=131411116248#comments
https://www.justjans.com/blogs/news/quick-easy-caesar-dressing?comment=130730557597#comments
https://gardenersorchardandbakery.com/blogs/news/apple-cider-is-back?comment=122845659181#comments
https://www.locoskates.com/blogs/loco-blog/heads-up-matt-smith?comment=129589805099#comments
https://cityfarmhouseantiques.com/blogs/news/dont-wait-for-easter-decorate-with-bunnies-all-year?comment=130071625798#comments
https://adricewines.wine/blogs/news/our-first-blog-post?comment=133872419093#comments
https://www.mrduffys.com/blogs/news/our-calypso-collection?comment=136815477077#comments
https://www.crazybulk.in/blogs/news/4-tips-on-smart-training-goals-in-2021?comment=127615336597#comments
https://jordandene.com/blogs/blog/coffee-break-snot-girl-vol-one?comment=130685239533#comments
https://bitteshop.com/blogs/news/48803013-sweet-treat-strawberry-galette?comment=122068435114#comments
https://doddleandco.com/blogs/parenting/how-to-keep-your-chill-during-the-holidays?comment=125180182551#comments
https://www.austinkeen.com/blogs/news/breaking-down-austin-keens-lake-to-lake-tunnel-transfer?comment=126156996805#comments
https://zazu.cl/blogs/mundo-zazu/pulsera-roja-protege-tus-energias?comment=128211189829#comments
https://measinasamoa.com.au/blogs/news/fai-mai-tyla-hina-lei-floral-design?comment=130297725011#comments
https://www.prevenbus.com/blog/2021/07/05/episode-de-prev-enligne-du-lundi-5-juillet-2021.html#commentaire
https://frostbuddy.com/blogs/frost-buddy-podcast/21-why-we-care-about-who-people-are-not-what-they-do?comment=131653337243#comments
https://www.dollymoo.com/blogs/news/6606909-fresh-batch-of-lavender?comment=127934332970#comments
https://www.ossboardsupply.com/blogs/news/112934275-oss-glory-days-thunder-adam?comment=131226108002#Comments
Kylie Harvey
GET RICH WITH BLANK ATM CARD, Whatsapp: +18033921735
I want to testify about Dark Web blank atm cards which can withdraw money from any atm machines around the world. I was very poor before and have no job. I saw so many testimony about how Dark Web Online Hackers send them the atm blank card and use it to collect money in any atm machine and become rich I email them also and they sent me the blank atm card. I have use it to get 500,000 dollars. withdraw the maximum of 5,000 USD daily. Dark Web is giving out the card just to help the poor. Hack and take money directly from any atm machine vault with the use of atm programmed card which runs in automatic mode.
You can also contact them for the service below
Western Union/MoneyGram Transfer Bank Transfer PayPal / Skrill Transfer Crypto Mining CashApp Transfer Bitcoin Loans Recover Stolen/Missing Crypto/Funds/AssetsEmail: darkwebonlinehackers@gmail.com
Email: info@darkwebonlinehackers.com
Telegram or WhatsApp: +18033921735
Website: www.darkwebonlinehackers.com
BigTittyBitches26
lamaletitafeliz
https://sexonly.top/get/b242/b242aymwfiruqgehntx.php
daddysbitch404
https://sexonly.top/get/b898/b898nuxrcgfyeasrbta.php
TeTebell
https://sexonly.top/get/b563/b563fcsundynnpsubvc.php
KatyaCora
https://sexonly.top/get/b853/b853amffqkwvoymkfns.php
VIPexperience29
https://sexonly.top/get/b260/b260azwmojzzertepzm.php
xPapaSmurff
https://sexonly.top/get/b981/b981hughouwaigxllpd.php
LittleSoledad
https://sexonly.top/get/b777/b777boryageylzlfzzq.php
hii_diana
https://sexonly.top/get/b573/b573kwlxnyjtotzfeyk.php
Trinibaby
https://sexonly.top/get/b616/b616ezpnxhopfylbsul.php
NinhaKhalifa
https://sexonly.top/get/b829/b829alpdqvgoullxzxt.php
barbiewhore7
https://sexonly.top/get/b931/b931xtqkzoxizyrtesd.php
Queen_Maiora
https://sexonly.top/get/b608/b608hfssrzjjflvvvch.php
lesenka_villalobos
https://sexonly.top/get/b165/b165cctytmkjgtqdyui.php
KinkyCoupleChloeandTyler
https://sexonly.top/get/b17/b17ldpxoulyvlmwish.php
brattybaby333
https://sexonly.top/get/b462/b462cwcpncedsbmbzju.php
Something4someone
https://sexonly.top/get/b676/b676kzfzveuzdmvovqe.php
CathyB
https://sexonly.top/get/b595/b595eskfjrhgsjgtqok.php
petprincessa
https://sexonly.top/get/b780/b780pgkbsxhzcxvaoqn.php
laysa1
https://sexonly.top/get/b375/b375faofpuudrlqajcv.php
kailynclarck
https://sexonly.top/get/b737/b737ggqfqclwidpemtj.php
Skylermoonpdx
https://sexonly.top/get/b333/b333febshfnzgcjsgsw.php
funsized_Dolly
https://sexonly.top/get/b696/b696wgzbdaqnljhmqit.php
ArielandPoseidon
https://sexonly.top/get/b164/b164rlyphadxzijmorh.php
VirgoScorpiolove
https://sexonly.top/get/b488/b488mwkfprmbughfcbj.php
Qu33nbarbi3
https://sexonly.top/get/b478/b478spjrcrofqxjmgfw.php
Stargirl22
https://sexonly.top/get/b573/b573ezdqztbmsfnjqxq.php
Bljou
https://sexonly.top/get/b181/b181iybjlmsogjvwabh.php
hot_ass_hollywood
https://sexonly.top/get/b204/b204aowqhspvgkckgkb.php
Glistening_Milk
https://sexonly.top/get/b853/b853rdgsrmcwpkczjud.php
Tanisa
https://sexonly.top/get/b98/b98qzbezyhdhrurrkf.php
itzivorylanexo
https://sexonly.top/get/b54/b54kojgtgbwgqulsnu.php
HayleyRose
https://sexonly.top/get/b576/b576mrdytfegvbouxfo.php
LtlMsMelanin
https://sexonly.top/get/b822/b822nydymbfjeqhtiam.php
skybrianna
https://sexonly.top/get/b893/b893mujgtnaqhspjstf.php
Kaitlyn0889
https://sexonly.top/get/b331/b331qwxopeohwvlmsvt.php
KittySquirts
https://sexonly.top/get/b262/b262dgdqgscrsgccwyy.php
Ruusaan66
https://sexonly.top/get/b9/b9alxwskotecbdxsa.php
SerenaMadison
https://sexonly.top/get/b414/b414fmufykdlvjbpari.php
Lactatingmomma048
https://sexonly.top/get/b413/b413bwawknttllufacx.php
GGNEGRAMg
https://sexonly.top/get/b954/b954fuzlhfnmlhxlowh.php
KikiKawaii
https://sexonly.top/get/b20/b20yousjjieklashgx.php
Laylaplayyy
https://sexonly.top/get/b143/b143lokgjgajywqywkg.php
scarlettwolfie
https://sexonly.top/get/b147/b147gyalfyjrghxbhcu.php
KaseyStorm
https://sexonly.top/get/b20/b20pmlrepnfpxbobzk.php
KittyRains
https://sexonly.top/get/b552/b552ucrnkyozcmfezro.php
Loudpacgod
https://sexonly.top/get/b375/b375gjwnkslsmstedsg.php
Kechupbaby
https://sexonly.top/get/b415/b415qwacfvzbqbcfunw.php
LULRED21
https://sexonly.top/get/b144/b144qoettwjyuwrispc.php
RoseBlue01
https://sexonly.top/get/b469/b469zvgzcqqbettqlnx.php
ElvenPrincessUK
https://sexonly.top/get/b989/b989fuieciipwnuxozt.php
morbo_tattoo
https://sexonly.top/get/b33/b33gmamzoepscoivyf.php
missjaifux
https://sexonly.top/get/b155/b155ydlhkcapdewzqux.php
Shiny_star
https://sexonly.top/get/b257/b257vsemlgmsikcdsxo.php
absolutebrat
https://sexonly.top/get/b957/b957sumypuaxmainqco.php
Naughtycouple6900
https://sexonly.top/get/b869/b869wtmmjaectolabyz.php
cloverhayes
https://sexonly.top/get/b77/b77tgzxsezmbyzikkf.php
VioletteVixxxen
https://sexonly.top/get/b540/b540ziugwkqhefqeqfm.php
SashaHart16
https://sexonly.top/get/b85/b85zggzddirqtzmeqk.php
Chamille_Tasty
https://sexonly.top/get/b372/b372ufmmuqwmnljpmsa.php
SorenLuka
https://sexonly.top/get/b43/b43grrhvgjbgpqulnl.php
LacieLace
https://sexonly.top/get/b124/b124wtpcxlcqdfuisyv.php
LanaFredericks
https://sexonly.top/get/b41/b41qvgnydhjxlnztkw.php
sakuraaneko
https://sexonly.top/get/b810/b810xkhdqtayfbpyxii.php
Cxttxncxndyy
https://sexonly.top/get/b553/b553ixzjdhilfnbfllr.php
FionaInk
https://sexonly.top/get/b717/b717dfeyvtyhedoyocx.php
RedHeadSquirrel
https://sexonly.top/get/b602/b602zvegntervgrukwl.php
Wildflower95
https://sexonly.top/get/b541/b541uorlscmrsxqmybz.php
Wildmoonchil66
https://sexonly.top/get/b619/b619xfowrbfewylsnrt.php
CassandraBale
https://sexonly.top/get/b83/b83hqoeprwhjlpfzja.php
Flora_Bella
https://sexonly.top/get/b937/b937nlrnyfyigccveia.php
Banana_love
https://sexonly.top/get/b805/b805jbirjcrbrvfpyhf.php
tybutler1
https://sexonly.top/get/b158/b158egtrceuxhhrqgxd.php
NanasOnanaS
https://sexonly.top/get/b590/b590offvaaiucupvkbe.php
lindathoren
https://sexonly.top/get/b348/b348ykdllmbsyejlmfa.php
AlanNMoMo
https://sexonly.top/get/b201/b201brzthcadlwzxwpq.php
michellelynn
https://sexonly.top/get/b785/b785lcrdamdqdcazjqu.php
Danna1116
https://sexonly.top/get/b709/b709uckgqnbcvuixafx.php
grace_lane
https://sexonly.top/get/b732/b732jzpshfmrvoulqlq.php
ChubbyKittenWhiskers
https://sexonly.top/get/b768/b768xvzxqqhnmazzunv.php
kyleighann
https://sexonly.top/get/b535/b535lbdkiadezwzdwuq.php
HarleyDirty
https://sexonly.top/get/b84/b84eyzhvzvfvogmddi.php
Honeybee643
https://sexonly.top/get/b812/b812sinnhmncqwhsnkp.php
LonelyZelda
https://sexonly.top/get/b404/b404fekgpdkdkojtiih.php
Mytinderella
https://sexonly.top/get/b474/b474lxhicxozvhxiokk.php
Eva69Loved
https://sexonly.top/get/b503/b503wllbstxycrqzzhe.php
ivyminxxx
https://sexonly.top/get/b924/b924youncyxjztegiyx.php
Allie_Austyn
https://sexonly.top/get/b937/b937tmoqowoajntnrqg.php
Cassiecrybby
https://sexonly.top/get/b596/b596bwoeqsagaycehiq.php
MeganGramm
https://sexonly.top/get/b916/b916uwfzpxqzseevhfr.php
lilymorena
https://sexonly.top/get/b509/b509dbsazxczfrxdrdf.php
PeakyBrownies
https://sexonly.top/get/b724/b724xksysynlzhjocyt.php
maggiegold
https://sexonly.top/get/b396/b396iodthhpwjqzxztq.php
alexchance1
https://sexonly.top/get/b150/b150hvjcollpfpkezhr.php
Eyelucy
https://sexonly.top/get/b271/b271bmqwaorfegjdolk.php
kevillysantana
https://sexonly.top/get/b622/b622sbyzohtnrdaizaw.php
MissJaydaRayne
https://sexonly.top/get/b304/b304fcmlxcpcpwrezfg.php
That1JadeChick
https://sexonly.top/get/b451/b451nlpkeskomlwoyxl.php
DeeperThots69
https://sexonly.top/get/b887/b887imneucietzumpjk.php
TeenyTinyMiki
https://sexonly.top/get/b815/b815owlcltzzqnwjdbh.php
BigTittyBitches26
https://sexonly.top/get/b846/b846iorsyxotrsipegn.php
Debbie Arnold
I am out here to speed this good news to the entire world on how I got help from Dr Kachi a great lottery spell caster that will help you cast a lottery spell and give you the rightful numbers to win the lottery, I didn’t believe lottery spell at first but as life got harder i decided to give a try, I spend so much money on tickets just to make sure I win. until the day I met Dr KACHI online, which so many people have talked good about, that he is very great when it comes to casting lottery spell, he told me the necessary things to do and behold it was like a magic, i won $20 Million Dollars Florida Powerball Double Play with the numbers Dr Kachi gave to me. his a really trustful person worthy and reliable, i am sharing this to you who have been finding it so hard to win the lottery, Thanks you Dr. Kachi who helped me contact email drkachispellcast@gmail.com OR Text Number and Call: +1 (209) 893-8075 Visit his Website: https://drkachispellcaster.wixsite.com/my-site
안전 카지노사이트
파라오카지노_https://betop24.com/pharaoh-casino/
쿨카지노_https://betop24.com/cool-casino/
뉴헤븐카지노_https://betop24.com/nhcasino/
솔카지노_https://betop24.com/solcasino/
펀카지노_https://betop24.com/fun-casino/
헤라카지노_https://betop24.com/hera-casino/
J9카지노_https://betop24.com/j9-casino/
클레오카지노_https://betop24.com/cleo-casino/
http://paste.jp/ddd64b2f/
https://paste.enginehub.org/Woj2ds6M4
https://pastebin.freepbx.org/view/d498661b
온라인바카라_https://betop24.com/
안전 카지노사이트_https://betop24.com/
온라인카지노 추천_https://betop24.com/
바카라사이트 추천_https://betop24.com/
카지노사이트_https://betop24.com/
바카라사이트_https://betop24.com/
https://paste.myst.rs/ygke48wm
https://paste.enginehub.org/IDSg9YSy_
https://paste2.org/O4WGyeFB
https://pasteio.com/xRU9Rbj21TZd
https://bitbin.it/S8vGoFA1/
https://yamcode.com/betop24-81
https://pastelink.net/1zwgj9p6
https://ivpaste.com/v/KjG2buBzcR
https://commie.io/#44qG7gGa
https://rentry.co/3reuk
http://nopaste.ceske-hry.cz/399360
http://nopaste.ceske-hry.cz/399388
https://rentry.co/f5d2y
https://commie.io/#xqKp4Si1
https://ivpaste.com/v/HMfJmqOC6y
https://bitbin.it/aU4VjHmz/
https://pasteio.com/xgRT5gX3aeAs
https://paste2.org/aC7CHBN5
https://paste.enginehub.org/8WaMQLoeD
https://paste.myst.rs/7itd7fgy
https://pastelink.net/jfoevnaj
https://pastebin.freepbx.org/view/1407d6a7
https://sites.google.com/view/betop24link/%EC%95%88%EC%A0%84-%EC%B9%B4%EC%A7%80%EB%85%B8%EC%82%AC%EC%9D%B4%ED%8A%B8/betop24
https://tinyurl.com/598thjcu
https://sites.google.com/view/betop24baccarat/%ED%99%88
https://sites.google.com/view/betop24casino/%ED%99%88
https://sites.google.com/view/betop24online/%ED%99%88
https://linktr.ee/betop24
https://taplink.cc/betop24
https://sleek.bio/betop24
https://betop24.carrd.co/
https://linkbio.co/5021212kwSXqz
https://solo.to/betop24
https://biolinky.co/betop24
https://linkfly.to/50212Y9UCdO
https://pastelink.net/w2cak23f
https://yamcode.com/untitled-62448
https://notes.io/q4g25
https://pastebin.com/Yqg2czD1
https://pastelink.net/3w9btm1u
https://paste.feed-the-beast.com/view/6fc3c45a
https://pasteio.com/xO4kpVtkWQ8W
https://justpaste.it/betop24
https://pastebin.freeswitch.org/view/4fc5b866
http://pastebin.falz.net/2499691
https://paste.laravel.io/33eed31e-0510-432f-b265-77715da89b55
https://paste2.org/ZVwLzFHb
https://paste.myst.rs/80wsv443
https://controlc.com/cfb4d590
https://bitbin.it/dKmAygCF/
https://pastehere.xyz/oJXlublq7/
https://rentry.co/aqcmh
https://paste.enginehub.org/cBOWjUldx
http://nopaste.paefchen.net/1939933
https://anotepad.com/note/read/y22eawf8
https://ivpaste.com/v/ylPwpbLVGA
http://nopaste.ceske-hry.cz/399193
https://commie.io/#5Vv0rqZx
http://paste.jp/2b1e81a5/
https://paste.enginehub.org/Zu6XH7JaR
https://1arctic.blogspot.com/2022/05/7-of-best-new-web-based-club-games.html
https://5eclipse.blogspot.com/2022/03/the-future-of-online-casino-economy.html
https://1arctic.blogspot.com/2022/05/7-of-best-new-web-based-club-games.html
https://1arctic.blogspot.com/2022/06/quinncasino-to-become-dundee-uniteds.html
https://1arctic.blogspot.com/2022/06/ways-to-succeed-at-online-casino-matches.html
https://1arctic.blogspot.com/2022/06/3-useful-tips-when-using-credit-cards.html
https://1arctic.blogspot.com/2022/06/bit-by-bit-directions-to-play-online.html
https://1arctic.blogspot.com/2022/06/the-most-effective-method-to-begin-web.html
https://1arctic.blogspot.com/2022/06/macau-closes-most-organizations-in.html
https://1arctic.blogspot.com/2022/06/why-is-online-casino-gambling-so.html
https://1arctic.blogspot.com/2022/06/top-5-signs-you-picked-extraordinary.html
https://1arctic.blogspot.com/2022/06/tips-for-selecting-ideal-online.html
https://1arctic.blogspot.com/2022/06/is-there-impact-of-online-gaming-on.html
https://1arctic.blogspot.com/2022/06/5-methods-for-improving-your-gambling.html
https://1arctic.blogspot.com/2022/06/5-reasons-why-playing-online-casino.html
https://1arctic.blogspot.com/2022/06/the-future-of-online-betting-in-india.html
https://1arctic.blogspot.com/2022/06/15-best-online-casinos-in-uk-top-uks.html
https://1arctic.blogspot.com/2022/06/what-tech-is-meaning-for-online-casino.html
https://1arctic.blogspot.com/2022/06/why-legalization-of-gambling-is.html
https://1arctic.blogspot.com/2022/07/normal-biases-that-influence-online.html
https://1arctic.blogspot.com/2022/07/the-3-most-common-online-casino.html
https://1apricot0.blogspot.com/2022/07/4-safety-tips-for-playing-mobile-online.html
https://1arctic.blogspot.com/2022/07/victoria-presents-new-dependable.html
https://1apricot0.blogspot.com/2022/07/instructions-to-choose-right-online.html
https://1arctic.blogspot.com/2022/07/what-to-consider-when-selecting-online.html
https://1apricot0.blogspot.com/2022/07/the-benefits-of-cryptocurrency-in-live.html
https://1arctic.blogspot.com/2022/07/exposing-some-of-biggest-online-casino.html
https://1arctic.blogspot.com/2022/07/manual-for-best-online-casinos-for-new.html
https://1apricot0.blogspot.com/2022/07/best-3-sites-for-playing-online-casino.html
https://1arctic.blogspot.com/2022/07/online-casino-breaking-it-down-for-you.html
https://1arctic.blogspot.com/2022/07/the-most-effective-method-to-begin-web.html
https://1arctic.blogspot.com/2022/07/6-things-to-never-do-in-casino-online.html
https://1arctic.blogspot.com/2022/07/best-online-casino-games-where-you-can.html
https://1arctic.blogspot.com/2022/07/how-do-online-casino-regulations-look.html
https://1apricot.mystrikingly.com/blog/how-to-get-bitcoin-casino-free-spins
https://1arctic.blogspot.com/2022/07/versatile-casino-games-predictions-show.html
https://1apricot.mystrikingly.com/blog/most-famous-spin-the-wheel-games
https://1apricot.mystrikingly.com/blog/overview-of-online-casino-industry-in-asian-markets-in-2022
https://1arctic.blogspot.com/2022/07/try-not-to-roll-dice-on-online-casino.html
https://1apricot.mystrikingly.com/blog/completely-safe-online-casino-gambling-how-to-protect-yourself
https://1arctic.blogspot.com/2022/07/top-5-hints-for-online-club-achievement.html
https://1apricot.mystrikingly.com/blog/betting-is-on-the-ascent-in-general-in-the-uk-and-in-scotland
https://2beach0.blogspot.com/2022/06/5-best-vpns-for-ignition-casino-in-2022.html
https://2beach0.blogspot.com/2022/06/pick-reliable-online-casino-for-real.html
https://2beach0.blogspot.com/2022/06/online-casinos-versus-live-casinos-what.html
https://2beach0.blogspot.com/2022/06/the-most-effective-method-to-attract.html
https://2beach0.blogspot.com/2022/06/sec-commissioner-greg-sankey-says.html
https://2beach0.blogspot.com/2022/06/charges-on-casino-winnings-large.html
https://2beach0.blogspot.com/2022/06/4-online-casino-games-that-are-highly.html
https://2beach0.blogspot.com/2022/06/a-brief-history-of-online-gambling.html
https://2beach0.blogspot.com/2022/06/business-examples-from-outcome-of.html
https://2beach0.blogspot.com/2022/06/win-real-money-for-playing-online.html
https://2beach0.blogspot.com/2022/06/know-your-ideal-interest-group-online.html
https://2beach0.blogspot.com/2022/06/nations-where-you-can-gamble-online.html
https://2beach0.blogspot.com/2022/06/advantages-of-gambling-online.html
https://2beach0.blogspot.com/2022/06/all-that-you-need-to-know-about-online.html
https://2beach0.blogspot.com/2022/06/are-you-aware-you-can-play-live.html
https://2beach0.blogspot.com/2022/06/club-and-gaming-market-size-analysis-by.html
https://2beach0.blogspot.com/2022/07/online-casino-as-most-popular-resource.html
https://2beach0.blogspot.com/2022/07/the-secret-to-taking-down-odds-in.html
https://2beach0.blogspot.com/2022/07/why-you-should-try-online-casino-games.html
https://2beach0.blogspot.com/2022/07/impending-club-trips-open-to-region.html
https://2beach0.blogspot.com/2022/07/online-casino-games-dos-and-donts-you.html
https://2beach0.blogspot.com/2022/07/how-to-track-down-virtual-gambling.html
https://2beach0.blogspot.com/2022/07/top-5-safety-measures-for-online.html
https://2beach0.blogspot.com/2022/07/how-to-withdraw-money-from-online-casino.html
https://2beach0.blogspot.com/2022/07/online-live-casino-gambling-explained.html
https://2beach0.blogspot.com/2022/07/which-games-offer-best-casino-odds.html
https://2beach0.blogspot.com/2022/07/4-gambling-tips-for-beginners.html
https://2beach0.blogspot.com/2022/07/online-casinos-getting-better-in-your.html
https://2beach0.blogspot.com/2022/07/online-casino-tools-that-you-can-use-to.html
https://2beach0.blogspot.com/2022/07/internet-gambling-why-disbursement.html
https://2beach0.blogspot.com/2022/07/5-amazing-benefits-of-playing-online.html
https://3cave0.blogspot.com/2022/06/french-european-or-american-what-makes.html
https://2blueberry0.blogspot.com/2022/07/macau-expands-covid-19-closure.html
https://3cave0.blogspot.com/2022/06/play-top-quality-web-based-gambling.html
https://3cave0.blogspot.com/2022/06/most-important-factors-when-choosing.html
https://2blueberry0.blogspot.com/2022/07/the-most-trusted-online-casino-hub-stop.html
https://3cave0.blogspot.com/2022/06/betting-rtp-percentage-casino-return-to.html
https://2blueberry0.blogspot.com/2022/07/best-online-casino-games-where-you-can.html
https://3cave0.blogspot.com/2022/06/web-based-gambling-market-observes.html
https://2blueberry0.blogspot.com/2022/07/best-online-casino-games-where-you-can.html
https://2blueberry0.blogspot.com/2022/07/best-ripple-casinos-online-top-xrp.html
https://3cave0.blogspot.com/2022/06/79-of-respondents-need-gst-on-web-based.html
https://3cave0.blogspot.com/2022/06/sorts-of-online-casino-players-that-are.html
https://3cave0.blogspot.com/2022/06/how-imaginative-us-online-club-are.html
https://3cave0.blogspot.com/2022/06/a-closer-look-at-technology-behind.html
https://3cherry0.blogspot.com/2022/07/publication-casino-betting-tomfoolery.html
https://3cherry0.blogspot.com/2022/07/the-most-effective-method-to-arrive-at.html
https://3cave0.blogspot.com/2022/06/step-by-step-instructions-to-play-free.html
https://3cherry0.blogspot.com/2022/07/so-you-want-to-build-online-casino.html
https://3cave0.blogspot.com/2022/06/genuine-cash-online-gambling-clubs-in.html
https://3cave0.blogspot.com/2022/06/betting-tips-you-can-steal-from-pros.html
https://3cherry0.blogspot.com/2022/07/best-online-casino-games-to-play-in.html
https://4dragonfruit.blogspot.com/2022/07/how-can-cryptocurrencies-disrupt.html
https://4dragonfruit.blogspot.com/2022/07/fanduel-employs-new-inventive-office.html
https://4dragonfruit.blogspot.com/2022/07/a-complete-guide-to-online-casinos-in.html
https://4dragonfruit.blogspot.com/2022/07/how-could-online-casino-players-manage.html
https://4dragonfruit.blogspot.com/2022/07/trend-setting-innovations-in-online.html
https://5emblica.blogspot.com/2022/07/macau-casinos-get-15-billion-in-loans.html
https://5emblica.blogspot.com/2022/07/casino-app-vs-mobile-ready-website.html
https://3cave0.blogspot.com/2022/06/the-simplest-method-for-tracking-down.html
https://3cave0.blogspot.com/2022/06/10-best-online-casinos-in-brazil-where.html
https://3cave0.blogspot.com/2022/06/5-reasons-pinpointing-how-internet.html
https://3cave0.blogspot.com/2022/06/the-most-phenomenal-gambling-club-heists.html
https://3cave0.blogspot.com/2022/07/7-ways-to-make-your-gambling-experience.html
https://3cave0.blogspot.com/2022/07/online-casinos-101-how-to-enjoy.html
https://3cave0.blogspot.com/2022/07/how-can-digital-forms-of-money-upset.html
https://3cave0.blogspot.com/2022/07/aces-of-online-casino-not-on-gamstop.html
https://3cave0.blogspot.com/2022/07/5-ways-to-make-some-extra-cash-playing.html
https://3cave0.blogspot.com/2022/07/a-beginners-guide-to-online-casino.html
https://3cave0.blogspot.com/2022/07/the-easiest-casino-games-to-play-at.html
https://3cave0.blogspot.com/2022/07/peruse-this-prior-to-sending-your.html
https://3cave0.blogspot.com/2022/07/what-are-advantages-of-online-casino.html
https://5emblica.blogspot.com/2022/07/what-tech-is-meaning-for-online-casino.html
https://5emblica.blogspot.com/2022/07/5-most-beneficial-online-casino.html
https://5emblica.blogspot.com/2022/07/payid-online-gambling-clubs-in.html
https://2blueberry.mystrikingly.com/blog/most-famous-web-based-club-games-in-singapore
https://2blueberry.mystrikingly.com/blog/how-online-casino-and-the-gaming-industry-are-intertwined
https://2blueberry.mystrikingly.com/blog/4-safety-tips-for-playing-mobile-online-casino
https://2blueberry.mystrikingly.com/blog/the-most-effective-method-to-play-slots-for-real-money-online-casino-in-nz
https://2blueberry.mystrikingly.com/blog/top-10-uk-casino-sites-for-players-the-best-online-casinos-in-uk
https://3cherry.mystrikingly.com/blog/why-you-should-try-online-casino-games
https://3cherry.mystrikingly.com/blog/extraordinary-music-picks-while-playing-an-internet-based-gambling-club
https://3cherry.mystrikingly.com/blog/brain-research-of-online-club-players
https://3cherry.mystrikingly.com/blog/best-not-gamstop-casino-2022-betbeard
https://4dragon.mystrikingly.com/blog/what-are-the-advantages-of-online-casino
https://3cave0.blogspot.com/2022/07/how-smartphones-have-propelled-casino.html
https://3cave0.blogspot.com/2022/07/what-are-features-of-best-online-casino.html
https://3cave0.blogspot.com/2022/07/online-club-how-might-you-be-certain.html
https://3cave0.blogspot.com/2022/07/instructions-to-choose-online-casino.html
https://3cave0.blogspot.com/2022/07/what-are-features-of-best-online-casino_21.html
https://4desert.blogspot.com/2022/06/why-playamo-casino-is-gamblers-best.html
https://4desert.blogspot.com/2022/06/online-casino-states-like-pa-drive.html
https://4desert.blogspot.com/2022/06/how-to-play-casino-games-and-win.html
https://4desert.blogspot.com/2022/06/an-insight-into-todays-graphics-on.html
https://4desert.blogspot.com/2022/06/club-market-is-set-to-have-advanced.html
https://4desert.blogspot.com/2022/06/voyage-ships-adding-sports-wagering.html
https://4desert.blogspot.com/2022/06/are-online-club-manipulated.html
https://4desert.blogspot.com/2022/06/the-most-effective-method-to-win-at.html
https://4desert.blogspot.com/2022/06/when-to-double-down-in-blackjack.html
https://4desert.blogspot.com/2022/06/celebs-that-endorse-online-casinos.html
https://4desert.blogspot.com/2022/06/how-artificial-intelligence-is.html
https://4desert.blogspot.com/2022/06/google-mobile-search-surge-mirrors.html
https://4desert.blogspot.com/2022/06/best-online-casino-2022-top-gambling.html
https://4desert.blogspot.com/2022/06/various-kinds-of-web-based-gambling.html
https://4desert.blogspot.com/2022/06/from-casino-games-to-movies-why-are.html
https://4desert.blogspot.com/2022/06/5-of-best-side-hustles-that-you-can.html
https://4desert.blogspot.com/2022/07/how-to-forestall-your-web-based-gaming.html
https://4dragon.mystrikingly.com/blog/high-stakes-betting-at-online-gambling-clubs-in-canada
https://4dragon.mystrikingly.com/blog/gaming-innovation-group-powers-lucky-days-online-gambling-club-send-off-in
https://4dragon.mystrikingly.com/blog/4rabet-review-online-casino-with-sports-betting
https://4dragon.mystrikingly.com/blog/888-casino-canada-review-2022-is-888-casino-legit-and-safe-to-use
https://5emblica.mystrikingly.com/blog/online-casino-gambling-company-opens-studio-in-fairfield
https://5emblica.mystrikingly.com/blog/what-tech-is-meaning-for-online-casino-industry
https://5emblica.mystrikingly.com/blog/online-casino-gambling-company-opens-studio-in-fairfield-52ef432e-77f9-424f-9413-fd194aaf1502
https://5emblica.mystrikingly.com/blog/online-casino-industry-market-including-top-central-members-bettson-ab-netent
https://5emblica.mystrikingly.com/blog/most-recent-newsholland-casino-online-to-add-netent-online-openings-for-dutch
https://4desert.blogspot.com/2022/07/top-best-club-superstars-on-planet.html
https://4desert.blogspot.com/2022/07/internet-betting-or-in-game-elements-in.html
https://4desert.blogspot.com/2022/07/how-to-increase-your-winning-chances.html
https://4desert.blogspot.com/2022/07/5-tips-to-help-you-win-at-your-first.html
https://4desert.blogspot.com/2022/07/tips-on-how-to-optimize-your-betting.html
https://4desert.blogspot.com/2022/07/instructions-to-play-online-casino-for.html
https://4desert.blogspot.com/2022/07/victoria-acquaints-new-measures-with.html
https://4desert.blogspot.com/2022/07/the-most-up-to-date-mature-market.html
https://4desert.blogspot.com/2022/07/so-you-want-to-build-online-casino.html
https://4desert.blogspot.com/2022/07/5-top-things-to-look-out-for-when.html
https://4desert.blogspot.com/2022/07/could-online-casino-players-at-any.html
https://4desert.blogspot.com/2022/07/all-that-you-need-to-know-how-to-win-on.html
https://4desert.blogspot.com/2022/07/step-by-step-instructions-to-win-online.html
https://4desert.blogspot.com/2022/07/the-five-most-popular-online-casino.html
https://5eclipse.blogspot.com/2022/06/the-future-of-online-casinos-in-india.html
https://5eclipse.blogspot.com/2022/06/esports-betting-with-cryptocurrency-at.html
https://5eclipse.blogspot.com/2022/06/how-fame-of-online-gambling-clubs.html
https://5eclipse.blogspot.com/2022/06/the-obligation-to-dependable-gaming.html
https://5eclipse.blogspot.com/2022/06/top-space-themed-casinos-and-casino.html
https://5eclipse.blogspot.com/2022/06/breaking-down-best-methods-to-recognize.html
https://5eclipse.blogspot.com/2022/06/8-facts-you-should-know-about-online.html
https://5eclipse.blogspot.com/2022/06/ais-invisible-contributions-to-casino.html
https://5eclipse.blogspot.com/2022/06/look-further-into-online-gambling-clubs.html
https://5eclipse.blogspot.com/2022/06/top-internet-based-club-games-to-play.html
https://5eclipse.blogspot.com/2022/06/gambling-club-games-designed-in-view-of.html
https://5eclipse.blogspot.com/2022/06/why-more-players-are-choosing-online.html
https://5eclipse.blogspot.com/2022/06/online-casino-promotions.html
https://5eclipse.blogspot.com/2022/06/evolution-live-casino-offering-goes.html
https://5eclipse.blogspot.com/2022/06/pokerstars-obtains-poker-license-to.html
https://5eclipse.blogspot.com/2022/06/amateurs-guide-to-must-know-poker-hands.html
https://5eclipse.blogspot.com/2022/07/online-casinos-versus-live-casinos-pros.html
https://5eclipse.blogspot.com/2022/07/best-online-casinos-with-sign-up.html
https://5eclipse.blogspot.com/2022/07/is-it-beneficial-to-run-personal-web.html
https://5eclipse.blogspot.com/2022/07/7-best-online-casinos-in-canada-for.html
https://5eclipse.blogspot.com/2022/07/unfamiliar-casinos-have-been-disaster.html
https://5eclipse.blogspot.com/2022/07/casino-and-gaming-market.html
https://5eclipse.blogspot.com/2022/07/why-online-casino-providers-use-popular.html
https://5eclipse.blogspot.com/2022/07/the-evolution-of-mobile-roulette-games.html
https://5eclipse.blogspot.com/2022/07/why-it-is-better-to-use-casino.html
https://5eclipse.blogspot.com/2022/07/an-inside-look-how-to-find-ideal-online.html
https://5eclipse.blogspot.com/2022/07/wheel-of-fortune-to-become-standalone.html
https://5eclipse.blogspot.com/2022/07/most-well-known-web-based-gambling-club.html
https://5eclipse.blogspot.com/2022/07/what-is-real-money-online-casino-and.html
https://5eclipse.blogspot.com/2022/07/tips-to-find-online-casino-games.html
https://5eclipse.blogspot.com/2022/07/is-online-poker-good-or-bad-for-us.html
https://artic1.mystrikingly.com/blog/what-s-online-gambling-s-place-in-campus-life
https://artic1.mystrikingly.com/blog/how-to-find-the-safest-online-casino-6-useful-tips
https://artic1.mystrikingly.com/blog/benefits-of-crypto-casino
https://artic1.mystrikingly.com/blog/why-are-betting-apps-becoming-increasingly-popular
https://artic1.mystrikingly.com/blog/how-to-choose-a-safe-online-casino
https://artic1.mystrikingly.com/blog/rewards-at-online-casino-wagering-requirements
https://artic1.mystrikingly.com/blog/what-is-the-future-of-casino-tourism
https://artic1.mystrikingly.com/blog/free-twists-and-other-web-based-club-rewards-what-you-want-to-be-aware
https://artic1.mystrikingly.com/blog/the-differences-between-online-blackjack-and-land-based-blackjack-games
https://artic1.mystrikingly.com/blog/past-smorgasbords-and-spaces-casinos-twofold-down-on-artistic-work
https://artic1.mystrikingly.com/blog/the-set-of-experiences-behind-blackjack-s-prosperity
https://artic1.mystrikingly.com/blog/why-are-online-casino-games-popular
https://artic1.mystrikingly.com/blog/how-to-earn-money-by-playing-online-casino-games
https://artic1.mystrikingly.com/blog/step-by-step-instructions-to-select-the-right-online-casino
https://artic1.mystrikingly.com/blog/top-5-real-money-casino-games-for-android
https://artic1.mystrikingly.com/blog/the-most-effective-method-to-begin-an-internet-based-club-business
https://artic1.mystrikingly.com/blog/best-online-casino-games-in-the-netherlands
https://artic1.mystrikingly.com/blog/betting-is-on-the-ascent-all-in-all-in-the-uk-and-in-scotland-here-s
https://artic1.mystrikingly.com/blog/ways-to-play-poker-on-the-web
https://beach.mystrikingly.com/blog/what-is-rng-at-online-casinos-and-why-it-s-so-significant
https://beach.mystrikingly.com/blog/how-did-the-development-of-modern-online-payment-systems-affect-the
https://beach.mystrikingly.com/blog/15-best-online-casino-bonuses
https://beach.mystrikingly.com/blog/how-did-online-slots-become-the-most-popular-type-of-casino-game
https://beach.mystrikingly.com/blog/how-online-casino-gambling-has-turned-into-a-world-renowned-phenomenon
https://beach.mystrikingly.com/blog/focuses-to-consider-for-choosing-the-best-crypto-poker
https://beach.mystrikingly.com/blog/the-legalities-of-playing-at-a-mobile-casino
https://beach.mystrikingly.com/blog/web-based-gambling-may-be-under-attack-in-upcoming-uk-white-paper
https://beach.mystrikingly.com/blog/web-based-wagering-in-florida-has-it-been-legitimized-how-to-wager-on-the
https://beach.mystrikingly.com/blog/a-center-ground-that-club-and-the-esports-business-need-to-move-to-and-that
https://beach.mystrikingly.com/blog/best-casino-game-providers
https://beach.mystrikingly.com/blog/disapproving-of-your-business-the-gambling-club-is-learning-ground-for-every
https://beach.mystrikingly.com/blog/texas-hold-em-or-video-poker-battle-of-the-best-poker-odds-online
https://beach.mystrikingly.com/blog/7-advantages-of-playing-online-casino-games
https://beach.mystrikingly.com/blog/key-online-casino-gaming
https://beach.mystrikingly.com/blog/casino-games-what-are-the-best-gambling-club-web-based-games-today-on-the-web
https://beach.mystrikingly.com/blog/how-has-the-online-casino-industry-evolved-in-the-past-few-years
https://beach.mystrikingly.com/blog/the-best-paying-games-in-online-casinos
https://beach.mystrikingly.com/blog/how-to-increase-your-online-casino-winnings
https://desert000.mystrikingly.com/blog/benefits-and-elements-of-blackjack-web-based-games-in-2022
https://desert000.mystrikingly.com/blog/why-perusing-gambling-club-audits-is-significant
https://desert000.mystrikingly.com/blog/online-casino-market-major-impacting-factors-that-can-win-the-industry-in-us
https://desert000.mystrikingly.com/blog/best-payment-options-for-gambling-transactions-in-internet-slots-australia
https://desert000.mystrikingly.com/blog/reward-frameworks-in-web-based-club-how-to-utilize-rewards-to-draw-in-and
https://desert000.mystrikingly.com/blog/what-online-roulette-games-can-you-play-in-new-zealand
https://desert000.mystrikingly.com/blog/online-poker-platform-market-size-2022-statistics
https://desert000.mystrikingly.com/blog/unibet-becomes-fourth-online-poker-room-in-the-netherlands
https://desert000.mystrikingly.com/blog/programming-behind-casino-websites
https://desert000.mystrikingly.com/blog/best-nz-online-gambling-club-locales-top-appraised-web-based-club-for-new
https://desert000.mystrikingly.com/blog/playing-casino-games-during-halftime
https://desert000.mystrikingly.com/blog/club-industry-s-most-influential-leaders-and-ceos
https://desert000.mystrikingly.com/blog/positioning-the-8-most-memorable-tilts-in-poker-history
https://desert000.mystrikingly.com/blog/the-transition-from-offline-to-online-gambling-in-india
https://desert000.mystrikingly.com/blog/how-can-technology-affect-the-online-casino-industry
https://desert000.mystrikingly.com/blog/the-best-playing-cards-for-game-night-in-2022
https://desert000.mystrikingly.com/blog/step-by-step-instructions-to-prevent-a-gambling-addiction-simple-rules-for
https://desert000.mystrikingly.com/blog/the-online-gambling-gusher-and-how-to-tax-it
https://desert000.mystrikingly.com/blog/best-3-sites-for-playing-online-casino-games-in-canada
https://5eclipse.mystrikingly.com/blog/the-future-of-online-gaming-with-the-metaverse
https://5eclipse.mystrikingly.com/blog/gambling-clubs-not-downturn-resistant-yet-a-reasonable-recuperation-play
https://5eclipse.mystrikingly.com/blog/what-is-the-difference-between-real-slot-machines-and-online-slots
https://5eclipse.mystrikingly.com/blog/who-are-the-top-programming-suppliers-for-online-club
https://5eclipse.mystrikingly.com/blog/benefits-of-portable-betting-destinations-for-indian-players
https://5eclipse.mystrikingly.com/blog/online-casinos-sign-up-bonuses-what-you-want-to-be-aware
https://5eclipse.mystrikingly.com/blog/how-movies-impact-poker-players-image
https://5eclipse.mystrikingly.com/blog/internet-gambling-and-it-is-booming-worldwide-to-bet-market
https://5eclipse.mystrikingly.com/blog/interactivity-differences-between-table-roulette-and-video-roulette
https://5eclipse.mystrikingly.com/blog/overview-of-online-casino-industry-in-asian-markets-in-2022
https://5eclipse.mystrikingly.com/blog/the-benefits-of-cryptocurrency-in-live-online-casino-games
https://5eclipse.mystrikingly.com/blog/betting-corporation-las-vegas-sands-plans-to-create-a-new-casino-in-florida
https://5eclipse.mystrikingly.com/blog/gambling-club-gaming-market-business-strategy-2022
https://5eclipse.mystrikingly.com/blog/how-online-casino-and-the-gaming-industry-are-intertwined
https://5eclipse.mystrikingly.com/blog/7-best-online-casinos-in-germany-with-huge-bonuses
https://5eclipse.mystrikingly.com/blog/web-based-gambling-and-betting-market-boosting-growth-worldwide-by-2030
https://5eclipse.mystrikingly.com/blog/how-to-choose-the-online-baccarat-site
https://5eclipse.mystrikingly.com/blog/gclub-casino-is-an-exceptionally-evaluated-web-based-betting-website-known
https://5eclipse.mystrikingly.com/blog/step-by-step-instructions-to-choose-the-right-online-casino-game-for-you
https://cave000.mystrikingly.com/blog/what-worldwide-web-based-gambling-clubs-offer-in-contrast-with-malta-land
https://cave000.mystrikingly.com/blog/the-importance-of-choosing-provably-fair-games-on-dogecoin-gambling-sites
https://cave000.mystrikingly.com/blog/10-best-online-casinos-in-canada-for-real-money-gambling-and-huge-wins
https://cave000.mystrikingly.com/blog/playing-at-online-casinos-in-new-zealand-is-it-safe-and-legal
https://cave000.mystrikingly.com/blog/best-games-at-online-casino-2022
https://cave000.mystrikingly.com/blog/betting-industry-what-bodies-regulate-online-casinos
https://cave000.mystrikingly.com/blog/how-do-the-big-world-events-influence-gambling
https://cave000.mystrikingly.com/blog/how-social-media-and-the-casino-industry-interact
https://cave000.mystrikingly.com/blog/the-most-recent-live-club-games-stirring-up-the-business
https://cave000.mystrikingly.com/blog/is-it-even-possible-to-create-effective-strategies-to-play-roulette
https://cave000.mystrikingly.com/blog/5-best-casinos-in-mexico-and-the-world
https://cave000.mystrikingly.com/blog/company-employing-400-individuals-in-ct-for-new-web-based-betting-service
https://cave000.mystrikingly.com/blog/ontario-online-poker-players-unhappy-with-new-provincial-market
https://cave000.mystrikingly.com/blog/8-things-to-keep-in-mind-while-playing-free-online-slots
https://cave000.mystrikingly.com/blog/greatest-innovations-in-online-casino-industry
https://cave000.mystrikingly.com/blog/what-are-the-fundamental-difficulties-to-betting-related-business
https://cave000.mystrikingly.com/blog/instructions-to-compare-online-casinos-to-find-the-best-one
https://cave000.mystrikingly.com/blog/a-fast-manual-for-gambling-club-chip-types-and-frameworks
https://cave000.mystrikingly.com/blog/trend-setting-innovations-in-online-casino-games
https://1arctic.blogspot.com/2022/07/for-what-reason-is-online-casino.html
https://2beach0.blogspot.com/2022/07/5-best-online-casino-gambling-sites.html
https://3cave0.blogspot.com/2022/07/7-little-known-benefits-of-playing.html
https://4desert.blogspot.com/2022/07/what-to-consider-before-playing-for.html
https://5eclipse.blogspot.com/2022/07/why-do-we-select-best-online-casino.html
https://artic1.mystrikingly.com/blog/step-by-step-instructions-to-choose-a-reliable-online-casino-advice-from
https://beach.mystrikingly.com/blog/top-club-games-that-individuals-ought-to-test
https://cave000.mystrikingly.com/blog/beginner-tips-registration-process-and-safe-playing-at-an-online-casino
https://desert000.mystrikingly.com/blog/the-most-effective-method-to-arrive-at-players-and-fabricate-a-web-based
https://5eclipse.mystrikingly.com/blog/the-most-effective-method-to-know-if-an-online-casino-is-trusted-and-secure
https://1apricot0.blogspot.com/2022/07/new-online-casinos-vs-live-casinos-pros.html
https://3cherry0.blogspot.com/2022/07/gambling-club-need-luck-or-skills.html
https://4dragonfruit.blogspot.com/2022/07/the-amount-money-does-online-casino.html
https://5emblica.blogspot.com/2022/07/all-that-you-need-to-know-how-to-win-on.html
https://1apricot.mystrikingly.com/blog/how-no-deposit-casino-bonuses-work
https://2blueberry.mystrikingly.com/blog/best-online-casino-games-how-to-choose-the-right-one-for-you
https://3cherry.mystrikingly.com/blog/nz-online-casino-market-skyrockets-what-s-driving-the-boom
https://4dragon.mystrikingly.com/blog/meet-the-5-types-of-online-casino-gambling-players
https://5emblica.mystrikingly.com/blog/the-increase-in-the-variety-of-online-casino-games-is-now-available-to-u-s
https://2blueberry0.blogspot.com/2022/07/best-online-casinos-to-play-real-money.html
https://2blueberry0.blogspot.com/2022/07/new-to-casinos-here-are-easiest-games.html
https://3cherry0.blogspot.com/2022/07/the-best-online-casino-games.html
https://4dragonfruit.blogspot.com/2022/07/online-casino-versus-live-casino.html
https://5emblica.blogspot.com/2022/07/kinds-of-online-casino-games.html
https://1apricot.mystrikingly.com/blog/what-are-the-most-popular-casino-games-to-play-online-in-canada
https://2blueberry.mystrikingly.com/blog/how-casino-games-got-their-names
https://3cherry.mystrikingly.com/blog/most-profitable-casino-games-play-to-win
https://4dragon.mystrikingly.com/blog/10-web-based-betting-realities-and-insights-that-you-ought-to-be-aware
https://5emblica.mystrikingly.com/blog/the-benefits-of-getting-into-the-online-casino-business
https://1arctic.blogspot.com/2022/07/what-to-look-out-for-in-online-casino.html
https://2beach0.blogspot.com/2022/07/step-by-step-instructions-to-pay-for.html
https://3cave0.blogspot.com/2022/07/best-casino-bets-video-poker-versus.html
https://4desert.blogspot.com/2022/07/5-celebrities-that-like-to-play-in.html
https://5eclipse.blogspot.com/2022/07/australian-gamblers-to-receive-monthly.html
https://artic1.mystrikingly.com/blog/how-online-casino-gambling-has-turned-into-a-world-renowned-phenomenon
https://beach.mystrikingly.com/blog/online-casino-gambling-company-opens-studio-in-fairfield
https://cave000.mystrikingly.com/blog/all-you-need-to-know-about-mobile-casino
https://desert000.mystrikingly.com/blog/casino-pros-and-cons-an-online-casino-in-your-pocket
https://5eclipse.mystrikingly.com/blog/stunts-for-playing-casino-games-on-mobile-devices
https://1apricot0.blogspot.com/2022/07/the-best-games-to-play-in-web-based-club_25.html
https://1arctic.blogspot.com/2022/07/how-to-play-safely-in-mobile-online.html
https://2beach0.blogspot.com/2022/07/top-casino-games.html
https://3cave0.blogspot.com/2022/07/why-you-want-to-peruse-online-gambling.html
https://4desert.blogspot.com/2022/07/your-online-casino-bonus-guide.html
https://5eclipse.blogspot.com/2022/07/the-most-common-payment-methods-that.html
https://artic1.mystrikingly.com/blog/5-signs-that-an-online-casino-is-legit
https://beach.mystrikingly.com/blog/michigan-web-based-betting-income-declines-for-third-back-to-back-month-in-june
https://cave000.mystrikingly.com/blog/nj-online-casinos-still-huge-driver-for-overall-state-gambling-revenue
https://desert000.mystrikingly.com/blog/5-top-reasons-why-you-need-an-online-casino-guide-before-getting-started
https://5eclipse.mystrikingly.com/blog/which-poker-strategies-work-best
https://1apricot0.blogspot.com/2022/07/why-you-want-to-peruse-online-gambling.html
https://2blueberry0.blogspot.com/2022/07/the-evolution-of-online-casinos-over.html
https://3cherry0.blogspot.com/2022/07/best-online-gambling-sites-malaysia-is.html
https://4dragonfruit.blogspot.com/2022/07/paridirect-review-of-new-french-online.html
https://5emblica.blogspot.com/2022/07/online-casino-market-analysis-and.html
https://1apricot.mystrikingly.com/blog/instructions-to-start-gamble-online-step-by-step-guide-for-newbies
https://2blueberry.mystrikingly.com/blog/web-based-gambling-market-growth-global-foresight-key-growth-drivers
https://3cherry.mystrikingly.com/blog/could-online-gambling-at-any-point-be-safely-regulated
https://4dragon.mystrikingly.com/blog/the-most-effective-method-to-start-gamble-online-step-by-step-guide-for-newbies
https://5emblica.mystrikingly.com/blog/gambling-clubs-do-not-need-to-cheat-and-live-games-undergo-fairness-audits
https://2blueberry0.blogspot.com/2022/07/the-most-widespread-slot-machines-themes.html
https://3cherry0.blogspot.com/2022/07/sports-betting-problem-gambling-and.html
https://1apricot0.blogspot.com/2022/07/betwinner-online-sports-betting-and.html
https://4dragonfruit.blogspot.com/2022/07/play-and-earn-5-igaming-brands-that.html
https://5emblica.blogspot.com/2022/07/big-time-gaming-changes-up-qtech-games.html
https://1arctic.blogspot.com/2022/07/online-pokies-hacks-in-new-zealand.html
https://2beach0.blogspot.com/2022/07/are-distractions-costing-you-at-casino.html
https://3cave0.blogspot.com/2022/07/what-games-are-better-to-choose-at.html
https://4desert.blogspot.com/2022/07/how-to-find-slot-machines-that-are-most.html
https://5eclipse.blogspot.com/2022/07/the-different-versions-of-video-poker.html
https://1apricot.mystrikingly.com/blog/the-white-paper-on-betting-change-puts-club-administrators-on-the-edge
https://2blueberry.mystrikingly.com/blog/best-outside-bets-in-roulette
https://3cherry.mystrikingly.com/blog/what-s-in-store-for-casino-stocks-with-the-rise-of-blockchain-gambling
https://4dragon.mystrikingly.com/blog/most-recent-news8-common-sports-betting-mistakes-you-need-to-avoid
https://5emblica.mystrikingly.com/blog/top-5-cryptocurrency-casinos-in-the-uk
https://artic1.mystrikingly.com/blog/bet-like-the-pros-ways-to-make-a-profit
https://beach.mystrikingly.com/blog/the-most-effective-method-to-compare-online-casinos-to-find-the-best-one
https://cave000.mystrikingly.com/blog/instructions-to-use-bitcoin-at-gambling-sites
https://desert000.mystrikingly.com/blog/the-best-casinos-in-new-york
https://5eclipse.mystrikingly.com/blog/a-brief-history-of-poker-from-its-origins-to-today
https://1apricot0.blogspot.com/2022/07/for-what-reason-do-you-need-to-read.html
https://2blueberry0.blogspot.com/2022/07/undoubtedly-bitcoin-is-getting-forward.html
https://3cherry0.blogspot.com/2022/07/how-to-play-virtual-sporting-events-on.html
https://4dragonfruit.blogspot.com/2022/07/are-distractions-costing-you-at-casino.html
https://5emblica.blogspot.com/2022/07/top-5-cryptocurrency-casinos-in-uk.html
https://1arctic.blogspot.com/2022/07/luck-or-methodology-and-rationale-which.html
https://2beach0.blogspot.com/2022/07/the-casino-games-to-play-if-you-dont.html
https://3cave0.blogspot.com/2022/07/6-tactics-on-how-to-win-at-online.html
https://4desert.blogspot.com/2022/07/step-by-step-instructions-to-increase.html
https://5eclipse.blogspot.com/2022/07/conventional-casino-games.html
https://1apricot.mystrikingly.com/blog/nsoft-casino-visual-advancement-of-online-openings
https://2blueberry.mystrikingly.com/blog/top-five-travel-objections-with-the-best-club
https://3cherry.mystrikingly.com/blog/top-five-gambling-clubs-permitting-cash-withdrawal
https://4dragon.mystrikingly.com/blog/web-gaming-might-open-crypto-doors
https://5emblica.mystrikingly.com/blog/the-best-club-games-and-computer-games-any-football-fan-ought-to-be-aware
https://artic1.mystrikingly.com/blog/why-playing-mobile-casino-games-is-one-of-the-best-options
https://beach.mystrikingly.com/blog/how-to-claim-a-casino-bonus-in-the-uk
https://cave000.mystrikingly.com/blog/the-sensation-of-triumph-while-playing-for-genuine-cash-in-web-based-gambling
https://desert000.mystrikingly.com/blog/roulette-wheel-game-can-bring-you-more-benefits-and-here-is-why-meaning-and
https://5eclipse.mystrikingly.com/blog/rating-the-best-online-blackjack-in-the-usa
https://1apricot0.blogspot.com/2022/07/why-playing-mobile-casino-games-is-one.html
https://2blueberry0.blogspot.com/2022/07/the-sensation-of-triumph-while-playing.html
https://3cherry0.blogspot.com/2022/07/are-there-any-video-game-themed-online.html
https://4dragonfruit.blogspot.com/2022/07/online-casino-security-ddos-attack-and.html
https://5emblica.blogspot.com/2022/07/new-jerseys-resorts-casino-teams-up.html
https://2blueberry.mystrikingly.com/blog/roulette-wheel-game-can-bring-you-more-benefits-and-here-is-why-meaning-and
https://3cherry.mystrikingly.com/blog/rating-the-best-online-blackjack-in-the-usa
https://1apricot.mystrikingly.com/blog/the-grand-casino-orenes-bets-on-zitro-s-wheel-of-legends
https://4dragon.mystrikingly.com/blog/why-playing-mobile-casino-games-is-one-of-the-best-options
https://5emblica.mystrikingly.com/blog/measurements-of-players-in-casinos-in-the-world
https://1arctic.blogspot.com/2022/07/online-casino-gambling.html
https://2beach0.blogspot.com/2022/07/how-to-make-money-at-online-casinos.html
https://3cave0.blogspot.com/2022/07/a-typical-day-in-casino-according-to.html
https://4desert.blogspot.com/2022/07/7-things-you-need-to-know-about-playing.html
https://5eclipse.blogspot.com/2022/07/all-you-need-to-know-about-online.html
https://artic1.mystrikingly.com/blog/how-to-play-online-casino-singapore-safely
https://beach.mystrikingly.com/blog/why-internet-gaming-industry-s-candle-is-consuming-on-the-two-closures-in-the
https://cave000.mystrikingly.com/blog/upsides-and-downsides-of-online-casinos-keep-these-things-in-mind-before-you
https://desert000.mystrikingly.com/blog/online-gambling-and-betting-market-to-see-incredible-growth-during-2022-2029
https://5eclipse.mystrikingly.com/blog/instructions-to-adjust-your-online-poker-strategy-for-playing-live-games
https://1arctic.blogspot.com/2022/08/best-casino-apps.html
https://2beach0.blogspot.com/2022/08/why-are-mobile-casino-apps-so-popular.html
https://3cave0.blogspot.com/2022/08/mobile-casino-bonuses.html
https://4desert.blogspot.com/2022/08/is-online-gambling-legal-in-latin.html
https://5eclipse.blogspot.com/2022/08/how-free-chips-work-in-online-casino-biz.html
https://1apricot0.blogspot.com/2022/08/5-most-popular-online-casino-games-in.html
https://2blueberry0.blogspot.com/2022/08/3-most-popular-casino-games-with.html
https://3cherry0.blogspot.com/2022/08/best-progressive-jackpots-you-can-find.html
https://4dragonfruit.blogspot.com/2022/08/whats-difference-between-american-and.html
https://5emblica.blogspot.com/2022/08/all-that-you-need-to-know-about-tipping.html
https://artic1.mystrikingly.com/blog/best-mobile-poker-apps-for-real-money-in-2022
https://beach.mystrikingly.com/blog/vital-gambling-supplies-and-important-casino-equipment
https://cave000.mystrikingly.com/blog/botches-you-should-avoid-in-online-casinos
https://desert000.mystrikingly.com/blog/online-casino-enjoy-without-getting-up-from-your-living-room-couch
https://5eclipse.mystrikingly.com/blog/ireland-s-the-wild-west-of-online-gambling
https://1apricot.mystrikingly.com/blog/gambletypes-of-live-casino-games-on-the-online-gambling-scene
https://2blueberry.mystrikingly.com/blog/what-is-statistically-the-best-way-to-play-roulette
https://3cherry.mystrikingly.com/blog/how-to-play-online-casino-singapore-safely
https://4dragon.mystrikingly.com/blog/techniques-for-winning-at-online-casinos
https://5emblica.mystrikingly.com/blog/what-makes-online-sports-betting-so-enticing-for-users
https://1apricot0.blogspot.com/2022/08/a-lot-of-online-casinos-offer-poker-but.html
https://2blueberry0.blogspot.com/2022/08/botches-you-should-avoid-in-online.html
https://3cherry0.blogspot.com/2022/08/instructions-to-win-online-casino-games.html
https://4dragonfruit.blogspot.com/2022/08/what-best-onli-bluechipne-casino-has-to.html
https://5emblica.blogspot.com/2022/08/picking-right-music-for-online-gambling.html
https://1arctic.blogspot.com/2022/08/picking-best-online-casino.html
https://2beach0.blogspot.com/2022/08/what-best-online-casino-has-to-offer-you.html
https://3cave0.blogspot.com/2022/08/the-most-effective-method-to-maximize.html
https://4desert.blogspot.com/2022/08/the-worlds-most-popular-online-casino.html
https://5eclipse.blogspot.com/2022/08/online-roulette-how-to-win-often-at.html
https://1apricot.mystrikingly.com/blog/top-sites-to-play-three-card-poker-online-in-2022
https://2blueberry.mystrikingly.com/blog/ireland-s-the-wild-west-of-online-gambling
https://3cherry.mystrikingly.com/blog/social-betting-among-family-companions-at-home-legitimized-from-aug-1-as-new
https://4dragon.mystrikingly.com/blog/a-comprehensive-study-investigating-online-gambling-market
https://5emblica.mystrikingly.com/blog/bigwinner-a-well-known-gambling-club-and-wagering-site-committed-for-indian
https://artic1.mystrikingly.com/blog/5-propensities-for-savvy-online-gambling-club-players
https://beach.mystrikingly.com/blog/why-security-is-important-when-choosing-an-online-casino-in-california
https://cave000.mystrikingly.com/blog/vr-devices-to-enjoy-online-casino-gambling
https://desert000.mystrikingly.com/blog/significant-features-every-good-online-casino-should-offer
https://5eclipse.mystrikingly.com/blog/for-what-reason-do-customers-find-online-space-games-so-well-known
https://1apricot0.blogspot.com/2022/08/best-online-casino-to-win-money-in-2022.html
https://2blueberry0.blogspot.com/2022/08/novices-guide-to-playing-online-casinos.html
https://3cherry0.blogspot.com/2022/08/online-casino-enjoy-without-getting-up.html
https://4dragonfruit.blogspot.com/2022/08/playing-casino-games-3-tips-for.html
https://5emblica.blogspot.com/2022/08/step-by-step-instructions-to-choose.html
https://1apricot.mystrikingly.com/blog/online-casino-trends-to-watch-out-for
https://2blueberry.mystrikingly.com/blog/what-cricket-bettors-can-learn-from-online-casino-games
https://3cherry.mystrikingly.com/blog/instructions-to-maximize-your-profits-when-playing-online-casino-games
https://4dragon.mystrikingly.com/blog/top-10-most-reliable-online-casinos
https://5emblica.mystrikingly.com/blog/what-is-online-club-and-sorts-of-online-club
https://1arctic.blogspot.com/2022/08/guide-to-online-casino-rewards.html
https://2beach0.blogspot.com/2022/08/for-what-reason-are-casino-bonuses.html
https://3cave0.blogspot.com/2022/08/is-online-live-roulette-genuine.html
https://4desert.blogspot.com/2022/08/five-advantages-of-casino-bonus-offers.html
https://5eclipse.blogspot.com/2022/08/popular-types-of-casino-bonuses-you-can.html
https://artic1.mystrikingly.com/blog/why-do-online-casinos-give-out-so-much-free-money
https://beach.mystrikingly.com/blog/5-internet-based-club-tips-for-amateurs
https://cave000.mystrikingly.com/blog/what-is-online-casino-bonus-wagering
https://desert000.mystrikingly.com/blog/how-you-can-stop-yourself-from-becoming-an-online-casino-bonus-abuser
https://5eclipse.mystrikingly.com/blog/online-casinos-features-benefits-and-how-to-use-them
https://1arctic.blogspot.com/2022/08/various-types-of-rewards-and-bonuses-in.html
https://2beach0.blogspot.com/2022/08/which-casino-bonuses-do-beginners-have.html
https://3cave0.blogspot.com/2022/08/instructions-to-use-casino-promo-and.html
https://4desert.blogspot.com/2022/08/what-are-online-casino-bonuses-types-of.html
https://5eclipse.blogspot.com/2022/08/instructions-to-choose-best-casino.html
https://1apricot0.blogspot.com/2022/08/the-most-intriguing-web-based-club.html
https://2blueberry0.blogspot.com/2022/08/most-famous-web-based-gambling-club.html
https://3cherry0.blogspot.com/2022/08/how-to-safe-and-play-club-games.html
https://4dragonfruit.blogspot.com/2022/08/5-of-best-live-online-casino-software.html
https://5emblica.blogspot.com/2022/08/online-casino-what-are-winning.html
https://1apricot.mystrikingly.com/blog/what-makes-online-casinos-attractive-for-gamblers
https://2blueberry.mystrikingly.com/blog/picking-the-best-online-casino-site
https://3cherry.mystrikingly.com/blog/the-most-effective-method-to-take-your-baccarat-game-to-a-higher-level
https://4dragon.mystrikingly.com/blog/blessings-of-online-gambling
https://5emblica.mystrikingly.com/blog/focuses-to-remember-while-choosing-the-right-online-casino
https://artic1.mystrikingly.com/blog/pick-an-online-casino-properly
https://beach.mystrikingly.com/blog/most-recent-technologies-used-in-online-casinos
https://cave000.mystrikingly.com/blog/bitcoin-is-just-one-big-online-casino-how-about-we-just-admit-it
https://desert000.mystrikingly.com/blog/how-to-make-your-online-casino-game-more-successful-with-music
https://5eclipse.mystrikingly.com/blog/online-slots-are-the-number-one-online-game
https://1apricot0.blogspot.com/2022/08/philippine-court-certifies-positive.html
https://2blueberry0.blogspot.com/2022/08/programming-organization-proxous.html
https://3cherry0.blogspot.com/2022/08/is-gambling-worth-it-6-questions-to-ask.html
https://4dragonfruit.blogspot.com/2022/08/the-indian-gaming-boom.html
https://5emblica.blogspot.com/2022/08/ohio-responsible-gambling-campaign.html
https://1apricot.mystrikingly.com/blog/new-york-online-sports-betting-stays-strong-even-during-summer-doldrums
https://2blueberry.mystrikingly.com/blog/6-most-popular-betting-types-every-beginner-needs-to-know
https://3cherry.mystrikingly.com/blog/club-online-indonesia-compare-the-best-casino-sites-in-our-online-casino-index
https://4dragon.mystrikingly.com/blog/online-casino-regulation
https://5emblica.mystrikingly.com/blog/how-has-the-online-casino-industry-evolved-in-the-past-few-years
https://1arctic.blogspot.com/2022/08/complete-guide-to-playing-online-casino.html
https://2beach0.blogspot.com/2022/08/why-playing-mobile-casino-games-is-one.html
https://3cave0.blogspot.com/2022/08/the-most-effective-method-to-find-best.html
https://4desert.blogspot.com/2022/08/web-based-betting-has-advanced-hugely.html
https://5eclipse.blogspot.com/2022/08/playing-in-mobile-online-casino-in-india.html
https://artic1.mystrikingly.com/blog/how-to-recognize-a-good-online-casino
https://beach.mystrikingly.com/blog/the-history-of-gambling-leading-to-online-gambling-and-mobile-online-gambling
https://cave000.mystrikingly.com/blog/web-based-betting-standards-and-guidelines-in-central-europe
https://desert000.mystrikingly.com/blog/android-casino-in-the-netherlands-review
https://5eclipse.mystrikingly.com/blog/tips-for-a-better-gaming-experience
https://1apricot0.blogspot.com/2022/08/how-does-future-of-online-casino-games.html
https://2blueberry0.blogspot.com/2022/08/top-5-reasons-to-use-online-casinos.html
https://3cherry0.blogspot.com/2022/08/online-casinos-profit-or-fun.html
https://4dragonfruit.blogspot.com/2022/08/top-5-online-casino-safest-payment.html
https://5emblica.blogspot.com/2022/08/advantages-and-disadvantages-of.html
https://1arctic.blogspot.com/2022/08/5-online-casino-games-to-play-today.html
https://2beach0.blogspot.com/2022/08/a-few-important-considerations-before.html
https://3cave0.blogspot.com/2022/08/fast-tips-for-most-popular-online.html
https://4desert.blogspot.com/2022/08/well-known-online-casino-games-that-you.html
https://5eclipse.blogspot.com/2022/08/online-casino-games-that-everybody-loves.html
https://artic1.mystrikingly.com/blog/best-table-game-odds-baccarat-craps-or-blackjack
https://beach.mystrikingly.com/blog/types-of-gambling-games-online-running-business-legally-and-successfully
https://cave000.mystrikingly.com/blog/the-best-casino-games-online-how-to-track-down-them
https://desert000.mystrikingly.com/blog/5-propensities-for-brilliant-internet-based-gambling-club-players
https://5eclipse.mystrikingly.com/blog/the-most-effective-method-to-choose-the-best-online-casino
https://1apricot.mystrikingly.com/blog/is-gambling-a-type-cybersport
https://2blueberry.mystrikingly.com/blog/is-it-better-to-stop-slot-machines-or-let-them-spin
https://3cherry.mystrikingly.com/blog/5-tips-for-managing-multiple-online-gambling-accounts
https://4dragon.mystrikingly.com/blog/how-to-get-the-most-out-of-your-free-spins-at-online-casinos
https://5emblica.mystrikingly.com/blog/6-tips-to-find-the-best-online-casino-in-south-africa
https://1apricot0.blogspot.com/2022/08/how-secure-are-online-club-games.html
https://2blueberry0.blogspot.com/2022/08/an-itemized-take-gander-at-few-famous.html
https://3cherry0.blogspot.com/2022/08/7-easiest-and-hardest-skill-based.html
https://4dragonfruit.blogspot.com/2022/08/the-casino-games-to-play-if-you-dont.html
https://5emblica.blogspot.com/2022/08/how-gaming-machines-work-and-why-you.html
https://1arctic.blogspot.com/2022/08/what-are-online-casino-games-each-type.html
https://2beach0.blogspot.com/2022/08/which-software-developers-make-most.html
https://3cave0.blogspot.com/2022/08/most-competitive-online-casino-games.html
https://4desert.blogspot.com/2022/08/rundown-of-most-aggressive-internet.html
https://5eclipse.blogspot.com/2022/08/what-are-online-casinos.html
https://1apricot.mystrikingly.com/blog/could-you-at-any-point-play-at-online-gambling-club-in-malaysia
https://2blueberry.mystrikingly.com/blog/are-online-casino-apps-the-future
https://3cherry.mystrikingly.com/blog/top-5-tips-for-choosing-the-best-european-online-casino
https://4dragon.mystrikingly.com/blog/for-what-reason-do-sports-wagering-fans-play-live-vendor-blackjack
https://5emblica.mystrikingly.com/blog/advantages-of-choosing-online-casino-for-real-cash
https://artic1.mystrikingly.com/blog/might-you-at-any-point-play-at-online-club-in-malaysia
https://beach.mystrikingly.com/blog/are-online-casino-apps-the-future
https://cave000.mystrikingly.com/blog/top-5-tips-for-choosing-the-best-european-online-casino
https://desert000.mystrikingly.com/blog/australian-media-controller-gives-very-first-admonition-for-giving
https://5eclipse.mystrikingly.com/blog/online-casino-versus-land-based-which-is-the-most-ideal-way-to-play
https://1apricot0.blogspot.com/2022/08/what-are-most-popular-online-casino.html
https://2blueberry0.blogspot.com/2022/08/poland-slacking-in-web-based-gambling.html
https://3cherry0.blogspot.com/2022/08/the-most-well-known-web-based-betting.html
https://4dragonfruit.blogspot.com/2022/08/expert-tips-how-to-win-at-slots-in.html
https://5emblica.blogspot.com/2022/08/fb88-88bet1-legitimate-sports-casino.html
https://1arctic.blogspot.com/2022/08/the-top-online-casino-games-in-europe.html
https://2beach0.blogspot.com/2022/08/top-5-internet-based-gambling-club.html
https://3cave0.blogspot.com/2022/08/the-best-methods-for-choosing-online.html
https://4desert.blogspot.com/2022/08/the-most-effective-method-to-win-online.html
https://5eclipse.blogspot.com/2022/08/the-most-popular-casino-games-online-of.html
https://artic1.mystrikingly.com/blog/10-best-online-casino-games-to-try
https://beach.mystrikingly.com/blog/what-are-the-most-popular-online-casino-games-nowadays
https://cave000.mystrikingly.com/blog/the-most-famous-web-based-betting-games-in-italy
https://desert000.mystrikingly.com/blog/master-tips-how-to-win-at-slots-in-online-casino
https://5eclipse.mystrikingly.com/blog/5-ways-the-online-casino-industry-continues-to-innovate-today
https://1apricot.mystrikingly.com/blog/what-has-been-going-on-with-tropicana-online-casino
https://2blueberry.mystrikingly.com/blog/bitstarz-casino-review-an-inside-and-out-analysis-and-best-btc-casino
https://3cherry.mystrikingly.com/blog/the-reason-crypto-casinos-are-on-the-rise
https://4dragon.mystrikingly.com/blog/missteps-to-avoid-when-going-to-a-real-money-casino
https://5emblica.mystrikingly.com/blog/mummys-gold-casino
https://1apricot0.blogspot.com/2022/08/how-web-based-betting-changed-bingo.html
https://2blueberry0.blogspot.com/2022/08/the-technology-behind-online-casino.html
https://3cherry0.blogspot.com/2022/08/manual-for-playing-online-slots-in.html
https://4dragonfruit.blogspot.com/2022/08/casino-technology-toasts-10-year.html
https://5emblica.blogspot.com/2022/08/advantages-of-playing-free-slots.html
https://1apricot.mystrikingly.com/blog/online-slots-guide-play-casino-slots-real-money-and-free-today
https://2blueberry.mystrikingly.com/blog/realtime-gaming
https://3cherry.mystrikingly.com/blog/best-laptop-for-playing-online-casino-games
https://4dragon.mystrikingly.com/blog/intriguing-online-slots-by-vegas-x
https://5emblica.mystrikingly.com/blog/land-based-casinos-versus-online-casinos
https://1arctic.blogspot.com/2022/08/what-is-online-casino.html
https://2beach0.blogspot.com/2022/08/a-guide-to-best-online-casino-games-you.html
https://3cave0.blogspot.com/2022/08/online-casino-games-that-everybody-loves.html
https://4desert.blogspot.com/2022/08/most-popular-online-casino-games-for.html
https://5eclipse.blogspot.com/2022/08/what-are-features-of-best-online-casino.html
https://artic1.mystrikingly.com/blog/best-table-game-odds-baccarat-craps-or-blackjack-885ea2ab-5afe-4534-82d6-6e1509699e8e
https://beach.mystrikingly.com/blog/step-by-step-instructions-to-win-online-casino-games-top-5-tips
https://cave000.mystrikingly.com/blog/online-casino-games
https://desert000.mystrikingly.com/blog/the-best-casino-games-online-how-to-find-them
https://5eclipse.mystrikingly.com/blog/5-reasons-for-the-rise-in-popularity-of-the-online-casino
https://artic1.mystrikingly.com/blog/facts-about-online-casino-games
https://beach.mystrikingly.com/blog/how-does-your-online-casino-names-help-you
https://cave000.mystrikingly.com/blog/how-to-earn-money-by-playing-online-casino-games
https://desert000.mystrikingly.com/blog/6-payment-providers-for-casino-sites
https://5eclipse.mystrikingly.com/blog/5-best-india-online-blackjack-sites
https://1arctic.blogspot.com/2022/08/tips-for-online-casinos.html
https://2beach0.blogspot.com/2022/08/the-quick-guide-to-safe-online-gambling.html
https://3cave0.blogspot.com/2022/08/how-to-find-safe-web-based-betting.html
https://4desert.blogspot.com/2022/08/the-best-casino-sites-for-playing-real.html
https://5eclipse.blogspot.com/2022/08/for-what-reason-do-online-casinos-give.html
https://1apricot0.blogspot.com/2022/08/get-in-loop-with-online-casino-lingo.html
https://2blueberry0.blogspot.com/2022/08/do-chatbots-enhance-or-inhibit-online.html
https://3cherry0.blogspot.com/2022/08/online-casino-gaming-sports-wagering.html
https://4dragonfruit.blogspot.com/2022/08/best-games-and-software-features-at.html
https://5emblica.blogspot.com/2022/08/non-aams-casino-in-italy-2022-betheat.html
https://1apricot.mystrikingly.com/blog/resorts-promo-code-online-casino-promos-post-title
https://2blueberry.mystrikingly.com/blog/player-protection-responsibility-how-do-casinos-protect-their-players
https://3cherry.mystrikingly.com/blog/how-online-slots-became-so-popular
https://4dragon.mystrikingly.com/blog/what-advantages-might-you-at-any-point-rely-on-as-a-gambling-club-client
https://5emblica.mystrikingly.com/blog/the-rising-influence-of-casino-apps-on-the-gambling-industry
https://1apricot0.blogspot.com/2022/08/sino-gaming-magnate-held-for-unlawful.html
https://2blueberry0.blogspot.com/2022/08/are-slots-right-for-you.html
https://3cherry0.blogspot.com/2022/08/the-seven-most-useful-cryptocurrency.html
https://4dragonfruit.blogspot.com/2022/08/why-mobile-games-will-keep-on-growing.html
https://5emblica.blogspot.com/2022/08/6-annoying-habits-every-bad-gambler.html
https://1arctic.blogspot.com/2022/08/how-to-choose-online-casino.html
https://2beach0.blogspot.com/2022/08/top-5-marketing-strategies-for.html
https://3cave0.blogspot.com/2022/08/famous-online-casino-games-that-you-can.html
https://4desert.blogspot.com/2022/08/5-tips-to-find-best-online-casino-to.html
https://5eclipse.blogspot.com/2022/08/the-evolution-of-online-casinos-over.html
https://1apricot.mystrikingly.com/blog/an-easy-guide-to-win-blackjack-online-game
https://2blueberry.mystrikingly.com/blog/best-oregon-betting-apps-and-mobile-sites
https://3cherry.mystrikingly.com/blog/choose-an-online-casino-properly
https://4dragon.mystrikingly.com/blog/the-world-s-most-popular-online-casino-game
https://5emblica.mystrikingly.com/blog/5-best-online-casino-gambling-sites-with-real-money-for-us-players
https://artic1.mystrikingly.com/blog/how-tech-can-help-you-win-playing-online-casino-games
https://beach.mystrikingly.com/blog/the-most-effective-method-to-find-a-trusted-online-casino-in-norge
https://cave000.mystrikingly.com/blog/top-south-african-online-casino-guide-negotiates-no-deposit-bonus
https://desert000.mystrikingly.com/blog/needed-chinese-online-casino-businessman-nabbed-in-thailand
https://5eclipse.mystrikingly.com/blog/a-gambler-s-guide-to-online-casino-first-deposit-bonuses
https://1arctic.blogspot.com/2022/08/for-what-reason-are-online-casinos.html
https://2beach0.blogspot.com/2022/08/the-most-well-known-games-in-web-based.html
https://3cave0.blogspot.com/2022/08/4-amazing-reasons-to-start-playing-at.html
https://4desert.blogspot.com/2022/08/online-casino-technology-future-of.html
https://5eclipse.blogspot.com/2022/08/could-blackjack-strategy-charts-help.html
https://1apricot0.blogspot.com/2022/08/interesting-points-when-choosing-online.html
https://2blueberry0.blogspot.com/2022/08/best-online-casinos-in-uk-of-2022-top-3.html
https://3cherry0.blogspot.com/2022/08/how-to-pick-club-that-is-best-fit-for.html
https://4dragonfruit.blogspot.com/2022/08/most-recent-news-online-casino.html
https://5emblica.blogspot.com/2022/08/online-casino-website-vs-mobile-app-who.html
https://artic1.mystrikingly.com/blog/peru-president-signs-online-gaming-law-into-effect
https://beach.mystrikingly.com/blog/this-pandemic-as-adverse-effect-on-online-gaming-industry
https://cave000.mystrikingly.com/blog/as-monaco-scores-japan-confronting-manage-casino-secret
https://desert000.mystrikingly.com/blog/singapore-inaugurates-new-regulator-to-get-ahead-of-new-gambling-trends
https://5eclipse.mystrikingly.com/blog/the-free-bet-situation
https://1apricot.mystrikingly.com/blog/player-protection-responsibility-how-do-casinos-protect-their-players
https://2blueberry.mystrikingly.com/blog/what-are-the-most-popular-online-casino-games-nowadays
https://3cherry.mystrikingly.com/blog/best-online-casinos-in-new-zealand
https://4dragon.mystrikingly.com/blog/do-chatbots-enhance-or-inhibit-online-casino-customer-care
https://5emblica.mystrikingly.com/blog/club-online-indonesia
https://1arctic.blogspot.com/2022/08/online-casino-with-paypal-and-best.html
https://2beach0.blogspot.com/2022/08/different-baccarat-games-which-version.html
https://3cave0.blogspot.com/2022/08/online-slots-or-poker-choosing-perfect.html
https://4desert.blogspot.com/2022/08/creative-payment-methods-best-and-most.html
https://5eclipse.blogspot.com/2022/08/the-online-gambling-industry-in-romania.html
https://artic1.mystrikingly.com/blog/the-most-played-online-casino-games-in-2022
https://beach.mystrikingly.com/blog/acknowledge-major-traits-of-online-casino-singapore
https://cave000.mystrikingly.com/blog/the-innovation-behind-the-web-based-blackjack
https://desert000.mystrikingly.com/blog/we-are-skill-gamers-not-gamblers-indian-esports-and-skill-gamers-plea-to
https://5eclipse.mystrikingly.com/blog/how-do-gambling-clubs-bring-in-cash-on-poker
https://1apricot0.blogspot.com/2022/08/what-are-best-and-worst-casino-games-at.html
https://2blueberry0.blogspot.com/2022/08/the-best-gambling-club-encounters.html
https://3cherry0.blogspot.com/2022/08/wellbeing-tips-when-you-play-slot-games.html
https://4dragonfruit.blogspot.com/2022/08/benefits-of-reading-online-slot-review.html
https://5emblica.blogspot.com/2022/08/the-fundamental-principles-of-video.html
https://1apricot.mystrikingly.com/blog/what-new-online-casinos-do-differently
https://2blueberry.mystrikingly.com/blog/step-by-step-instructions-to-begin-a-web-based-gambling-club-business
https://3cherry.mystrikingly.com/blog/10-standards-every-online-casino-should-be-held-to
https://4dragon.mystrikingly.com/blog/things-you-need-to-know-about-playing-in-a-modern-online-casino
https://5emblica.mystrikingly.com/blog/crown-casinos-commission-investigates-gambling-regulator-s-lack-of-key
https://1arctic.blogspot.com/2022/08/4-amazing-slot-games-you-need-to-try.html
https://2beach0.blogspot.com/2022/08/inventive-options-used-by-online.html
https://3cave0.blogspot.com/2022/08/how-are-casino-apps-developed.html
https://4desert.blogspot.com/2022/08/learn-about-best-trusted-online-casino.html
https://5eclipse.blogspot.com/2022/08/how-to-tell-if-online-casino-is-safe.html
https://artic1.mystrikingly.com/blog/all-that-you-need-to-know-about-online-casinos
https://beach.mystrikingly.com/blog/benefits-of-playing-on-the-portal
https://cave000.mystrikingly.com/blog/what-difficulties-do-online-casinos-face-when-they-become-available-in-a-new
https://desert000.mystrikingly.com/blog/8-predictions-for-us-online-casino-industry
https://5eclipse.mystrikingly.com/blog/how-to-play-slot-games-online
https://1apricot.mystrikingly.com/blog/most-popular-online-casino-games-in-2021
https://2blueberry.mystrikingly.com/blog/the-evolution-of-online-casino-games?categoryId=297603
https://3cherry.mystrikingly.com/blog/what-s-drawing-people-towards-online-casino-games
https://4dragon.mystrikingly.com/blog/the-origins-of-modern-casino-games
https://5emblica.mystrikingly.com/blog/how-casino-games-got-their-names
https://1apricot0.blogspot.com/2022/08/is-it-important-to-obtain-online-casino.html
https://2blueberry0.blogspot.com/2022/08/which-gambling-superstitions-should-you.html
https://3cherry0.blogspot.com/2022/08/crypto-and-bitcoin-gambling-club.html
https://4dragonfruit.blogspot.com/2022/08/best-gambling-club-offers-to-purchase.html
https://5emblica.blogspot.com/2022/08/what-makes-online-casinos-so-popular-in.html
https://1apricot0.blogspot.com/2022/08/do-people-really-win-money-with-online_21.html
https://2blueberry0.blogspot.com/2022/08/how-to-play-online-club-games-free-of.html
https://3cherry0.blogspot.com/2022/08/ways-to-play-online-casino-games.html
https://4dragonfruit.blogspot.com/2022/08/want-to-start-successful-online-casino.html
https://5emblica.blogspot.com/2022/08/gaming-what-kind-of-gaming-content-to.html
https://1apricot.mystrikingly.com/blog/which-online-casino-to-choose
https://2blueberry.mystrikingly.com/blog/6-key-features-of-the-top-online-casinos
https://3cherry.mystrikingly.com/blog/different-types-of-online-casino-games-gamblers-should-know-about
https://4dragon.mystrikingly.com/blog/most-profitable-casino-games-play-to-win
https://5emblica.mystrikingly.com/blog/the-most-effective-method-to-begin-a-web-based-club-business
https://1arctic.blogspot.com/2022/08/a-few-important-considerations-before.html
https://2beach0.blogspot.com/2022/08/how-does-online-casino-software-work.html
https://3cave0.blogspot.com/2022/08/a-look-at-how-online-casino-games-are.html
https://4desert.blogspot.com/2022/08/top-ten-new-us-online-casino-operators.html
https://5eclipse.blogspot.com/2022/08/helpful-stunts-in-web-based-gambling.html
https://artic1.mystrikingly.com/blog/what-the-future-of-gambling-resembles
https://beach.mystrikingly.com/blog/crypto-and-bitcoin-gambling-club
https://cave000.mystrikingly.com/blog/which-gambling-superstitions-should-you-ignore
https://desert000.mystrikingly.com/blog/a-cross-platform-payments-solution-could-boost-the-games-industry
https://5eclipse.mystrikingly.com/blog/valuable-tips-to-win-at-online-slots
https://1arctic.blogspot.com/2022/08/11-basic-blackjack-tips-to-make-playing.html
https://2beach0.blogspot.com/2022/08/a-few-reasons-why-you-should-play.html
https://3cave0.blogspot.com/2022/08/why-there-are-so-many-web-based-club.html
https://4desert.blogspot.com/2022/08/online-casino-how-to-choose-best-one.html
https://5eclipse.blogspot.com/2022/08/texas-holdem-tips-its-easier-to-win.html
https://artic1.mystrikingly.com/blog/6-online-casino-games-moms-should-consider-playing
https://beach.mystrikingly.com/blog/the-most-effective-method-to-choose-an-online-casino-in-singapore
https://cave000.mystrikingly.com/blog/why-online-casinos-are-a-popular-choice-for-gamers
https://desert000.mystrikingly.com/blog/the-most-trusted-online-casino-malaysia-websites
https://5eclipse.mystrikingly.com/blog/how-to-claim-an-online-casino-bonus
https://1apricot0.blogspot.com/2022/08/the-most-effective-method-to-begin.html
https://2blueberry0.blogspot.com/2022/08/top-5-irish-online-casino-operators.html
https://3cherry0.blogspot.com/2022/08/the-adventure-of-online-gambling-club.html
https://4dragonfruit.blogspot.com/2022/08/secret-insider-facts-of-online-gambling.html
https://5emblica.blogspot.com/2022/08/a-concise-prologue-to-online-gambling.html
https://1apricot.mystrikingly.com/blog/what-matters-more-for-success-at-the-online-casino
https://2blueberry.mystrikingly.com/blog/the-impact-of-the-metaverse-on-online-gambling
https://3cherry.mystrikingly.com/blog/made-sense-of-difference-among-on-the-web-and-live-gambling-club
https://4dragon.mystrikingly.com/blog/increase-your-online-casino-winnings-by-withdrawing-money-to-the-crypto
https://5emblica.mystrikingly.com/blog/what-fintech-meant-for-the-online-casino
https://1arctic.blogspot.com/2022/08/the-success-of-mainstream-and-online.html
https://2beach0.blogspot.com/2022/08/try-not-to-roll-dice-on-online-casino.html
https://3cave0.blogspot.com/2022/08/are-pay-and-play-club-eventual-fate-of.html
https://4desert.blogspot.com/2022/08/various-types-of-online-casino-bonus.html
https://5eclipse.blogspot.com/2022/08/the-economic-effect-of-online-casino.html
https://artic1.mystrikingly.com/blog/the-most-famous-kinds-of-club-that-you-ought-to-be-aware-to-decide-to-suit
https://beach.mystrikingly.com/blog/has-anyone-won-big-on-online-casino
https://cave000.mystrikingly.com/blog/different-sides-of-the-live-club-coin-advantages-and-disadvantages
https://desert000.mystrikingly.com/blog/best-online-casino-no-deposit-bonus
https://5eclipse.mystrikingly.com/blog/the-maths-behind-wagering-chances-and-betting
https://1apricot0.blogspot.com/2022/08/what-are-features-of-best-online-casino.html
https://2blueberry0.blogspot.com/2022/08/web-based-gambling-and-its-unique.html
https://3cherry0.blogspot.com/2022/08/why-more-players-are-going-to-internet.html
https://4dragonfruit.blogspot.com/2022/08/6-mistakes-to-avoid-when-playing-casino.html
https://5emblica.blogspot.com/2022/08/manual-for-most-well-known-internet.html
https://1apricot.mystrikingly.com/blog/try-not-to-sit-around-play-best-online-casino-games
https://2blueberry.mystrikingly.com/blog/instructions-to-play-online-casino-games
https://3cherry.mystrikingly.com/blog/why-online-club-games-are-well-known-in-new-zealand
https://4dragon.mystrikingly.com/blog/online-club-as-the-most-famous-asset-for-current-players
https://5emblica.mystrikingly.com/blog/tips-to-beat-online-gambling-clubs-in-2021
https://1arctic.blogspot.com/2022/08/are-online-gambling-clubs-solid-hobby.html
https://2beach0.blogspot.com/2022/08/eight-of-best-betting-objections.html
https://3cave0.blogspot.com/2022/08/kids-however-young-as-11-may-be.html
https://4desert.blogspot.com/2022/08/instructions-to-set-up-new-online.html
https://5eclipse.blogspot.com/2022/08/five-reasons-to-play-at-online-casino.html
https://artic1.mystrikingly.com/blog/online-casino-trends-in-2022
https://beach.mystrikingly.com/blog/the-importance-of-playing-at-a-reputable-online-casino
https://cave000.mystrikingly.com/blog/the-latest-online-casino-features-which-improve-user-experience
https://desert000.mystrikingly.com/blog/how-online-casinos-wiki-is-helpful-for-gamers-to-identify-right-casino
https://5eclipse.mystrikingly.com/blog/how-the-utilization-of-portable-applications-has-changed-the-internet-betting
https://1apricot0.blogspot.com/2022/08/top-10-south-african-online-casinos-for.html
https://2blueberry0.blogspot.com/2022/08/find-best-of-gambling-in-online-casinos.html
https://3cherry0.blogspot.com/2022/08/6-best-payout-online-casinos-highest.html
https://4dragonfruit.blogspot.com/2022/08/best-online-casino-payouts-questions.html
https://5emblica.blogspot.com/2022/08/4-tips-to-choose-online-casino-that-is.html
https://1apricot.mystrikingly.com/blog/how-do-online-gambling-clubs-work
https://2blueberry.mystrikingly.com/blog/internet-browser-based-web-based-gambling-club
https://3cherry.mystrikingly.com/blog/best-web-based-club-games-you-ought-to-play
https://4dragon.mystrikingly.com/blog/online-casino-game-with-the-most-amazing-themes
https://5emblica.mystrikingly.com/blog/the-5-best-online-casino-games-of-2021
https://1arctic.blogspot.com/2022/08/what-makes-decent-online-casino.html
https://2beach0.blogspot.com/2022/08/no-misfortune-limits-for-dutch-online.html
https://3cave0.blogspot.com/2022/08/how-new-technology-is-improving-casino.html
https://4desert.blogspot.com/2022/08/the-advantage-of-online-casino-profit.html
https://5eclipse.blogspot.com/2022/08/do-chatbots-enhance-or-inhibit-online.html
https://1apricot0.blogspot.com/2022/08/what-vital-aspects-to-look-for-in.html
https://2blueberry0.blogspot.com/2022/08/online-casino-gambling-hot-option.html
https://3cherry0.blogspot.com/2022/08/the-importance-of-playing-at-reputable.html
https://4dragonfruit.blogspot.com/2022/08/process-about-gambling-club-has-been.html
https://5emblica.blogspot.com/2022/08/the-most-effective-method-to-play.html
https://artic1.mystrikingly.com/blog/is-it-important-to-obtain-online-casino-license
https://beach.mystrikingly.com/blog/why-utilize-a-welcome-reward-at-a-web-based-club
https://cave000.mystrikingly.com/blog/what-are-the-most-popular-online-casino-games-nowadays
https://desert000.mystrikingly.com/blog/the-best-of-real-cash-casino-online
https://5eclipse.mystrikingly.com/blog/is-artificial-intelligence-behind-the-growth-of-the-online-casino-industry
https://1apricot.mystrikingly.com/blog/why-you-should-prefer-online-casino-than-offline
https://2blueberry.mystrikingly.com/blog/shrewd-ways-of-saving-money-when-playing-at-an-online-casino
https://3cherry.mystrikingly.com/blog/how-to-become-a-successful-online-casino-high-roller
https://4dragon.mystrikingly.com/blog/12-signs-you-are-playing-at-a-safe-online-casino
https://5emblica.mystrikingly.com/blog/5-things-you-ought-to-be-aware-prior-to-playing-on-the-web-club
https://1apricot0.blogspot.com/2022/08/outright-beginners-guide-to-enjoying.html
https://2blueberry0.blogspot.com/2022/08/strategy-how-to-make-money-with-online.html
https://3cherry0.blogspot.com/2022/08/best-online-casino-which-you-can-pick.html
https://4dragonfruit.blogspot.com/2022/08/how-to-track-down-decent-internet-based.html
https://5emblica.blogspot.com/2022/08/high-stakes-casinos.html
https://1apricot.mystrikingly.com/blog/top-5-casino-games-with-the-highest-winning-chances
https://2blueberry.mystrikingly.com/blog/how-would-i-pick-an-exact-web-based-club
https://3cherry.mystrikingly.com/blog/different-strategies-that-will-help-you-win-on-online-casinos
https://4dragon.mystrikingly.com/blog/5-benefits-of-choosing-online-casinos-for-real-money
https://5emblica.mystrikingly.com/blog/find-out-about-the-web-based-gambling-club-games-and-a-few-significant
https://1arctic.blogspot.com/2022/08/how-to-tell-decent-internet-based-club.html
https://2beach0.blogspot.com/2022/08/would-it-be-good-idea-for-you-to-choose.html
https://3cave0.blogspot.com/2022/08/5-amazing-bonuses-casinos-offer.html
https://4desert.blogspot.com/2022/08/tips-to-search-for-best-online-casinos.html
https://5eclipse.blogspot.com/2022/08/do-you-need-to-bring-cash-to-casino-or.html
https://artic1.mystrikingly.com/blog/roulette-systems-you-can-attempt-in-2022
https://beach.mystrikingly.com/blog/who-is-the-top-baccarat-player-in-gambling-history
https://cave000.mystrikingly.com/blog/social-benefits-of-online-gambling
https://desert000.mystrikingly.com/blog/ranking-five-card-draw-hands
https://5eclipse.mystrikingly.com/blog/eventual-fate-of-web-based-betting-innovation-in-india
https://1apricot0.blogspot.com/2022/08/what-makes-decent-web-based-club.html
https://2blueberry0.blogspot.com/2022/08/no-misfortune-limits-for-dutch-web.html
https://3cherry0.blogspot.com/2022/08/web-based-betting-in-pennsylvania.html
https://4dragonfruit.blogspot.com/2022/08/how-new-technology-is-improving-casino.html
https://5emblica.blogspot.com/2022/08/betmgm-casino-mi-bonus-code-excels-with.html
https://1apricot.mystrikingly.com/blog/how-to-tell-a-decent-web-based-club-from-a-terrible-one
https://2blueberry.mystrikingly.com/blog/made-sense-of-future-of-web-based-betting-innovation-in-india
https://3cherry.mystrikingly.com/blog/would-it-be-a-good-idea-for-you-to-choose-established-online-casinos-or-try
https://4dragon.mystrikingly.com/blog/5-amazing-bonuses-casinos-offer
https://5emblica.mystrikingly.com/blog/ontario-sports-betting-what-do-we-know-about-the-market
https://1arctic.blogspot.com/2022/08/the-most-effective-method-to-get-in-on.html
https://2beach0.blogspot.com/2022/08/step-by-step-instructions-to-take.html
https://3cave0.blogspot.com/2022/08/getting-funding-for-your-internet-based.html
https://4desert.blogspot.com/2022/08/moment-play-casino-games-how-to-play.html
https://5eclipse.blogspot.com/2022/08/top-5-richest-casino-owners-in-us.html
https://artic1.mystrikingly.com/blog/what-a-dealer-should-never-do-at-the-casino
https://beach.mystrikingly.com/blog/the-most-effective-method-to-turn-your-online-gaming-start-up-into-a
https://cave000.mystrikingly.com/blog/demonstrated-manual-for-understanding-chances-and-better-wagering
https://desert000.mystrikingly.com/blog/the-legality-of-online-gambling
https://5eclipse.mystrikingly.com/blog/top-5-motivations-behind-why-switzerland-is-the-ideal-spot-to-bet
https://artic1.mystrikingly.com/blog/get-to-know-the-benefits-of-slot-online
https://beach.mystrikingly.com/blog/5-reasons-why-online-casinos-are-becoming-more-and-more-popular
https://cave000.mystrikingly.com/blog/where-is-it-legitimate-to-play-web-based-betting-in-2022
https://desert000.mystrikingly.com/blog/why-online-casinos-offer-free-spins
https://5eclipse.mystrikingly.com/blog/why-players-additionally-prefer-to-lose
https://1arctic.blogspot.com/2022/08/methods-for-winning-when-gambling-on.html
https://2beach0.blogspot.com/2022/08/how-to-know-if-online-casino-is-legit.html
https://3cave0.blogspot.com/2022/08/key-features-that-indicate-high-quality.html
https://4desert.blogspot.com/2022/08/the-impact-of-online-slots-on-casino.html
https://5eclipse.blogspot.com/2022/08/the-popularity-of-gambling-industry-in.html
https://1apricot0.blogspot.com/2022/08/the-most-effective-method-to-get-in-on.html
https://2blueberry0.blogspot.com/2022/08/how-is-playing-online-casino-games.html
https://3cherry0.blogspot.com/2022/08/cleared-up-how-for-find-best-mobile.html
https://4dragonfruit.blogspot.com/2022/08/how-gambling-problems-are-solved-in.html
https://5emblica.blogspot.com/2022/08/instructions-to-play-online-at-casinos.html
https://1apricot.mystrikingly.com/blog/made-sense-of-what-are-casino-video-games-and-slot-machines
https://2blueberry.mystrikingly.com/blog/acquainting-a-new-top-place-with-gamble-online
https://3cherry.mystrikingly.com/blog/cryptogames-a-provably-fair-crypto-casino
https://4dragon.mystrikingly.com/blog/instant-play-casino-games-how-to-play-them-correctly
https://5emblica.mystrikingly.com/blog/what-are-the-best-casino-academies-for-dealers-and-croupiers-between-arizona
https://1arctic.blogspot.com/2022/08/5-tips-to-find-best-online-casino-to.html
https://2beach0.blogspot.com/2022/08/casino-for-real-money-how-to-choose.html
https://3cave0.blogspot.com/2022/08/greatest-wins-in-gambling-history.html
https://4desert.blogspot.com/2022/08/5-web-based-gambling-club-tips-for.html
https://5eclipse.blogspot.com/2022/08/no-store-rewards-in-club-types.html
https://artic1.mystrikingly.com/blog/what-you-need-to-know-about-online-casinos-and-how-to-have-a-safe-playing
https://beach.mystrikingly.com/blog/five-parameters-that-are-important-while-choosing-a-slot-machine
https://cave000.mystrikingly.com/blog/engaging-quality-of-the-club
https://desert000.mystrikingly.com/blog/online-casinos-fun-or-dangerous-gambling
https://5eclipse.mystrikingly.com/blog/why-do-most-canadian-gamblers-choose-echeck-casinos-canada
https://1apricot0.blogspot.com/2022/08/best-online-casinos-in-malaysia.html
https://2blueberry0.blogspot.com/2022/08/the-impact-of-gaming-software-on-online.html
https://3cherry0.blogspot.com/2022/08/3-reasons-why-you-should-play-provably.html
https://4dragonfruit.blogspot.com/2022/08/man-made-brainpower-technologies-are.html
https://5emblica.blogspot.com/2022/08/top-5-richest-casino-owners-in-us.html
https://1apricot.mystrikingly.com/blog/a-night-of-gambling-in-copenhagen
https://2blueberry.mystrikingly.com/blog/live-club-competitions-how-to-play-prizes-and-then-some
https://3cherry.mystrikingly.com/blog/online-casino-technology-the-future-of-gambling
https://4dragon.mystrikingly.com/blog/innovation-and-online-casinos-growing-hand-in-hand
https://5emblica.mystrikingly.com/blog/the-ultimate-guide-to-choosing-the-perfect-online-casino
https://1arctic.blogspot.com/2022/09/most-ideal-ways-to-win-online-casino.html
https://2beach0.blogspot.com/2022/09/variety-psychology-in-online-casino.html
https://3cave0.blogspot.com/2022/09/what-are-primary-advantages-of-visiting.html
https://4desert.blogspot.com/2022/09/casino-online-vietnam-compare-best-high.html
https://5eclipse.blogspot.com/2022/09/rounds-of-online-casino.html
https://artic1.mystrikingly.com/blog/what-are-the-upsides-of-a-quick-payout-club
https://beach.mystrikingly.com/blog/tracking-down-the-most-appropriate-internet-based-club
https://cave000.mystrikingly.com/blog/top-ps5-casino-games-of-all-time
https://desert000.mystrikingly.com/blog/the-most-effective-method-to-use-the-online-casino-industry-to-thrive-in
https://5eclipse.mystrikingly.com/blog/what-is-australian-online-casino-and-how-does-it-work
https://1apricot0.blogspot.com/2022/09/what-is-best-device-to-play-online.html
https://2blueberry0.blogspot.com/2022/09/rounds-of-online-casino.html
https://3cherry0.blogspot.com/2022/09/the-most-effective-method-to-use-online.html
https://4dragonfruit.blogspot.com/2022/09/the-advantage-of-online-casino-profit.html
https://5emblica.blogspot.com/2022/09/why-online-casino-games-are-perfect.html
https://1apricot.mystrikingly.com/blog/online-gambling-club-client-experience-5-methods-for-expanding-player
https://2blueberry.mystrikingly.com/blog/online-casino-regulation
https://3cherry.mystrikingly.com/blog/check-in-web-based-club-is-betting-protected-without-it
https://4dragon.mystrikingly.com/blog/6-best-payout-online-casinos-highest-paying-casinos
https://5emblica.mystrikingly.com/blog/club-in-view-of-true-guaranteed-programming
https://1apricot0.blogspot.com/2022/09/helpful-tips-for-people-new-to-online.html
https://2blueberry0.blogspot.com/2022/09/what-is-australian-online-casino-and.html
https://3cherry0.blogspot.com/2022/09/best-online-casino-canada-2022-betbeard.html
https://4dragonfruit.blogspot.com/2022/09/the-best-kinds-of-music-to-pay.html
https://5emblica.blogspot.com/2022/09/why-is-ethereum-best-cryptocurrency-for.html
https://1apricot.mystrikingly.com/blog/what-can-welsh-businesses-learn-from-the-booming-online-casino-industry
https://2blueberry.mystrikingly.com/blog/7-reasons-why-online-casinos-are-becoming-the-biggest-gambling-trend
https://3cherry.mystrikingly.com/blog/the-california-gaming-industry
https://4dragon.mystrikingly.com/blog/atlantic-city-readies-for-ny-casino-competition
https://5emblica.mystrikingly.com/blog/figuring-out-the-probability-of-a-win-is-it-a-matter-of-luck-or-strategy
https://1arctic.blogspot.com/2022/09/before-you-go-gambling-how-to-find-best.html
https://2beach0.blogspot.com/2022/09/legitimate-changes-make-colorado.html
https://3cave0.blogspot.com/2022/09/practical-play-celebrates-yearly.html
https://4desert.blogspot.com/2022/09/5-slot-machine-secrets-casinos-dont.html
https://5eclipse.blogspot.com/2022/09/casino-stock-winners-have-free-cash.html
https://artic1.mystrikingly.com/blog/7-tips-on-playing-the-slots-without-losing-it-all
https://beach.mystrikingly.com/blog/concealed-joker-dominates-casino-stepping-stool-game-at-aew-all-out
https://cave000.mystrikingly.com/blog/card-games-from-india-that-you-need-to-play
https://desert000.mystrikingly.com/blog/versatile-casino-apps-that-will-make-your-life-easier-in-2022
https://5eclipse.mystrikingly.com/blog/work-on-your-stoic-expression-it-might-assist-you-with-scoring-a-regal
https://1arctic.blogspot.com/2022/09/step-by-step-instructions-to-safely-pay.html
https://2beach0.blogspot.com/2022/09/learn-how-to-use-paypal-to-play-at.html
https://3cave0.blogspot.com/2022/09/fun-and-exciting-reasons-to-play-real.html
https://4desert.blogspot.com/2022/09/the-top-5-betting-apps-in-india.html
https://5eclipse.blogspot.com/2022/09/what-impact-has-crypto-had-on-japans.html
https://1apricot0.blogspot.com/2022/09/before-you-go-gambling-how-to-find-best.html
https://2blueberry0.blogspot.com/2022/09/5-slot-machine-secrets-casinos-dont.html
https://3cherry0.blogspot.com/2022/09/the-most-effective-method-to-safely-pay.html
https://4dragonfruit.blogspot.com/2022/09/legitimate-changes-make-colorado.html
https://5emblica.blogspot.com/2022/09/anticipated-value-this-weeks-top-5.html
https://1apricot.mystrikingly.com/blog/3-card-games-from-india-that-you-need-to-play
https://2blueberry.mystrikingly.com/blog/best-casino-movies
https://3cherry.mystrikingly.com/blog/rainmaker-casino-review
https://4dragon.mystrikingly.com/blog/rounds-of-the-online-casino
https://5emblica.mystrikingly.com/blog/online-casino-technology-the-future-of-gambling
https://artic1.mystrikingly.com/blog/pragmatic-play-partners-with-500-casino
https://beach.mystrikingly.com/blog/betting-in-the-guinness-book-of-records-the-most-interesting-records
https://cave000.mystrikingly.com/blog/the-best-luxury-casino-resorts-to-visit-in-new-jersey-usa
https://desert000.mystrikingly.com/blog/in-which-eu-nations-are-gambling-clubs-legitimate
https://5eclipse.mystrikingly.com/blog/best-betting-affiliate-programs
https://1apricot0.blogspot.com/2022/09/figure-out-how-to-utilize-paypal-to.html
https://2blueberry0.blogspot.com/2022/09/fun-and-exciting-reasons-to-play-real.html
https://3cherry0.blogspot.com/2022/09/turn-casino-canada-review.html
https://4dragonfruit.blogspot.com/2022/09/igaming-2022-how-online-poker-has.html
https://5emblica.blogspot.com/2022/09/best-blockchain-poker-sites-in-2022.html
https://1apricot.mystrikingly.com/blog/what-impact-has-crypto-had-on-japan-s-colossal-gambling-industry
https://2blueberry.mystrikingly.com/blog/why-online-casinos-are-increasingly-sponsoring-football-clubs
https://3cherry.mystrikingly.com/blog/5-mobile-casino-apps-that-will-make-your-life-easier-in-2022
https://4dragon.mystrikingly.com/blog/in-which-eu-nations-are-club-lawful
https://5emblica.mystrikingly.com/blog/paraguay-s-gambling-regulator-launches-tender-for-legal-sportsbooks
https://1arctic.blogspot.com/2022/09/online-casino-nigeria-why-gamble-online.html
https://2beach0.blogspot.com/2022/09/top-5-new-web-based-club-in-poland-and.html
https://3cave0.blogspot.com/2022/09/the-rise-of-mobile-casino-gambling-in.html
https://4desert.blogspot.com/2022/09/most-up-to-date-casino-games.html
https://5eclipse.blogspot.com/2022/09/the-advancement-of-cryptocurrency-in.html
https://artic1.mystrikingly.com/blog/could-you-at-any-point-play-casino-games-on-your-playstation
https://beach.mystrikingly.com/blog/why-are-offshore-casinos-so-popular
https://cave000.mystrikingly.com/blog/world-s-top-rated-online-casino-12play-invest-in-new-technology-to-give-you
https://desert000.mystrikingly.com/blog/why-is-it-a-good-idea-to-become-a-gambling-tourist
https://5eclipse.mystrikingly.com/blog/tips-to-stay-safe-while-gaming-online
https://1arctic.blogspot.com/2022/09/getting-your-casino-account-with-money.html
https://2beach0.blogspot.com/2022/09/5-benefits-of-playing-at-casino-without.html
https://3cave0.blogspot.com/2022/09/the-best-books-for-improving-your.html
https://4desert.blogspot.com/2022/09/the-biggest-jackpots-in-history-of.html
https://5eclipse.blogspot.com/2022/09/is-live-dealer-craps-troublesome-game.html
https://1apricot0.blogspot.com/2022/09/worlds-top-rated-online-casino-12play.html
https://2blueberry0.blogspot.com/2022/09/why-you-should-choose-online-casino.html
https://3cherry0.blogspot.com/2022/09/securing-your-casino-account-with-money.html
https://4dragonfruit.blogspot.com/2022/09/softswiss-jackpot-aggregator.html
https://5emblica.blogspot.com/2022/09/betting-on-sports-at-leading-online.html
https://1apricot.mystrikingly.com/blog/ice-casino-games-bonuses-and-promotions
https://2blueberry.mystrikingly.com/blog/why-you-should-avoid-online-gambling-stocks-like-the-plague
https://3cherry.mystrikingly.com/blog/the-best-books-for-improving-your-online-gambling-in-the-uk
https://4dragon.mystrikingly.com/blog/the-biggest-jackpots-in-the-history-of-online-casinos
https://5emblica.mystrikingly.com/blog/can-you-play-casino-games-on-your-playstation
https://artic1.mystrikingly.com/blog/is-it-legitimate-to-play-club-and-bet-on-sports-at-rajabets
https://beach.mystrikingly.com/blog/australian-gambling-researcher-lobbies-for-mandatory-preset-loss-limits
https://cave000.mystrikingly.com/blog/5-best-slot-machines-about-cricket-match-up
https://desert000.mystrikingly.com/blog/what-is-a-white-label-casino-platform-and-how-to-get-it
https://5eclipse.mystrikingly.com/blog/understanding-how-sports-betting-is-done-in-online-casinos
https://1apricot0.blogspot.com/2022/09/what-should-you-know-before-playing.html
https://2blueberry0.blogspot.com/2022/09/why-are-online-slots-so-popular.html
https://3cherry0.blogspot.com/2022/09/how-do-slot-machines-work.html
https://4dragonfruit.blogspot.com/2022/09/top-13-best-free-slot-games-to-enjoy.html
https://5emblica.blogspot.com/2022/09/5-biggest-and-most-entertaining.html
https://1apricot.mystrikingly.com/blog/what-makes-online-slots-so-in-demand
https://2blueberry.mystrikingly.com/blog/the-5-best-online-casino-games-of-2021
https://3cherry.mystrikingly.com/blog/online-casino-games
https://4dragon.mystrikingly.com/blog/most-popular-casino-games-you-can-play
https://5emblica.mystrikingly.com/blog/what-are-the-best-gambling-club-games-to-play
https://1arctic.blogspot.com/2022/09/look-out-for-way-to-improve-on-some.html
https://2beach0.blogspot.com/2022/09/what-to-be-cautious-about-in-land-based.html
https://3cave0.blogspot.com/2022/09/5-ways-online-casino-websites-are.html
https://4desert.blogspot.com/2022/09/justifications-for-why-mobile-online.html
https://5eclipse.blogspot.com/2022/09/virtual-casino-games-myth-or-reality.html
https://artic1.mystrikingly.com/blog/peru-s-gaming-regulator-fines-more-than-30-casinos-over-violations
https://beach.mystrikingly.com/blog/why-manhattan-needs-an-all-star-casino
https://cave000.mystrikingly.com/blog/live-casino-dealers-who-are-they-and-what-are-their-roles
https://desert000.mystrikingly.com/blog/fortune-coins-casino-no-deposit-bonus-code
https://5eclipse.mystrikingly.com/blog/government-shake-up-means-more-uncertainty-for-uk-gambling-reform
https://1arctic.blogspot.com/2022/09/what-are-ways-online-casino-games-are.html
https://2beach0.blogspot.com/2022/09/tips-to-help-you-avoid-sketchy-online.html
https://3cave0.blogspot.com/2022/09/instructions-to-determine-best-casino.html
https://4desert.blogspot.com/2022/09/club-bonuses-online.html
https://5eclipse.blogspot.com/2022/09/swedish-casino-license.html
https://1apricot0.blogspot.com/2022/09/best-online-casino-and-casino-sites-for.html
https://2blueberry0.blogspot.com/2022/09/what-are-ways-online-casino-games-are.html
https://3cherry0.blogspot.com/2022/09/tips-to-help-you-avoid-sketchy-online.html
https://4dragonfruit.blogspot.com/2022/09/online-casino-technology-future-of.html
https://5emblica.blogspot.com/2022/09/the-most-effective-method-to-safely-pay.html
https://artic1.mystrikingly.com/blog/it-s-not-pace-of-expense-on-lottery-club-and-games-that-terrifies-the-citizen
https://beach.mystrikingly.com/blog/all-you-need-to-know-about-casino-online-free-spins
https://cave000.mystrikingly.com/blog/hollywood-stars-who-like-poker
https://desert000.mystrikingly.com/blog/will-gambling-have-an-impact-on-your-social-skills
https://5eclipse.mystrikingly.com/blog/there-s-more-than-one-way-to-steal-money-from-a-casino-floor
https://1apricot.mystrikingly.com/blog/step-by-step-instructions-to-safely-pay-when-playing-online-casino-games
https://2blueberry.mystrikingly.com/blog/how-to-determine-the-best-casino-bonuses-for-your-first-game
https://3cherry.mystrikingly.com/blog/legalizing-sports-betting-stacks-the-odds-against-californians
https://4dragon.mystrikingly.com/blog/online-casino-features-what-to-look-for
https://5emblica.mystrikingly.com/blog/type-of-online-casino-games-offered-by-eu9-casino-malaysia
https://1arctic.blogspot.com/2022/09/is-online-club-legitimate-for-voyagers.html
https://2beach0.blogspot.com/2022/09/how-to-pick-online-casino-with-best.html
https://3cave0.blogspot.com/2022/09/the-best-live-gambling-club-in-singapore.html
https://4desert.blogspot.com/2022/09/top-6-online-casino-games-you-should-try.html
https://5eclipse.blogspot.com/2022/09/what-goes-on-behind-scenes-of-live.html
https://1apricot0.blogspot.com/2022/09/what-is-best-device-to-play-online_13.html
https://2blueberry0.blogspot.com/2022/09/online-casino-fight-sparks-new-look-at.html
https://3cherry0.blogspot.com/2022/09/michigan-web-based-betting-business.html
https://4dragonfruit.blogspot.com/2022/09/how-fin-tech-improves-quality-of-online.html
https://5emblica.blogspot.com/2022/09/online-casino-trends-in-2022.html
https://artic1.mystrikingly.com/blog/3-web-based-game-types-filling-in-prevalence
https://beach.mystrikingly.com/blog/top-10-things-every-successful-gambler-tries-to-avoid
https://cave000.mystrikingly.com/blog/best-live-online-casino-games-in-2022
https://desert000.mystrikingly.com/blog/cell-phones-and-the-online-casino-industry
https://5eclipse.mystrikingly.com/blog/extreme-online-slots-guide-and-insights-for-every-player
https://1apricot.mystrikingly.com/blog/what-you-should-look-for-in-online-gambling-sites
https://2blueberry.mystrikingly.com/blog/what-makes-a-decent-web-based-club
https://3cherry.mystrikingly.com/blog/for-what-reason-would-it-be-a-good-idea-for-you-play-at-hfive5-online
https://4dragon.mystrikingly.com/blog/why-you-should-avoid-online-gambling-stocks-like-the-plague
https://5emblica.mystrikingly.com/blog/things-you-can-learn-from-movies-about-online-gaming
https://1apricot0.blogspot.com/2022/09/figure-out-how-cell-phones-are-changing.html
https://2blueberry0.blogspot.com/2022/09/is-online-club-legitimate-for-explorers.html
https://3cherry0.blogspot.com/2022/09/a-september-spree-of-free-at-juicy.html
https://4dragonfruit.blogspot.com/2022/09/betting-industry-is-broken-lets-bet-on.html
https://5emblica.blogspot.com/2022/09/best-crypto-casinos-and-bitcoin.html
https://1arctic.blogspot.com/2022/09/interesting-points-while-playing-games.html
https://2beach0.blogspot.com/2022/09/what-skills-does-gaming-develop.html
https://3cave0.blogspot.com/2022/09/whats-fascination-of-web-based-crazy.html
https://4desert.blogspot.com/2022/09/tips-for-safe-gaming-how-to-pick.html
https://5eclipse.blogspot.com/2022/09/why-is-it-impossible-for-roma-to-have.html
https://artic1.mystrikingly.com/blog/best-devices-for-ca-online-casino-play
https://beach.mystrikingly.com/blog/factors-for-choosing-an-online-casino
https://cave000.mystrikingly.com/blog/web-based-gambling-not-important-in-singapore
https://desert000.mystrikingly.com/blog/administrators-to-weigh-stretching-out-internet-betting-to-2033
https://5eclipse.mystrikingly.com/blog/how-casino-apps-have-changed-the-dynamics-of-the-indian-gambling-industry
https://1apricot.mystrikingly.com/blog/yggdrasil-launches-content-globally-with-ggpoker
https://2blueberry.mystrikingly.com/blog/skillonnet-launches-with-ezugi-content-for-its-partner-casinos
https://3cherry.mystrikingly.com/blog/what-skills-does-gaming-develop
https://4dragon.mystrikingly.com/blog/best-roulette-sites-with-the-top-live-and-online-roulette-games-for-real-money
https://5emblica.mystrikingly.com/blog/extreme-online-slots-guide-and-insights-for-every-player
https://1apricot0.blogspot.com/2022/09/benefits-of-becoming-vip-in-online.html
https://2blueberry0.blogspot.com/2022/09/how-to-find-most-suitable-online-casino.html
https://3cherry0.blogspot.com/2022/09/centerfold-girl-online-club-with.html
https://4dragonfruit.blogspot.com/2022/09/why-us-online-casino-gaming-wont-be.html
https://5emblica.blogspot.com/2022/09/collector-returns-online-sell-offs.html
https://1apricot.mystrikingly.com/blog/ontario-sports-betting-olg-overhauls-self-exclusion-program-amid-igaming-growth
https://2blueberry.mystrikingly.com/blog/kassu-casino-online-audit-inventive-games-lead-the-way
https://3cherry.mystrikingly.com/blog/west-virginia-sports-betting-and-igaming-markets-see-august-improvement
https://4dragon.mystrikingly.com/blog/livescore-bet-joins-to-dutch-industry-body-noga
https://5emblica.mystrikingly.com/blog/philippine-club-s-nasdaq-posting-still-conceivable-this-year
https://artic1.mystrikingly.com/blog/new-jersey-gets-ready-to-pursue-one-more-ten-years-of-internet-betting
https://beach.mystrikingly.com/blog/might-you-venture-to-play-this-new-roulette-game
https://cave000.mystrikingly.com/blog/kyrgyzstan-hoping-to-trade-out-from-on-the-web-and-land-based-gaming
https://desert000.mystrikingly.com/blog/craps-realities-you-ought-to-be-aware-prior-to-getting-the-dice
https://5eclipse.mystrikingly.com/blog/how-to-abstain-from-seeming-to-be-a-novice-while-playing-poker
https://1arctic.blogspot.com/2022/09/advantages-of-turning-into-celebrity-in.html
https://2beach0.blogspot.com/2022/09/how-did-simulated-intelligence-change.html
https://3cave0.blogspot.com/2022/09/web-based-betting-development-sees.html
https://4desert.blogspot.com/2022/09/based-betting-request-sent-off-place-of.html
https://5eclipse.blogspot.com/2022/09/techniques-for-succeeding-at-slot.html
https://1apricot0.blogspot.com/2022/09/best-web-based-club-in-philippines.html
https://2blueberry0.blogspot.com/2022/09/best-web-based-gambling-clubs-in.html
https://3cherry0.blogspot.com/2022/09/compelling-wellbeing-tips-that-you.html
https://4dragonfruit.blogspot.com/2022/09/digital-security-in-online-casino-sector.html
https://5emblica.blogspot.com/2022/09/spin-genie-launches-online-casino-in.html
https://1apricot.mystrikingly.com/blog/why-online-casino-games-are-popular-in-2022
https://2blueberry.mystrikingly.com/blog/mohegan-launches-new-innovative-online-gaming-platform-in-ontario-canada
https://3cherry.mystrikingly.com/blog/web-based-betting-development-sees-expansion-in-monetary-wrongdoing-risk
https://4dragon.mystrikingly.com/blog/mga-games-supplies-fair-play-gambling-club-with-games
https://5emblica.mystrikingly.com/blog/3-web-based-exercises-to-attempt-today
https://1arctic.blogspot.com/2022/09/putting-resources-into-club-and-web.html
https://2beach0.blogspot.com/2022/09/online-casino-in-latvia-utilizes.html
https://3cave0.blogspot.com/2022/09/5-stars-reputed-to-play-in-web-based.html
https://4desert.blogspot.com/2022/09/australian-parliamentary-board-of.html
https://5eclipse.blogspot.com/2022/09/top-10-fascinating-betting-tech-new.html
https://artic1.mystrikingly.com/blog/which-casinos-do-irish-players-like-online-versus-land-based
https://beach.mystrikingly.com/blog/is-fortunate-feline-blackjack-the-most-exceedingly-awful-casino-game
https://cave000.mystrikingly.com/blog/5-best-casino-games-for-football-sweethearts
https://desert000.mystrikingly.com/blog/what-is-the-following-large-move-toward-portable-gaming
https://5eclipse.mystrikingly.com/blog/how-to-put-aside-the-fastest-installment-at-betting-stages-utilizing-pay-by
https://artic1.mystrikingly.com/blog/what-impact-does-electronic-music-have-on-casino-wins
https://beach.mystrikingly.com/blog/6-factors-low-stakes-blackjack-players-should-be-aware
https://cave000.mystrikingly.com/blog/most-well-known-web-based-casino-games-betting-insights
https://desert000.mystrikingly.com/blog/study-1-in-5-u-s-grown-ups-bet-cash-on-sports-in-past-year
https://5eclipse.mystrikingly.com/blog/fellow-could-face-fine-of-up-to-42-7m-in-the-event-that-it-keeps-on-working
https://1apricot0.blogspot.com/2022/09/6-things-to-never-do-in-gambling-club.html
https://2blueberry0.blogspot.com/2022/09/what-is-extraordinary-in-web-based.html
https://3cherry0.blogspot.com/2022/09/the-most-well-known-web-based-club.html
https://4dragonfruit.blogspot.com/2022/09/7-justifications-for-why-online.html
https://5emblica.blogspot.com/2022/09/why-is-online-club-betting-so.html
https://1arctic.blogspot.com/2022/09/online-casino-terminology-you-need-to.html
https://2beach0.blogspot.com/2022/09/top-enormous-win-casinos-to-bet-at.html
https://3cave0.blogspot.com/2022/09/5-different-ways-you-can-get-removed.html
https://4desert.blogspot.com/2022/09/how-digital-money-influenced-universe.html
https://5eclipse.blogspot.com/2022/09/positioning-most-seasoned-casinos.html
https://1apricot.mystrikingly.com/blog/online-club-business-visionaries-spread-out-the-doormat
https://2blueberry.mystrikingly.com/blog/4-best-expertise-based-web-based-club-games-to-play
https://3cherry.mystrikingly.com/blog/for-what-reason-in-all-actuality-do-individuals-very-much-want-to-bet-in
https://4dragon.mystrikingly.com/blog/advantages-of-playing-on-the-web-gambling-club-games
https://5emblica.mystrikingly.com/blog/why-openings-are-the-most-positive-internet-based-gambling-club-games
https://artic1.mystrikingly.com/blog/kinds-of-live-casino-games-in-yes8-singapore
https://beach.mystrikingly.com/blog/web-based-betting-locales-sucking-crores-of-taka
https://cave000.mystrikingly.com/blog/cambodian-police-salvage-vietnamese-lady-from-betting-firm
https://desert000.mystrikingly.com/blog/are-free-twists-no-stores-at-online-casinos-a-misuse-of-your-time-or-worth
https://5eclipse.mystrikingly.com/blog/what-is-the-joker-in-pai-gow
https://1arctic.blogspot.com/2022/09/the-most-effective-method-to-build-your.html
https://2beach0.blogspot.com/2022/09/the-most-effective-method-to-deal-with.html
https://3cave0.blogspot.com/2022/09/every-one-of-highlights-of-yes8-online.html
https://4desert.blogspot.com/2022/09/with-casino-thought-dead-tmc.html
https://5eclipse.blogspot.com/2022/09/4-ways-to-really-look-at-security-at.html
https://1apricot0.blogspot.com/2022/09/the-best-mechanical-enhancements-in-web.html
https://2blueberry0.blogspot.com/2022/09/a-definitive-manual-for-online-gambling.html
https://3cherry0.blogspot.com/2022/09/how-sports-and-online-gambling-club.html
https://4dragonfruit.blogspot.com/2022/09/connections-among-sports-and-club.html
https://5emblica.blogspot.com/2022/09/best-web-based-betting-destinations-in.html
https://1apricot.mystrikingly.com/blog/every-one-of-the-elements-of-yes8-online-gambling-club-singapore
https://2blueberry.mystrikingly.com/blog/the-most-effective-method-to-build-your-possibilities-winning-in-a-web-based
https://3cherry.mystrikingly.com/blog/connecticut-online-club-and-sports-wagering-numbers-expansion-in-august
https://4dragon.mystrikingly.com/blog/with-club-thought-dead-tmc-consideration-goes-to-internet-betting
https://5emblica.mystrikingly.com/blog/kinds-of-live-club-games-in-yes8-singapore
https://artic1.mystrikingly.com/blog/thailand-takes-action-against-2-819-unlawful-betting-sites
https://beach.mystrikingly.com/blog/uk-betting-change-bill-apparently-en-route-to-the-garbage-bin
https://cave000.mystrikingly.com/blog/is-it-conceivable-to-work-out-the-possibilities-winning-in-a-casino
https://desert000.mystrikingly.com/blog/the-most-awesome-casino-resorts-uncovered-in-insta-study
https://5eclipse.mystrikingly.com/blog/register-at-home-of-pokies-casino-now
https://1arctic.blogspot.com/2022/09/best-web-based-betting-locales-in.html
https://2beach0.blogspot.com/2022/09/the-dos-and-donts-of-online-casino.html
https://3cave0.blogspot.com/2022/09/philippines-complete-internet-betting.html
https://4desert.blogspot.com/2022/09/australian-officials-to-survey-internet.html
https://5eclipse.blogspot.com/2022/09/phenomenal-speed-web-casino-no.html
https://1apricot0.blogspot.com/2022/09/regal-vegas-on-line-on-line-club-canada.html
https://2blueberry0.blogspot.com/2022/09/best-web-based-on-line-club-australia.html
https://3cherry0.blogspot.com/2022/09/online-games-betting-business-sector.html
https://4dragonfruit.blogspot.com/2022/09/how-sports-and-online-gambling-club.html
https://5emblica.blogspot.com/2022/09/casinos-advertisements-and-popular.html
https://1apricot.mystrikingly.com/blog/what-you-ought-to-be-familiar-with-online-club-like-bitbetwin
https://2blueberry.mystrikingly.com/blog/top-5-casino-gambling-sites-and-poker-games-that-pay-real-money
https://3cherry.mystrikingly.com/blog/grand-fortune-casino-review
https://4dragon.mystrikingly.com/blog/how-do-online-sports-affect-the-development-of-offline-games
https://5emblica.mystrikingly.com/blog/home-of-pokies-convenient-web-gambling-club
https://artic1.mystrikingly.com/blog/betsson-takes-web-based-gaming-and-sports-wagering-offering-live-in-mexico
https://beach.mystrikingly.com/blog/indonesian-lead-representative-in-a-tough-situation-for-supposed-betting
https://cave000.mystrikingly.com/blog/what-kinds-of-rewards-do-online-crypto-casinos-offer
https://desert000.mystrikingly.com/blog/how-do-online-games-influence-the-improvement-of-disconnected-games
https://5eclipse.mystrikingly.com/blog/antiquated-betting-insight-that-will-change-your-game
https://1apricot0.blogspot.com/2022/09/californias-most-found-out-about-web.html
https://2blueberry0.blogspot.com/2022/09/top-web-based-gambling-club-games-that.html
https://3cherry0.blogspot.com/2022/09/softswiss-adds-event-streaming-feature.html
https://4dragonfruit.blogspot.com/2022/09/alvin-chau-denies-association-in-web.html
https://5emblica.blogspot.com/2022/09/5g-expanded-to-26-more-countries-how.html
https://1apricot.mystrikingly.com/blog/shangri-la-live-internet-based-club-and-sports-dependable-web-based-club
https://2blueberry.mystrikingly.com/blog/gamingthe-most-famous-hockey-online-gambling-club-games
https://3cherry.mystrikingly.com/blog/5-things-to-be-aware-prior-to-playing-at-an-internet-based-gambling-club
https://4dragon.mystrikingly.com/blog/free-casino-slot-games-for-fun
https://5emblica.mystrikingly.com/blog/free-club-opening-games-for-entertainment-only
https://1arctic.blogspot.com/2022/09/top-5-casino-betting-destinations-and.html
https://2beach0.blogspot.com/2022/09/how-sports-and-online-casino-devotees.html
https://3cave0.blogspot.com/2022/09/the-best-mechanical-enhancements-in-web.html
https://4desert.blogspot.com/2022/09/connecticut-online-casino-and-sports.html
https://5eclipse.blogspot.com/2022/09/the-effect-of-innovation-and-grants-on.html
https://1apricot0.blogspot.com/2022/09/5-hints-to-tracking-down-best-internet.html
https://2blueberry0.blogspot.com/2022/09/things-to-be-aware-of-online-gambling.html
https://3cherry0.blogspot.com/2022/09/the-effect-of-online-gambling-clubs-on.html
https://4dragonfruit.blogspot.com/2022/09/how-music-can-further-develop-your.html
https://5emblica.blogspot.com/2022/09/enlistment-cycle-at-uk-authorized.html
https://1apricot.mystrikingly.com/blog/how-to-play-at-parimatch-india-online-club
https://2blueberry.mystrikingly.com/blog/how-digital-currency-turned-into-a-piece-of-betting-industry
https://3cherry.mystrikingly.com/blog/west-virginia-no-deposit-casino-bonus-codes-september-2022
https://4dragon.mystrikingly.com/blog/playcasino-among-the-most-dependable-gambling-club-audit-locales-in-south-africa
https://5emblica.mystrikingly.com/blog/what-is-the-best-sic-bo-technique
https://1arctic.blogspot.com/2022/09/the-best-application-online-casino.html
https://2beach0.blogspot.com/2022/09/online-casino-patterns-2022.html
https://3cave0.blogspot.com/2022/09/how-to-pick-trusted-online-casino-in.html
https://4desert.blogspot.com/2022/09/most-solid-installment-and-withdrawal.html
https://5eclipse.blogspot.com/2022/09/step-by-step-instructions-to-work-on.html
https://artic1.mystrikingly.com/blog/jokerstar-casino-dispatches-online-in-germany
https://beach.mystrikingly.com/blog/instructions-to-play-online-casinos-for-amateurs
https://cave000.mystrikingly.com/blog/ape-in-poker-takes-steps-into-the-metaverse
https://desert000.mystrikingly.com/blog/most-dependable-installment-and-withdrawal-strategies-in-online-casinos
https://5eclipse.mystrikingly.com/blog/the-main-events-throughout-the-entire-existence-of-gambling-in-latin-america
https://1apricot0.blogspot.com/2022/09/tips-for-how-to-keep-away-from-fraud-at.html
https://2blueberry0.blogspot.com/2022/09/us-web-club-betting-is-ready-for.html
https://3cherry0.blogspot.com/2022/09/softswiss-big-stake-aggregator-starts.html
https://4dragonfruit.blogspot.com/2022/09/bet-on-web-and-bring-in-cash-6-step.html
https://5emblica.blogspot.com/2022/09/logical-play-jumps-right-into-it-with.html
https://1apricot.mystrikingly.com/blog/rich-palms-club-audit
https://2blueberry.mystrikingly.com/blog/paypal-online-gambling-clubs
https://3cherry.mystrikingly.com/blog/understanding-the-operations-of-betting-necessities
https://4dragon.mystrikingly.com/blog/best-wagering-promotions-for-sunday-night-football
https://5emblica.mystrikingly.com/blog/ladies-soccer-in-the-legends-football-class-of-australia
https://artic1.mystrikingly.com/blog/the-best-application-online-casino-a-complete-aide
https://beach.mystrikingly.com/blog/online-casino-patterns-2022
https://cave000.mystrikingly.com/blog/online-casino-streams-signs-organization-with-practical-arrangement
https://desert000.mystrikingly.com/blog/borgata-casino-dad-top-three-bonanza-slots-to-play
https://5eclipse.mystrikingly.com/blog/step-by-step-instructions-to-work-on-your-involvement-with-the-web-based-casino
https://1arctic.blogspot.com/2022/09/instructions-to-play-online-casinos-for.html
https://2beach0.blogspot.com/2022/09/every-one-of-different-game-motors-push.html
https://3cave0.blogspot.com/2022/09/different-web-based-casinos-reliability.html
https://4desert.blogspot.com/2022/09/sorts-of-installment-choices-in-web.html
https://5eclipse.blogspot.com/2022/09/cash-reward-and-free-twists-at.html
https://1apricot0.blogspot.com/2022/09/the-most-effective-method-to-play.html
https://2blueberry0.blogspot.com/2022/09/pin-up-gambling-club-audit.html
https://3cherry0.blogspot.com/2022/09/how-would-i-quit-betting-for-all-time.html
https://4dragonfruit.blogspot.com/2022/09/gamingthe-greatest-gaming-patterns.html
https://5emblica.blogspot.com/2022/09/tips-that-can-make-you-win-more-in-web.html
https://1apricot.mystrikingly.com/blog/borgata-gambling-club-dad-top-three-big-stake-spaces-to-play
https://2blueberry.mystrikingly.com/blog/different-web-based-gambling-clubs-dedication-programs-for-you-in-canada
https://3cherry.mystrikingly.com/blog/how-to-pick-a-confided-in-web-based-gambling-club-in-singapore
https://4dragon.mystrikingly.com/blog/are-online-gambling-clubs-lawful
https://5emblica.mystrikingly.com/blog/different-web-based-gambling-club-games
https://artic1.mystrikingly.com/blog/top-3-socially-themed-casino-games-and-their-intriguing-beginnings
https://beach.mystrikingly.com/blog/crypto-casinos-without-kyc-acquiring-ubiquity-among-card-sharks
https://cave000.mystrikingly.com/blog/texas-hold-em-how-it-has-showed-up-and-the-essential-standards-of-the-game
https://desert000.mystrikingly.com/blog/issue-betting-security-advocates-worried-about-christchurch-casino-online
https://5eclipse.mystrikingly.com/blog/sorts-of-installment-choices-in-web-based-gaming
https://1arctic.blogspot.com/2022/09/philippines-to-close-175-seaward.html
https://2beach0.blogspot.com/2022/09/best-ontario-online-casinos-draftkings.html
https://3cave0.blogspot.com/2022/09/parimatch-casino-on-bookmakers-site.html
https://4desert.blogspot.com/2022/09/the-most-effective-method-to-pick-solid.html
https://5eclipse.blogspot.com/2022/09/the-most-effective-method-to-play-slots.html
https://artic1.mystrikingly.com/blog/australia-s-northern-region-says-no-new-slots-until-something-like-2023
https://beach.mystrikingly.com/blog/new-jersey-looking-at-esports-as-internet-betting-option
https://cave000.mystrikingly.com/blog/how-to-pick-a-confided-online-casino-in-singapore
https://desert000.mystrikingly.com/blog/betting-chiefs-foresee-extension-of-online-casino-gaming-at-ecgc
https://5eclipse.mystrikingly.com/blog/best-online-sports-betting-sites-in-the-philippines
https://1apricot0.blogspot.com/2022/09/is-it-good-idea-to-invest-in-online.html
https://2blueberry0.blogspot.com/2022/09/how-to-pick-confided-in-web-based-club.html
https://3cherry0.blogspot.com/2022/09/for-what-reason-really-do-individuals.html
https://4dragonfruit.blogspot.com/2022/09/hfive5-bet-in-web-based-club-singapore.html
https://5emblica.blogspot.com/2022/09/sort-of-online-gambling-club-games.html
https://1apricot.mystrikingly.com/blog/avoid-these-mistakes-when-playing-online-casino-games
https://2blueberry.mystrikingly.com/blog/the-10-most-famous-internet-based-club-games
https://3cherry.mystrikingly.com/blog/top-5-reasons-to-use-online-casinos
https://4dragon.mystrikingly.com/blog/advantages-of-picking-on-the-web-gambling-club-for-genuine-money
https://5emblica.mystrikingly.com/blog/4-interesting-points-while-picking-a-web-based-gambling-club
https://1arctic.blogspot.com/2022/09/best-online-gambling-sites-in-singapore.html
https://2beach0.blogspot.com/2022/09/best-live-roulette-casino-sites-in.html
https://3cave0.blogspot.com/2022/09/best-live-baccarat-casino-sites-in.html
https://4desert.blogspot.com/2022/09/blockchains-and-digital-currencies.html
https://5eclipse.blogspot.com/2022/09/3-oaks-gaming-goes-live-with-cosmolot.html
https://1apricot.mystrikingly.com/blog/how-would-i-pick-the-best-web-based-club-in-the-uk
https://2blueberry.mystrikingly.com/blog/best-gambling-club-applications-for-ios-and-android-september-2022
https://3cherry.mystrikingly.com/blog/how-did-the-main-club-big-stake-show-up
https://4dragon.mystrikingly.com/blog/illinois-to-legitimize-web-betting-chiefs-anticipate
https://5emblica.mystrikingly.com/blog/lawful-internet-gaming-no-danger-to-indiana-s-gambling-club-industry
https://artic1.mystrikingly.com/blog/asia-gather-together-the-star-grips-on-casino-concerns-and-resorts-world
https://beach.mystrikingly.com/blog/advances-that-affected-the-improvements-of-the-online-casino-industry
https://cave000.mystrikingly.com/blog/the-u-s-doubles-down-on-online-gambling
https://desert000.mystrikingly.com/blog/how-did-the-first-casino-jackpot-appear
https://5eclipse.mystrikingly.com/blog/illinois-to-legalize-internet-gambling-executives-predict
https://1apricot0.blogspot.com/2022/09/advances-that-impacted-improvements-of.html
https://2blueberry0.blogspot.com/2022/09/could-you-at-any-point-play-with-crypto.html
https://3cherry0.blogspot.com/2022/09/best-web-based-betting-locales-in.html
https://4dragonfruit.blogspot.com/2022/09/the-philippines-gets-rid-of-rebel-web.html
https://5emblica.blogspot.com/2022/09/philippines-to-extradite-40000-chinese.html
https://1arctic.blogspot.com/2022/09/can-you-play-with-crypto-at-online.html
https://2beach0.blogspot.com/2022/09/the-philippines-weeds-out-rogue-online.html
https://3cave0.blogspot.com/2022/09/how-do-i-choose-best-online-casino-in-uk.html
https://4desert.blogspot.com/2022/09/best-casino-apps-for-ios-and-android.html
https://5eclipse.blogspot.com/2022/09/best-live-blackjack-casino-sites.html
https://artic1.mystrikingly.com/blog/legal-online-gaming-no-threat-to-indiana-s-casino-industry-study-finds
https://beach.mystrikingly.com/blog/can-we-expect-social-responsibility-from-gambling-companies
https://cave000.mystrikingly.com/blog/asia-gather-together-hoiana-designates-new-cmo-sjm-experiences-entire-year
https://desert000.mystrikingly.com/blog/the-smoothest-and-the-fastest-among-india-s-top-5-online-casinos
https://5eclipse.mystrikingly.com/blog/shanghai-police-cracking-down-on-online-gambling-gangs
https://1arctic.blogspot.com/2022/09/play-no-cost-slots-at-online-casinos.html
https://2beach0.blogspot.com/2022/09/why-sports-betting-regulation-is-such.html
https://3cave0.blogspot.com/2022/09/the-difference-between-baltic-and.html
https://4desert.blogspot.com/2022/09/martingale-strategy-guide-for-casino.html
https://5eclipse.blogspot.com/2022/09/whats-best-way-to-keep-your-customers.html
https://1apricot0.blogspot.com/2022/09/time-usage-ways-to-play-online-gambling.html
https://2blueberry0.blogspot.com/2022/09/concentrate-on-makes-projection-of-us.html
https://3cherry0.blogspot.com/2022/09/playing-on-web-gambling-club-games.html
https://4dragonfruit.blogspot.com/2022/09/read-up-investigates-possible-for.html
https://5emblica.blogspot.com/2022/09/illinois-online-club-games-are.html
https://1apricot.mystrikingly.com/blog/how-esports-betting-is-changing-the-landscape-of-online-gambling
https://2blueberry.mystrikingly.com/blog/various-kinds-of-games-at-a-gambling-club-on-the-web
https://3cherry.mystrikingly.com/blog/openings-to-cell-phones-pandemic-sends-australia-s-betting-issue-on-the-web
https://4dragon.mystrikingly.com/blog/best-live-vendor-gambling-club-in-canada
https://5emblica.mystrikingly.com/blog/cryptocurrencies-in-gambling-clubs-the-commitments-and-traps
https://1arctic.blogspot.com/2022/10/how-computer-programmers-are-involving.html
https://2beach0.blogspot.com/2022/10/planning-development-of-cutting-edge.html
https://3cave0.blogspot.com/2022/10/investigation-into-online-betting.html
https://4desert.blogspot.com/2022/10/is-online-betting-regulations-evolving.html
https://5eclipse.blogspot.com/2022/10/jerk-versus-betting-gamers-and-crypto.html
https://1apricot0.blogspot.com/2022/10/how-programmers-are-involving.html
https://2blueberry0.blogspot.com/2022/10/planning-development-of-advanced-web.html
https://3cherry0.blogspot.com/2022/10/investigation-into-web-based-betting.html
https://4dragonfruit.blogspot.com/2022/10/is-internet-betting-regulations.html
https://5emblica.blogspot.com/2022/10/jerk-versus-betting-gamers-and-crypto.html
https://artic1.mystrikingly.com/blog/best-casino-no-store-extra-codes-in-michigan-october-2022
https://beach.mystrikingly.com/blog/hawker-casino-live-examination-could-incorporate-polygraph-testing
https://cave000.mystrikingly.com/blog/11-practices-you-can-adjust-while-preparing-for-the-wsop
https://desert000.mystrikingly.com/blog/your-complete-manual-for-wagering-trades
https://5eclipse.mystrikingly.com/blog/90-of-betting-shut-down-says-official
https://1apricot.mystrikingly.com/blog/netent-invites-players-into-a-cuddly-feline-s-kitchen-in-its-new-web-based
https://2blueberry.mystrikingly.com/blog/5-film-based-games-coming-to-xbox-in-2023
https://3cherry.mystrikingly.com/blog/5-film-based-games-coming-to-xbox-in-2023
https://4dragon.mystrikingly.com/blog/europe-gaming-business-sector-worth-in-2022
https://5emblica.mystrikingly.com/blog/fight-in-court-between-torstar-proprietors-heads-to-court-monday
https://1arctic.blogspot.com/2022/10/why-okbet-stays-website-of-decision-for.html
https://2beach0.blogspot.com/2022/10/top-5-live-casino-sites-with-online.html
https://3cave0.blogspot.com/2022/10/everymatrix-wins-veikkaus-public-tender.html
https://4desert.blogspot.com/2022/10/responsible-gambling-council-plays-on.html
https://5eclipse.blogspot.com/2022/10/industry-analyst-believes-illinois-may.html
https://1apricot0.blogspot.com/2022/10/crypto-openings-how-to-play.html
https://2blueberry0.blogspot.com/2022/10/best-igaming-partner-for-last-part-of.html
https://3cherry0.blogspot.com/2022/10/best-no-store-gambling-club-extra-codes.html
https://4dragonfruit.blogspot.com/2022/10/top-5-live-club-destinations-with.html
https://5emblica.blogspot.com/2022/10/capable-betting-board-plays-on-internet.html
https://1apricot.mystrikingly.com/blog/softswiss-club-stage-new-element-group-competitions
https://2blueberry.mystrikingly.com/blog/latam-spaces-into-the-lead-position-for-most-captivating-business-sector-for
https://3cherry.mystrikingly.com/blog/gambling-club-partition-clans-split-as-california-citizens-consider-online
https://4dragon.mystrikingly.com/blog/bitstarz-survey-2022-is-it-a-genuine-and-safe-crypto-gambling-club
https://5emblica.mystrikingly.com/blog/gambling-club-innovation-and-applications
https://artic1.mystrikingly.com/blog/kazuo-okada-allies-face-coercion-charges-over-casino-takeover
https://beach.mystrikingly.com/blog/board-approved-for-new-york-downstate-casino-expansion
https://cave000.mystrikingly.com/blog/report-finds-indiana-online-casinos-won-t-kill-land-based-casinos
https://desert000.mystrikingly.com/blog/tom-horn-gaming-brings-its-first-class-casino-content-to-quantum-gaming
https://5eclipse.mystrikingly.com/blog/us-leovegas-launch-appears-dead-opening-an-nj-online-casino-slot
https://1apricot0.blogspot.com/2022/10/pilot-most-current-accident-game-from.html
https://2blueberry0.blogspot.com/2022/10/everymatrix-wins-veikkaus-public.html
https://3cherry0.blogspot.com/2022/10/nfl-newsbest-online-gambling-club-games.html
https://4dragonfruit.blogspot.com/2022/10/yougov-review-shows-americans-worried.html
https://5emblica.blogspot.com/2022/10/las-vegas-tasks-help-boyd-gaming-byd.html
https://1apricot.mystrikingly.com/blog/board-supported-for-new-york-downstate-club-extension
https://2blueberry.mystrikingly.com/blog/elys-game-innovation-and-amazing-focal-declare-jv-to-lay-out-second-sportsbook
https://3cherry.mystrikingly.com/blog/new-yorker-records-claim-against-driving-brand-betmgm
https://4dragon.mystrikingly.com/blog/malta-gaming-authority-looking-for-player-insurance
https://5emblica.mystrikingly.com/blog/7-abilities-you-want-to-win-more-at-online-gambling-club-games
https://1arctic.blogspot.com/2022/10/which-is-better-online-gambling-or.html
https://2beach0.blogspot.com/2022/10/top-5-innovations-in-online-casino.html
https://3cave0.blogspot.com/2022/10/how-to-better-manage-your-bankroll-when.html
https://4desert.blogspot.com/2022/10/softswiss-jackpot-aggregator-announces.html
https://5eclipse.blogspot.com/2022/10/why-are-cryptocurrencies-becoming.html
https://artic1.mystrikingly.com/blog/lady-luck-games-signs-game-distribution-agreement-with-cyg-pte-ltd
https://beach.mystrikingly.com/blog/why-gembet-is-a-legit-online-casino
https://cave000.mystrikingly.com/blog/reasons-for-the-popularity-of-online-casino-and-its-advantages
https://desert000.mystrikingly.com/blog/how-to-play-and-win-at-uk-online-poker
https://5eclipse.mystrikingly.com/blog/softswiss-partners-with-axecasino-for-jackpot-campaign-tool
https://1apricot0.blogspot.com/2022/10/genuine-cash-online-gambling-clubs.html
https://2blueberry0.blogspot.com/2022/10/what-to-search-for-in-another-web-based.html
https://3cherry0.blogspot.com/2022/10/what-are-upsides-of-playing-laid-out.html
https://4dragonfruit.blogspot.com/2022/10/step-by-step-instructions-to-join-to.html
https://5emblica.blogspot.com/2022/10/best-web-based-club-locales-in-malaysia.html
https://1arctic.blogspot.com/2022/10/best-online-casino-with-real-money.html
https://2beach0.blogspot.com/2022/10/how-to-develop-bitcoin-casino-platform.html
https://3cave0.blogspot.com/2022/10/how-covid-19-and-lockdowns-affected.html
https://4desert.blogspot.com/2022/10/how-is-online-casino-industry-already.html
https://5eclipse.blogspot.com/2022/10/luck-vs-skill-which-is-more-important.html
https://artic1.mystrikingly.com/blog/playing-online-casino-games-while-traveling-what-others-don-t-know
https://beach.mystrikingly.com/blog/online-betting-how-to-select-the-best-online-sportsbook-for-you
https://cave000.mystrikingly.com/blog/the-ultimate-beginner-s-guide-to-sports-betting
https://desert000.mystrikingly.com/blog/the-record-breaking-bet-on-sports-gambling-in-california-faces-long-odds
https://5eclipse.mystrikingly.com/blog/most-popular-online-casino-games-in-2022
https://1apricot.mystrikingly.com/blog/7-abilities-you-really-want-to-win-more-at-online-gambling-club-games
https://2blueberry.mystrikingly.com/blog/worldwide-internet-betting-business-sector-report-2022
https://3cherry.mystrikingly.com/blog/the-most-effective-method-to-turn-into-a-club-decoration
https://4dragon.mystrikingly.com/blog/how-to-engage-yourself-during-the-weekend
https://5emblica.mystrikingly.com/blog/online-gaming-machines-what-are-they-and-their-principles
https://artic1.mystrikingly.com/blog/raising-the-stakes-momentum-builds-to-allow-online-casino-gambling-in-indiana
https://beach.mystrikingly.com/blog/list-of-the-uk-most-popular-casino-games
https://cave000.mystrikingly.com/blog/land-based-gambling-returns-to-france-as-online-segment-sees-decline
https://desert000.mystrikingly.com/blog/the-record-breaking-bet-on-sports-gambling-in-california-faces-long-odds-d80d5f6e-c6e2-42ac-8805-cb1d816c05c5
https://5eclipse.mystrikingly.com/blog/betsafe-sportsbook-refuses-to-pay-winnings-to-frustrated-peruvian-sports-bettor
https://1arctic.blogspot.com/2022/10/online-strategies-to-win-slots-2022.html
https://2beach0.blogspot.com/2022/10/amunra-unveils-its-updated-website.html
https://3cave0.blogspot.com/2022/10/ho-family-could-lose-two-portugal.html
https://4desert.blogspot.com/2022/10/asiakt2win-safeguards-players-from.html
https://5eclipse.blogspot.com/2022/10/who-thought-putting-casino-in-everyones.html
https://1apricot0.blogspot.com/2022/10/7-warning-signs-to-detect-online-poker.html
https://2blueberry0.blogspot.com/2022/10/which-is-better-internet-betting-or.html
https://3cherry0.blogspot.com/2022/10/report-finds-indiana-online-gambling.html
https://4dragonfruit.blogspot.com/2022/10/5-tomfoolery-games-in-web-based-club-of.html
https://5emblica.blogspot.com/2022/10/rundown-of-top-5-developments-in-web.html
https://1apricot.mystrikingly.com/blog/the-most-effective-method-to-more-readily-deal-with-your-bankroll-while
https://2blueberry.mystrikingly.com/blog/softswiss-big-stake-aggregator-reports-association-with-axecasino
https://3cherry.mystrikingly.com/blog/why-are-digital-currencies-turning-into-a-famous-installment-choice-in
https://4dragon.mystrikingly.com/blog/instructions-to-create-a-bitcoin-gambling-club-stage-for-business
https://5emblica.mystrikingly.com/blog/instructions-to-play-and-succeed-at-uk-online-poker
https://1arctic.blogspot.com/2022/10/north-dakota-tribes-want-exclusive.html
https://2beach0.blogspot.com/2022/10/should-sports-betting-be-legal-at.html
https://3cave0.blogspot.com/2022/10/top-5-cat-slots-at-online-casinos.html
https://4desert.blogspot.com/2022/10/how-to-start-bitcoin-casino.html
https://5eclipse.blogspot.com/2022/10/prohibiting-internet-poker-machines-and.html
https://artic1.mystrikingly.com/blog/crypto-casinos-5-security-tips
https://beach.mystrikingly.com/blog/sports-betting-tips-to-win-more-bets-in-2022
https://cave000.mystrikingly.com/blog/a-night-in-vegas-benefits-ronald-mcdonald-house
https://desert000.mystrikingly.com/blog/maryland-sports-betting-mobile-gambling-will-begin-before-end-of-2022
https://5eclipse.mystrikingly.com/blog/blue-guru-announces-the-release-of-the-seafaring-slot-reel-big-fish
https://1apricot.mystrikingly.com/blog/which-indiana-club-games-offer-the-best-yield-to-players
https://2blueberry.mystrikingly.com/blog/best-web-based-club-with-genuine-cash-spaces-in-2022
https://3cherry.mystrikingly.com/blog/most-famous-web-based-gambling-club-games-in-2022
https://4dragon.mystrikingly.com/blog/upping-the-ante-force-works-to-permit-online-club-betting-in-indiana
https://5emblica.mystrikingly.com/blog/what-games-might-you-at-any-point-play-in-web-based-club-singapore
https://1apricot0.blogspot.com/2022/10/what-is-prop-26-how-club-and-courses.html
https://2blueberry0.blogspot.com/2022/10/disallowing-web-poker-machines-and.html
https://3cherry0.blogspot.com/2022/10/how-to-begin-bitcoin-club.html
https://4dragonfruit.blogspot.com/2022/10/crypto-gambling-clubs-5-security-tips.html
https://5emblica.blogspot.com/2022/10/featuressports-wagering-tips-to-win.html
https://artic1.mystrikingly.com/blog/which-indiana-casinos-games-offer-the-highest-return-to-players
https://beach.mystrikingly.com/blog/is-it-legal-to-gamble-online-in-india-take-a-look-at-regulations
https://cave000.mystrikingly.com/blog/gaming-conference-looks-at-lessons-learned-from-pandemic-and-road-ahead
https://desert000.mystrikingly.com/blog/slotegrator-offers-more-slots-after-kajot-games-deal
https://5eclipse.mystrikingly.com/blog/high-paying-online-slots-mega-joker-cleopatra-mega-moolah
https://1apricot0.blogspot.com/2022/10/playstar-accomplices-gf-gaming-for.html
https://2blueberry0.blogspot.com/2022/10/the-most-effective-method-to-deal-with.html
https://3cherry0.blogspot.com/2022/10/the-role-of-chatbots-in-online-casino.html
https://4dragonfruit.blogspot.com/2022/10/softswiss-big-stake-aggregator.html
https://5emblica.blogspot.com/2022/10/everygame-casino-promo-codes.html
https://1apricot.mystrikingly.com/blog/exceptional-extra-offers-and-novel-advancements-from-everygame-gambling-club
https://2blueberry.mystrikingly.com/blog/instructions-to-wager-expert-football-props-player-wagers-new-picks-sports
https://3cherry.mystrikingly.com/blog/work-on-your-triumphant-possibilities-with-these-internet-based-club-tips
https://4dragon.mystrikingly.com/blog/the-fate-of-gambling-club-installment-techniques
https://5emblica.mystrikingly.com/blog/internet-betting-stage-m88-house-taps-manny-pacquiao-as-brand-envoy
https://1arctic.blogspot.com/2022/10/ukgc-fines-ggpoker-743536-for-anti.html
https://2beach0.blogspot.com/2022/10/how-to-play-online-casino-singapore.html
https://3cave0.blogspot.com/2022/10/how-to-stay-safe-when-playing-online.html
https://4desert.blogspot.com/2022/10/why-is-popularity-of-online-casino-in.html
https://5eclipse.blogspot.com/2022/10/playstar-gains-presumptive-colorado.html
https://1apricot0.blogspot.com/2022/10/benefits-of-playing-on-web-spaces.html
https://2blueberry0.blogspot.com/2022/10/step-by-step-instructions-to-find-your.html
https://3cherry0.blogspot.com/2022/10/do-individuals-truly-win-cash-with.html
https://4dragonfruit.blogspot.com/2022/10/5-hints-and-deceives-to-dominating-web.html
https://5emblica.blogspot.com/2022/10/a-manual-for-succeeding-at-online-club.html
https://1apricot.mystrikingly.com/blog/how-to-pick-the-best-portable-internet-based-gambling-club
https://2blueberry.mystrikingly.com/blog/misconceptions-about-portable-betting-games
https://3cherry.mystrikingly.com/blog/new-internet-based-gambling-clubs
https://4dragon.mystrikingly.com/blog/versatile-gaming-is-the-eventual-fate-of-online-club
https://5emblica.mystrikingly.com/blog/the-main-6-versatile-gambling-clubs-you-ought-to-play
https://artic1.mystrikingly.com/blog/explained-reason-behind-the-rise-of-esports-betting-in-online-casinos
https://beach.mystrikingly.com/blog/canadian-casino-games-to-play-online-in-2022
https://cave000.mystrikingly.com/blog/new-york-casino-board-overseeing-3-downstate-licenses-missing-2-members
https://desert000.mystrikingly.com/blog/greenwood-gaming-extends-partnership-with-philadelphia-76ers-parx-casino-and
https://5eclipse.mystrikingly.com/blog/rng-meaning-what-is-rng-and-what-does-it-mean
https://1arctic.blogspot.com/2022/10/what-online-casino-games-are-most.html
https://2beach0.blogspot.com/2022/10/the-final-tool-in-challenging-market.html
https://3cave0.blogspot.com/2022/10/understanding-casino-bonuses.html
https://4desert.blogspot.com/2022/10/explained-how-to-find-best-online.html
https://5eclipse.blogspot.com/2022/10/ontarios-online-gambling-revenue-tops.html
https://1apricot0.blogspot.com/2022/10/the-most-effective-method-to-track-down.html
https://2blueberry0.blogspot.com/2022/10/step-by-step-instructions-to-play.html
https://3cherry0.blogspot.com/2022/10/knowledge-into-new-guidelines-for.html
https://4dragonfruit.blogspot.com/2022/10/how-liberal-yuugado-club-and-yuugado.html
https://5emblica.blogspot.com/2022/10/how-has-yuugado-casino-become.html
https://1apricot.mystrikingly.com/blog/risk-free-gambling-or-just-clever-marketing-the-truth-about-online-casino
https://2blueberry.mystrikingly.com/blog/playstar-acquires-hypothetical-colorado-online-gambling-club-access
https://3cherry.mystrikingly.com/blog/6-motivations-behind-why-hfive5-is-the-top-web-based-gambling-club-singapore
https://4dragon.mystrikingly.com/blog/best-south-africa-online-gambling-sites-oct-2022
https://5emblica.mystrikingly.com/blog/tipico-wins-lottoland-loses-as-germany-keeps-on-forming-web-based-betting
https://artic1.mystrikingly.com/blog/how-mobile-betting-is-taking-over-online-betting-in-the-igaming-industry
https://beach.mystrikingly.com/blog/uruguay-casino-workers-strike-over-online-gambling-plans
https://cave000.mystrikingly.com/blog/new-pa-online-casinos-coming-to-a-mobile-device-near-you
https://desert000.mystrikingly.com/blog/why-roulette-is-the-fastest-growing-game-in-casinos
https://5eclipse.mystrikingly.com/blog/casino-revenue-reports-show-us-gaming-could-be-cooling-amid-economic-uncertainty
https://1arctic.blogspot.com/2022/10/can-you-bet-on-sports-online-in-maryland.html
https://2beach0.blogspot.com/2022/10/casino-guru-to-award-responsible.html
https://3cave0.blogspot.com/2022/10/when-will-sports-betting-be-legal-in.html
https://4desert.blogspot.com/2022/10/social-casinos-on-acmas-2022-23.html
https://5eclipse.blogspot.com/2022/10/how-technology-is-changing-gambling.html
https://artic1.mystrikingly.com/blog/indiana-sports-betting-handle-continues-to-climb-in-september
https://beach.mystrikingly.com/blog/how-the-new-site-bluechip-affects-the-gambling-industry
https://cave000.mystrikingly.com/blog/what-is-the-difference-between-a-casino-site-and-a-casino-app
https://desert000.mystrikingly.com/blog/record-online-customer-activity-and-fx-push-revenue-up-2-at-entain-in-q3
https://5eclipse.mystrikingly.com/blog/land-based-casinos-protests-igaming-in-uruguay
https://1arctic.blogspot.com/2022/10/uruguay-casino-workers-strike-in.html
https://2beach0.blogspot.com/2022/10/the-best-table-game-to-play-at-online.html
https://3cave0.blogspot.com/2022/10/top-popular-games-available-at.html
https://4desert.blogspot.com/2022/10/why-online-crypto-casinos-are-better.html
https://5eclipse.blogspot.com/2022/10/aristocrat-leisure-limited-launches-its.html
https://1apricot0.blogspot.com/2022/10/greenwood-gaming-extends-partnership.html
https://2blueberry0.blogspot.com/2022/10/what-is-rng-and-whats-significance-here.html
https://3cherry0.blogspot.com/2022/10/bovada-gambling-club-audit-fair-survey.html
https://4dragonfruit.blogspot.com/2022/10/visa-and-top-web-based-betting-charge.html
https://5emblica.blogspot.com/2022/10/michigan-man-wins-54m-betting-on-web.html
https://1apricot.mystrikingly.com/blog/yet-another-attempt-at-passing-the-blame-for-online-gambling-around-instead
https://2blueberry.mystrikingly.com/blog/skill-based-gambling-preferred-by-higher-iq-people-research-finds
https://3cherry.mystrikingly.com/blog/how-accomplishes-club-echeck-work
https://4dragon.mystrikingly.com/blog/detroit-club-incomes-down-in-second-from-last-quarter
https://5emblica.mystrikingly.com/blog/three-card-poker-online-everything-you-need-to-know
https://1apricot0.blogspot.com/2022/10/top-5-web-based-club-games-to-play.html
https://2blueberry0.blogspot.com/2022/10/for-what-reason-might-player-at-any.html
https://3cherry0.blogspot.com/2022/10/rundown-of-best-canadian-club-for.html
https://4dragonfruit.blogspot.com/2022/10/best-web-based-gambling-club-with.html
https://5emblica.blogspot.com/2022/10/nj-gambling-club-sports-wagering-online.html
https://1apricot.mystrikingly.com/blog/gambling-com-gathering-reports-finalists-for-2022-american-betting-honors
https://2blueberry.mystrikingly.com/blog/betmgm-gambling-club-reward-bookies1500-grants-100-percent-store-match
https://3cherry.mystrikingly.com/blog/bitcoin-roulette-how-to-play-rules-technique-made-sense-of
https://4dragon.mystrikingly.com/blog/gambling-com-gathering-reports-finalists-for-2022-american-betting-honors
https://5emblica.mystrikingly.com/blog/why-the-casino-theme-in-movies-is-here-to-stay
https://1apricot0.blogspot.com/2022/10/cambodia-specialists-assault-10000.html
https://2blueberry0.blogspot.com/2022/10/1win-audit-of-bookie-in-2022.html
https://3cherry0.blogspot.com/2022/10/survey-of-1xbet-bangladesh-sports.html
https://4dragonfruit.blogspot.com/2022/10/bgaming-debuts-sweet-treat-with.html
https://5emblica.blogspot.com/2022/10/grant-winning-programming-supplier-adds.html
https://1apricot.mystrikingly.com/blog/markets-well-known-in-malaysia
https://2blueberry.mystrikingly.com/blog/why-is-igaming-turning-out-to-be-more-famous-constantly
https://3cherry.mystrikingly.com/blog/the-lgbtq-people-group-in-the-realm-of-betting
https://4dragon.mystrikingly.com/blog/massachusetts-sports-wagering-ought-to-before-long-have-clear-vision-on
https://5emblica.mystrikingly.com/blog/web-based-betting-programming-business-sector-worth-usd-158-20-billion-of
https://1apricot0.blogspot.com/2022/10/noble-cause-battle-nd-clans-arrangement.html
https://2blueberry0.blogspot.com/2022/10/amazingly-this-nft-metaverse-club-is-as.html
https://3cherry0.blogspot.com/2022/10/online-lottery-will-be-accessible-to.html
https://4dragonfruit.blogspot.com/2022/10/how-playing-club-games-can-add.html
https://5emblica.blogspot.com/2022/10/the-science-behind-internet-betting.html
https://5emblica.blogspot.com/2022/10/the-boundaries-of-best-internet-based.html
https://4dragonfruit.blogspot.com/2022/10/extreme-manual-for-crypto-club-and-top.html
https://3cherry0.blogspot.com/2022/10/the-computerized-showcasing-patterns.html
https://2blueberry0.blogspot.com/2022/10/legalized-online-betting-is-bringing.html
https://1apricot0.blogspot.com/2022/10/brilliant-grid-to-send-off-web-based.html
https://1apricot0.blogspot.com/2022/10/why-has-live-gambling-club-house-become.html
https://2blueberry0.blogspot.com/2022/10/survey-finds-most-georgia-electors.html
https://3cherry0.blogspot.com/2022/10/everymatrix-enters-new-jersey-by-means.html
https://4dragonfruit.blogspot.com/2022/10/most-recent-newsthe-jerk-restriction-on.html
https://5emblica.blogspot.com/2022/10/online-openings-lift-germanys-betting.html
https://1apricot0.blogspot.com/2022/10/japanese-specialists-pronounce-online.html
https://2blueberry0.blogspot.com/2022/10/tickets-selling-quick-for-2022-asian.html
https://3cherry0.blogspot.com/2022/10/softswiss-bonanza-aggregator-dispatches.html
https://4dragonfruit.blogspot.com/2022/10/what-makes-online-club-destinations-so.html
https://5emblica.blogspot.com/2022/10/highlights-of-authorized-web-based-club.html
https://1apricot0.blogspot.com/2022/10/how-to-pick-right-web-based-club.html
https://2blueberry0.blogspot.com/2022/10/why-are-online-club-games-getting-more.html
https://3cherry0.blogspot.com/2022/10/how-digital-currency-is-changing-south.html
https://4dragonfruit.blogspot.com/2022/10/philippines-business-bunches-call-for.html
https://5emblica.blogspot.com/2022/10/new-games-by-3-oaks-games-accessible-in.html
https://1apricot0.blogspot.com/2022/10/how-do-crypto-based-web-based-club.html
https://2blueberry0.blogspot.com/2022/10/development-reports-asia-development.html
https://3cherry0.blogspot.com/2022/10/apple-stops-betting-promotions-on.html
https://4dragonfruit.blogspot.com/2022/10/bear-slopes-club-and-travel-resort-gets.html
https://5emblica.blogspot.com/2022/10/twitter-affirms-fruition-of-elon-musks.html
https://1apricot0.blogspot.com/2022/10/top-ways-to-analyze-rewards-of-online.html
https://2blueberry0.blogspot.com/2022/10/mathews-why-prop-26-and-27-misfortunes.html
https://3cherry0.blogspot.com/2022/10/playstar-dispatches-online-club.html
https://4dragonfruit.blogspot.com/2022/10/top-digital-money-gambling-clubs-in-us.html
https://5emblica.blogspot.com/2022/10/greece-awards-quickspin-igaming.html
https://1apricot0.blogspot.com/2022/10/macaus-mgm-cotai-gambling-club-secured.html
https://2blueberry0.blogspot.com/2022/10/club-stores-in-nz-innovation-in.html
https://3cherry0.blogspot.com/2022/10/sports-wagering-is-simpler-than-at-any.html
https://4dragonfruit.blogspot.com/2022/10/driving-igaming-arrangements-supplier.html
https://5emblica.blogspot.com/2022/10/wagering-business-sector-patterns.html
https://1apricot0.blogspot.com/2022/10/things-to-be-familiar-with-themed-spaces.html
https://2blueberry0.blogspot.com/2022/10/what-are-benefits-of-quick-payout-club.html
https://3cherry0.blogspot.com/2022/10/a-manual-for-online-club-rewards.html
https://4dragonfruit.blogspot.com/2022/10/in-game-money-transformation-softswiss.html
https://5emblica.blogspot.com/2022/10/accord-gambling-club-needs-to-assemble.html
https://1apricot0.blogspot.com/2022/11/softswiss-refreshes-gambling-club-stage.html
https://2blueberry0.blogspot.com/2022/11/okada-camp-sure-grave-compulsion.html
https://3cherry0.blogspot.com/2022/11/twitter-to-lay-off-25-of-labor-force-in.html
https://4dragonfruit.blogspot.com/2022/11/elements-of-web-based-versatile-club.html
https://5emblica.blogspot.com/2022/11/web-based-betting-business-sector-size.html
https://1apricot0.blogspot.com/2022/11/well-known-baccarat-wagering-frameworks.html
https://2blueberry0.blogspot.com/2022/11/best-internet-based-crypto-club.html
https://3cherry0.blogspot.com/2022/11/enteractive-expects-to-improve.html
https://4dragonfruit.blogspot.com/2022/11/portable-web-based-club-industry.html
https://5emblica.blogspot.com/2022/11/ocado-enters-south-korea-with-lotte.html
https://1apricot0.blogspot.com/2022/11/how-independent-robots-are-changing.html
https://2blueberry0.blogspot.com/2022/11/why-openings-are-best-games-to-utilize.html
https://3cherry0.blogspot.com/2022/11/key-measures-to-pick-genuine-club-on-web.html
https://4dragonfruit.blogspot.com/2022/11/why-is-ethereum-betting-so-unique.html
https://5emblica.blogspot.com/2022/11/sports-wagering-online-gambling-club.html
https://1apricot0.blogspot.com/2022/11/innovation-and-openings-how-tech.html
https://2blueberry0.blogspot.com/2022/11/what-sorts-of-games-might-you-at-any.html
https://3cherry0.blogspot.com/2022/11/the-developing-impact-of-applications.html
https://4dragonfruit.blogspot.com/2022/11/the-two-most-horrendously-terrible.html
https://5emblica.blogspot.com/2022/11/the-significance-of-safe-internet.html
https://1apricot0.blogspot.com/2022/11/how-might-one-pick-dependable-web-based.html
https://2blueberry0.blogspot.com/2022/11/a-novices-manual-for-well-known.html
https://3cherry0.blogspot.com/2022/11/here-is-reason-few-web-based-bettors.html
https://4dragonfruit.blogspot.com/2022/11/will-2023-be-time-of-crypto-wagering-in.html
https://5emblica.blogspot.com/2022/11/assessment-dont-neglect-cost-of-betting.html
https://1apricot0.blogspot.com/2022/11/dangers-of-web-based-betting-and-how-to.html
https://2blueberry0.blogspot.com/2022/11/south-korea-police-seize-46m-in-strikes.html
https://3cherry0.blogspot.com/2022/11/bcgame-puts-700-eth-in-nfts-for.html
https://4dragonfruit.blogspot.com/2022/11/club-mix-ups-you-ought-to-keep-away.html
https://5emblica.blogspot.com/2022/11/las-vegas-counsel-venetian-palazzo-club.html
https://1arctic.blogspot.com/2022/11/us-controllers-get-serious-about-slotie.html
https://abbba12.blogspot.com/2022/11/playstar-dispatches-icasino-application.html
https://2beach0.blogspot.com/2022/11/gaming-americas-week-after-week.html
https://3cave0.blogspot.com/2022/11/super-gathering-declares-securing-of.html
https://5eclipse.blogspot.com/2022/11/straight-factories-club-michigan-opens.html
https://butom1212.blogspot.com/2022/11/club-sportsbooks-could-take-profit-hit.html
https://chochoco2.blogspot.com/2022/11/las-vegas-strip-club-wagers-large-on.html
https://1arctic.blogspot.com/2022/11/full-house-targets-illinois-gambling.html
https://2beach0.blogspot.com/2022/11/parx-club-among-innumerable-nearby.html
https://butom1212.blogspot.com/2022/11/the-main-real-factors-of-internet.html
https://3cave0.blogspot.com/2022/11/how-wellbeing-and-tomfoolery-meet-up.html
https://chochoco2.blogspot.com/2022/11/what-is-hardest-gambling-club-game-to.html
https://5eclipse.blogspot.com/2022/11/betting-live-streams-why-are-they-so.html
https://1arctic.blogspot.com/2022/11/enormous-bet-to-permit-sports-betting.html
https://2beach0.blogspot.com/2022/11/new-york-online-club-poker-addabbo-needs.html
https://butom1212.blogspot.com/2022/11/the-most-effective-method-to-find.html
https://3cave0.blogspot.com/2022/11/what-licenses-should-web-based-gambling.html
https://chochoco2.blogspot.com/2022/11/most-established-club-games-that-you.html
https://5eclipse.blogspot.com/2022/11/why-fortunate-numbers-matter-in-web.html
https://1arctic.blogspot.com/2022/11/wynn-resorts-to-open-inlet-bedouins.html
https://2beach0.blogspot.com/2022/11/americans-answer-expansion-by-going-to.html
https://butom1212.blogspot.com/2022/11/fair-go-gambling-club-present-royal.html
https://3cave0.blogspot.com/2022/11/club-administrators-misfortunes-develop.html
https://chochoco2.blogspot.com/2022/11/hard-rock-celebrates-1-year-achievement.html
https://5eclipse.blogspot.com/2022/11/mo-club-to-treat-veterans-dynamic.html
https://1arctic.blogspot.com/2022/11/american-betting-honors-finalists.html
https://2beach0.blogspot.com/2022/11/betting-commissions-review-exhibits-uks.html
https://butom1212.blogspot.com/2022/11/the-fate-of-internet-games-how.html
https://3cave0.blogspot.com/2022/11/the-web-based-gaming-area-all-over.html
https://chochoco2.blogspot.com/2022/11/rsi-and-run-it-once-poker-is-us-online.html
https://5eclipse.blogspot.com/2022/11/savvy-move-from-evenbet-coordinating.html
https://abbba12.blogspot.com/2022/11/ipi-on-off-chance-that-discussions-are.html
https://1arctic.blogspot.com/2022/11/macau-gambling-clubs-expected-to.html
https://2beach0.blogspot.com/2022/11/las-vegas-strip-adds-another-colossal.html
https://butom1212.blogspot.com/2022/11/large-monetary-effect-for-mountain-home.html
https://3cave0.blogspot.com/2022/11/times-square-club-faces-one-in-million.html
https://chochoco2.blogspot.com/2022/11/all-in-club-in-west-michigan.html
https://5eclipse.blogspot.com/2022/11/the-most-effective-method-to-recognize.html
https://abbba12.blogspot.com/2022/11/online-club-in-usa.html
https://1arctic.blogspot.com/2022/11/most-recent-newsindustry-pioneers-send.html
https://2beach0.blogspot.com/2022/11/thai-police-express-separated-huge.html
https://butom1212.blogspot.com/2022/11/cambodia-china-set-organization-to-stop.html
https://3cave0.blogspot.com/2022/11/why-clients-ought-to-bet-at-online.html
https://chochoco2.blogspot.com/2022/11/spending-plan-2023-corrections-to.html
https://5eclipse.blogspot.com/2022/11/web-based-games-are-not-betting-what.html
https://abbba12.blogspot.com/2022/11/300-free-twists-and-more-at-delicious.html
https://1arctic.blogspot.com/2022/11/instructions-to-get-your-white-name.html
https://2beach0.blogspot.com/2022/11/income-development-go-on-at-plainville.html
https://butom1212.blogspot.com/2022/11/bristol-gambling-club-october-incomes.html
https://3cave0.blogspot.com/2022/11/the-maltese-gambling-club-game-supplier.html
https://chochoco2.blogspot.com/2022/11/bonanza-domain-city-gambling-club.html
https://5eclipse.blogspot.com/2022/11/a-manual-for-tracking-down-internet.html
https://abbba12.blogspot.com/2022/11/suntrust-megawide-stretch-out-lodging.html
https://1arctic.blogspot.com/2022/11/the-club-insight-in-hurry.html
https://2beach0.blogspot.com/2022/11/pennsylvania-fines-parx-club-for.html
https://butom1212.blogspot.com/2022/11/this-is-how-much-live-gambling-club.html
https://3cave0.blogspot.com/2022/11/unibet-could-be-available-to-be.html
https://chochoco2.blogspot.com/2022/11/online-club-eliminates-promotions.html
https://5eclipse.blogspot.com/2022/11/fonner-park-desires-to-complete.html
https://abbba12.blogspot.com/2022/11/for-what-reason-do-ladies-cherish.html
https://1arctic.blogspot.com/2022/11/what-sort-of-music-is-well-known-on-web.html
https://2beach0.blogspot.com/2022/11/live-roulette-tables-with-live-sellers.html
https://butom1212.blogspot.com/2022/11/texas-congressperson-vouches-for-club.html
https://3cave0.blogspot.com/2022/11/installment-techniques-for-online-club.html
https://chochoco2.blogspot.com/2022/11/this-club-bet-on-geothermal-and-hit-it.html
https://5eclipse.blogspot.com/2022/11/texas-administrator-seeks-push-for.html
https://abbba12.blogspot.com/2022/11/sports-wagering-in-ohio-caesars.html
https://1arctic.blogspot.com/2022/11/online-games-wagering-in-md-to-start.html
https://2beach0.blogspot.com/2022/11/bettings-spread.html
https://butom1212.blogspot.com/2022/11/greater-part-of-individuals-think-web.html
https://3cave0.blogspot.com/2022/11/the-best-website-for-live-wagering-and.html
https://chochoco2.blogspot.com/2022/11/online-games-wagering-carrying-out-in.html
https://5eclipse.blogspot.com/2022/11/wagering-destinations-ask-alert-after.html
https://abbba12.blogspot.com/2022/11/online-club-innovation-eventual-fate-of.html
https://1arctic.blogspot.com/2022/11/online-gambling-clubs-could-give-new.html
https://2beach0.blogspot.com/2022/11/report-new-jerseys-internet-based.html
https://butom1212.blogspot.com/2022/11/the-positive-impact-of-betting-business.html
https://3cave0.blogspot.com/2022/11/what-is-base-store-at-online-gambling.html
https://chochoco2.blogspot.com/2022/11/gom-consents-to-charge-internet-gaming.html
https://5eclipse.blogspot.com/2022/11/online-poker-to-make-legitimate.html
https://abbba12.blogspot.com/2022/11/megaworld-to-foster-us262-million.html
https://1arctic.blogspot.com/2022/11/ace-club-to-hold-opening-function-for.html
https://2beach0.blogspot.com/2022/11/nj-q3-club-procures-down-13-however.html
https://butom1212.blogspot.com/2022/11/yankees-and-mets-proprietors-seeking.html
https://3cave0.blogspot.com/2022/11/new-club-proprietor-closes-darling-las.html
https://chochoco2.blogspot.com/2022/11/web-based-betting-is-turning-out-to-be.html
https://5eclipse.blogspot.com/2022/11/web-based-betting-drives-151-million.html
https://abbba12.blogspot.com/2022/11/gig-accomplices-with-online-gambling.html
https://1arctic.blogspot.com/2022/11/online-club-regulations-all-over-planet.html
https://2beach0.blogspot.com/2022/11/the-market-for-web-based-betting-in-us.html
https://butom1212.blogspot.com/2022/11/the-most-effective-method-to-pick-right.html
https://3cave0.blogspot.com/2022/11/present-day-top-gambling-club-with.html
https://chochoco2.blogspot.com/2022/11/coinplay-crypto-club-audit-2022.html
https://5eclipse.blogspot.com/2022/11/what-could-organizations-at-any-point.html
https://abbba12.blogspot.com/2022/11/what-retail-organizations-can-gain-from.html
https://1arctic.blogspot.com/2022/11/what-are-best-vocations-in-gambling.html
https://2beach0.blogspot.com/2022/11/macau-to-declare-club-10-year.html
https://butom1212.blogspot.com/2022/11/sportsbooks-at-jack-club-and.html
https://3cave0.blogspot.com/2022/11/playing-in-web-based-club-fledglings.html
https://chochoco2.blogspot.com/2022/11/figure-out-how-club-games-designers-use.html
https://5eclipse.blogspot.com/2022/11/the-ongoing-circumstance-encompassing.html
https://abbba12.blogspot.com/2022/11/top-norwegian-internet-based-gambling.html
https://site-6954901-6807-7781.mystrikingly.com/blog/macau-club-stocks-take-off-after-new-licenses-conceded
https://1arctic.blogspot.com/2022/11/step-by-step-instructions-to-pick-best.html
https://artic1.mystrikingly.com/blog/betby-lays-out-happy-association-with-500-gambling-club
https://2beach0.blogspot.com/2022/11/hong-kongs-far-east-consortium-allowed.html
https://beach.mystrikingly.com/blog/french-retailer-club-offers-partakes-in-brazil-s-assai-to-cut-obligation
https://butom1212.blogspot.com/2022/11/cryptocurrency-what-to-anticipate-from.html
https://site-6955035-8022-3958.mystrikingly.com/blog/firecreek-crossing-resort-gambling-club-venture-to-be-based-on-south-virginia
https://3cave0.blogspot.com/2022/11/the-product-supplier-of-igaming.html
https://cave000.mystrikingly.com/blog/impermanent-club-in-terrific-island-may-be-open-by-christmas
https://chochoco2.blogspot.com/2022/11/macau-gambling-club-stocks-rally.html
https://site-7349605-733-2297.mystrikingly.com/blog/gambling-club-laborers-merit-a-working-environment-liberated-from-lethal
https://5eclipse.blogspot.com/2022/11/four-us-expresses-that-might-direct.html
https://5eclipse.mystrikingly.com/blog/gambling-club-stocks-got-uplifting-news-however-financial-backers-stay-watchful
https://abbba12.blogspot.com/2022/11/tech-patterns-changing-web-based-club.html
https://site-6954901-6807-7781.mystrikingly.com/blog/a-club-in-furious-times-square-this-theater-pundit-says-hell-no
https://1arctic.blogspot.com/2022/11/guard-dog-prosecutes-club-monster-star.html
https://artic1.mystrikingly.com/blog/online-club-10-years-of-age-excursion-from-work-area-to-versatile
https://2beach0.blogspot.com/2022/11/how-cloud-gaming-is-upsetting-gambling.html
https://beach.mystrikingly.com/blog/variables-to-consider-while-choosing-an-ideal-web-based-betting-website
https://butom1212.blogspot.com/2022/11/win-frameworks-introduces-its-wigos.html
https://site-6955035-8022-3958.mystrikingly.com/blog/the-european-association-s-assorted-web-based-gambling-club-lawful-structure
https://3cave0.blogspot.com/2022/11/ballys-oak-road-seal-500m-deal.html
https://cave000.mystrikingly.com/blog/online-games-wagering-off-to-quick-beginning-in-md-as-more-permit-candidates
https://chochoco2.blogspot.com/2022/11/puerto-rico-club-income-becomes-by.html
https://site-7349605-733-2297.mystrikingly.com/blog/what-are-the-advantages-of-free-twists-at-online-club
https://5eclipse.blogspot.com/2022/11/privileged-insights-to-succeeding-at.html
https://5eclipse.mystrikingly.com/blog/how-internet-games-keep-their-players-inundated
https://abbba12.blogspot.com/2022/11/the-most-fascinating-internet-based.html
https://site-6954901-6807-7781.mystrikingly.com/blog/a-gander-at-the-innovation-behind-internet-based-club
https://1arctic.blogspot.com/2022/11/sea-gambling-club-online-applications.html
https://artic1.mystrikingly.com/blog/is-internet-betting-partitioning-a-landmass
https://2beach0.blogspot.com/2022/11/paykassma-online-games-wagering-and.html
https://beach.mystrikingly.com/blog/technique-and-ways-to-play-live-seller-poker-games-on-the-web
https://butom1212.blogspot.com/2022/11/gambling-club-pin-up.html
https://site-6955035-8022-3958.mystrikingly.com/blog/the-most-effective-method-to-track-down-best-club-rewards-in-canada
https://3cave0.blogspot.com/2022/11/online-roulette-technique-what-you.html
https://cave000.mystrikingly.com/blog/betting-in-ohio-is-the-state-prepared-for-send-off-in-2023
https://chochoco2.blogspot.com/2022/11/the-gaming-innovation-used-to-foster.html
https://site-7349605-733-2297.mystrikingly.com/blog/air-dice-is-currently-controlled-by-unwind
https://5eclipse.blogspot.com/2022/11/secret-customers-shipped-off-ontario.html
https://5eclipse.mystrikingly.com/blog/jackpot-fortunate-mississippi-club-player-prevails-upon-1m-on-gaming-machine
https://abbba12.blogspot.com/2022/12/succulent-stakes-gambling-club-convey.html
https://site-6954901-6807-7781.mystrikingly.com/blog/difficult-stretches-anticipate-club-gaming-industry-as-per-moody-s
https://1arctic.blogspot.com/2022/12/live-club-pittsburgh-injected-more-than.html
https://artic1.mystrikingly.com/blog/local-american-clan-under-agreement-to-purchase-enchantment-city-gambling-club
https://2beach0.blogspot.com/2022/12/petersburg-neglects-to-create-records.html
https://beach.mystrikingly.com/blog/macau-club-face-their-most-awful-year-ever-as-coronavirus-limitations-put
https://butom1212.blogspot.com/2022/12/las-vegas-strips-greatest-land-owner-in.html
https://site-6955035-8022-3958.mystrikingly.com/blog/head-doug-passage-tells-ontario-evaluator-general-to-focus-on-front-and
https://3cave0.blogspot.com/2022/12/complete-sight-and-sound-tmmi-extends.html
https://cave000.mystrikingly.com/blog/oaklawn-club-presently-has-family-accommodating-diversion
https://chochoco2.blogspot.com/2022/12/making-arrangements-for-gambling-club.html
https://site-7349605-733-2297.mystrikingly.com/blog/new-club-and-sportsbook-is-holding-back-nothing-of-a-58-billion-industry
https://5eclipse.blogspot.com/2022/12/new-jersey-online-club-spaces-fans-will.html
https://5eclipse.mystrikingly.com/blog/meta-explains-however-doesn-t-change-web-based-betting-promotion-strategy
https://abbba12.blogspot.com/2022/12/club-center-point-macau-set-for-most.html
https://site-6954901-6807-7781.mystrikingly.com/blog/the-most-recent-advanced-innovation-utilized-by-club
https://1arctic.blogspot.com/2022/12/bird-mountain-gambling-club-needs-to.html
https://artic1.mystrikingly.com/blog/no-store-club-extra-codes-december-2022
https://2beach0.blogspot.com/2022/12/online-club-on-binance-shrewd-chain.html
https://beach.mystrikingly.com/blog/best-genuine-cash-games-to-play-at-versatile-web-based-club
https://butom1212.blogspot.com/2022/12/springbok-gambling-club-casted-ballot.html
https://site-6955035-8022-3958.mystrikingly.com/blog/an-outline-of-the-present-status-of-online-gambling-clubs-in-the-uk
https://3cave0.blogspot.com/2022/12/new-york-online-games-wagering-rewards.html
https://cave000.mystrikingly.com/blog/florida-betting-controllers-postpone-offer-of-enchantment-city-club
https://chochoco2.blogspot.com/2022/12/saratoga-gambling-club-lodging-gives.html
https://site-7349605-733-2297.mystrikingly.com/blog/betmgm-club-fanduel-sportsbook-are-large-champs-at-2022-american-betting-honors
https://5eclipse.blogspot.com/2022/12/3-explanations-behind-internet-bettings.html
https://5eclipse.mystrikingly.com/blog/beavis-and-butt-head-return-for-michigan-online-club-space-game-news
https://abbba12.blogspot.com/2022/12/top-web-based-betting-exercises-in.html
https://site-6954901-6807-7781.mystrikingly.com/blog/online-gambling-club-no-store-reward-keep-what-you-win
https://1arctic.blogspot.com/2022/12/planning-tips-while-playing-club-games.html
https://artic1.mystrikingly.com/blog/gambling-club-incomes-settle-for-korea-s-heaven-gkl-in-november
https://2beach0.blogspot.com/2022/12/macau-leaves-nothing-to-chance-by.html
https://beach.mystrikingly.com/blog/second-sale-of-ipi-gambling-club-gear-to-zero-in-on-gaming-tables-gaming
https://butom1212.blogspot.com/2022/12/expansion-could-whittle-down-las-vegas.html
https://site-6955035-8022-3958.mystrikingly.com/blog/snoqualmie-gambling-club-visitor-hits-1m-bonanza-on-light-and-marvel-s-5
https://3cave0.blogspot.com/2022/12/three-most-played-internet-based-poker.html
https://cave000.mystrikingly.com/blog/villar-set-to-send-off-huge-gambling-club-complex-in-the-philippines-on-2023
https://chochoco2.blogspot.com/2022/12/macau-club-stocks-take-off-on-any.html
https://site-7349605-733-2297.mystrikingly.com/blog/loosen-up-gaming-brings-seasonal-joy-in-new-web-based-opening-st-nick-s
https://5eclipse.blogspot.com/2022/12/ways-to-pick-table-to-play-in-web-based.html
https://5eclipse.mystrikingly.com/blog/prescribed-tips-to-most-noteworthy-payout-in-web-based-gambling-clubs
https://abbba12.blogspot.com/2022/12/the-different-australian-web-based-club.html
https://site-6954901-6807-7781.mystrikingly.com/blog/web-based-betting-and-gambling-clubs-in-canada-keeps-on-blasting
https://1arctic.blogspot.com/2022/12/the-most-effective-method-to-succeed-at.html
https://artic1.mystrikingly.com/blog/how-innovation-is-making-web-based-betting-more-secure
https://2beach0.blogspot.com/2022/12/how-online-club-is-changing-betting.html
https://beach.mystrikingly.com/blog/the-most-famous-gambling-club-games-individuals-can-use-in-a-web-based-club
https://butom1212.blogspot.com/2022/12/acquainting-new-verticals-with-web.html
https://site-6955035-8022-3958.mystrikingly.com/blog/dr-bet-is-emerging-as-the-best-web-based-gambling-club-in-the-uk
https://3cave0.blogspot.com/2022/12/lawful-status-of-online-gambling-clubs.html
https://cave000.mystrikingly.com/blog/most-famous-opening-games-in-sweden
https://chochoco2.blogspot.com/2022/12/white-cap-studios-carries-goonies-to-us.html
https://site-7349605-733-2297.mystrikingly.com/blog/after-9-years-nj-online-club-observing-1b-achievements-internet-betting-news
https://5eclipse.blogspot.com/2022/12/holland-club-requested-to-eliminate.html
https://5eclipse.mystrikingly.com/blog/western-gambling-club-games-are-more-famous-than-indian-games
https://abbba12.blogspot.com/2022/12/dallmeier-dispatches-club-20-data.html
https://site-6954901-6807-7781.mystrikingly.com/blog/rock-and-mixes-president-talks-patterns-in-amusement-and-club-gaming-space
https://1arctic.blogspot.com/2022/12/tips-for-live-club-players.html
https://artic1.mystrikingly.com/blog/skycity-faces-common-punishment-procedures-over-supposed-breaks-at-adelaide
https://2beach0.blogspot.com/2022/12/ballys-presents-refreshed-chicago-club.html
https://beach.mystrikingly.com/blog/gambling-club-tops-richmond-list-of-things-to-get-yet-reasonable-lodging
https://butom1212.blogspot.com/2022/12/macau-government-presently-requiring.html
https://site-6955035-8022-3958.mystrikingly.com/blog/cripple-spring-club-changes-hands
https://3cave0.blogspot.com/2022/12/gaming-incomes-from-maryland-club-top.html
https://cave000.mystrikingly.com/blog/sa-gambling-club-blamed-for-administrative-breaks
https://chochoco2.blogspot.com/2022/12/foxwoods-resort-gambling-club-picks.html
https://site-7349605-733-2297.mystrikingly.com/blog/station-club-purchases-more-land-for-55m-plans-another-hotel
https://5eclipse.blogspot.com/2022/12/grosvenor-club-to-rebrand-as-it-looks.html
https://5eclipse.mystrikingly.com/blog/las-vegas-gambling-club-adds-distant-character-check-biometric-verification
https://abbba12.blogspot.com/2022/12/hard-rock-inn-and-gambling-club-bristol.html
https://site-6954901-6807-7781.mystrikingly.com/blog/gambling-club-authorities-field-inquiries-from-public
https://1arctic.blogspot.com/2022/12/catawba-two-rulers-gambling-club-abused.html
https://artic1.mystrikingly.com/blog/bally-s-gambling-club-plan-cuts-disliked-open-air-music-setting-adds
https://2beach0.blogspot.com/2022/12/north-carolina-ancestral-club-abused.html
https://beach.mystrikingly.com/blog/cairns-reef-inn-club-administrator-fined-for-unapproved-trip-understanding
https://butom1212.blogspot.com/2022/12/alert-while-picking-web-based-club.html
https://site-6955035-8022-3958.mystrikingly.com/blog/ohio-s-club-and-racinos-in-striking-distance-of-one-more-record-year-for
https://3cave0.blogspot.com/2022/12/north-las-vegas-gambling-club.html
https://cave000.mystrikingly.com/blog/dwg-signs-association-with-caesars-gambling-club-michigan
https://chochoco2.blogspot.com/2022/12/alibaba-tencent-macau-club-stocks-fuel.html
https://site-7349605-733-2297.mystrikingly.com/blog/stuffed-gambling-clubs-an-indication-of-beneficial-things-to-come-in-las-vegas
https://5eclipse.blogspot.com/2022/12/club-powers-portuguese-web-based.html
https://5eclipse.mystrikingly.com/blog/betting-dependence-non-benefit-publicizes-free-space-play-at-neighborhood
https://abbba12.blogspot.com/2022/12/how-to-pick-most-secure-web-based-club.html
https://site-6954901-6807-7781.mystrikingly.com/blog/how-man-made-consciousness-makes-online-club-more-secure-for-clients
https://1arctic.blogspot.com/2022/12/the-province-of-web-based-betting-in.html
https://artic1.mystrikingly.com/blog/live-vendor-club-what-are-they-and-which-one-to-pick
https://2beach0.blogspot.com/2022/12/the-amount-does-it-cost-to-begin.html
https://beach.mystrikingly.com/blog/online-gambling-clubs-with-probably-the-quickest-payouts
https://butom1212.blogspot.com/2022/12/strange-notions-in-betting-any.html
https://site-6955035-8022-3958.mystrikingly.com/blog/brain-research-of-a-champ-what-brings-the-triumph
https://3cave0.blogspot.com/2022/12/challenges-are-clear-for-web-based.html
https://cave000.mystrikingly.com/blog/moderate-opening-games-made-sense-of-and-tips
https://chochoco2.blogspot.com/2022/12/internet-gaming-industry-for-28-gst-on.html
https://site-7349605-733-2297.mystrikingly.com/blog/all-that-you-really-want-to-realize-about-playing-craps-at-online-club
https://5eclipse.blogspot.com/2022/12/taxi-closes-year-with-club-night-groups.html
https://5eclipse.mystrikingly.com/blog/penny-gambling-machines-the-most-famous-club-game
https://abbba12.blogspot.com/2022/12/gaming-organizations-to-assign-club.html
https://site-6954901-6807-7781.mystrikingly.com/blog/the-star-queensland-evened-out-with-67-98mln-fine-conceded-suspension-of
https://1arctic.blogspot.com/2022/12/brilliant-reels-club-blog-audit.html
https://artic1.mystrikingly.com/blog/terrific-sierra-resort-casted-a-ballot-best-generally-club-in-rigorously
https://2beach0.blogspot.com/2022/12/gaming-board-says-gambling-clubs-should.html
https://beach.mystrikingly.com/blog/star-amusement-faces-new-100m-fine-club-permit-suspension-in-australia
https://butom1212.blogspot.com/2022/12/lodging-associated-with-streams.html
https://site-6955035-8022-3958.mystrikingly.com/blog/how-have-club-affected-the-style-world
https://3cave0.blogspot.com/2022/12/concerns-communicated-over-availability.html
https://cave000.mystrikingly.com/blog/southwest-virginia-independent-ventures-win-bristol-gambling-club-pitch
https://chochoco2.blogspot.com/2022/12/instructions-to-handily-perceive-trick.html
https://site-7349605-733-2297.mystrikingly.com/blog/the-incomparable-advantages-of-playing-on-the-web-club-today
https://5eclipse.blogspot.com/2022/12/station-gambling-clubs-purchases-67.html
https://5eclipse.mystrikingly.com/blog/atlantic-city-club-smoking-waits-45-years-after-state-sanctioned-betting
https://abbba12.blogspot.com/2022/12/queensland-club-blamed-for-baiting.html
https://site-6954901-6807-7781.mystrikingly.com/blog/macau-releases-club-limit-section-prerequisites
https://1arctic.blogspot.com/2022/12/wynn-eyes-extension-of-everett-club.html
https://artic1.mystrikingly.com/blog/5-significant-ways-to-utilize-a-gambling-club-reward
https://2beach0.blogspot.com/2022/12/the-best-new-crypto-club-that-you-want.html
https://beach.mystrikingly.com/blog/osaka-gov-hirofumi-yoshimura-says-mgm-gambling-club-not-dependent-on-chinese
https://butom1212.blogspot.com/2022/12/las-vegas-strip-club-may-not-close.html
https://site-6955035-8022-3958.mystrikingly.com/blog/club-lugano-praises-its-twentieth-commemoration
https://3cave0.blogspot.com/2022/12/germany-club-travel-industry-market-is.html
https://cave000.mystrikingly.com/blog/procure-100-free-at-fanduel-club-while-sitting-tight-for-the-world-cup
https://chochoco2.blogspot.com/2022/12/top-new-games-at-borgata-club.html
https://site-7349605-733-2297.mystrikingly.com/blog/the-best-web-based-gambling-club-applications-and-promotion-codes-for-nj-dad
https://5eclipse.blogspot.com/2022/12/normal-slip-ups-to-keep-away-from-while.html
https://5eclipse.mystrikingly.com/blog/play-and-win-at-onlayin-kazino-1xbet
https://abbba12.blogspot.com/2022/12/light-board-considers-45-years-of-club.html
https://site-6954901-6807-7781.mystrikingly.com/blog/atlantic-city-gambling-clubs-ought-to-accentuate-sports-wagering-and-espor
https://1arctic.blogspot.com/2022/12/atlantic-city-gambling-club-lawyer.html
https://artic1.mystrikingly.com/blog/horseshoe-club-lake-charles-held-fantastic-opening-function-monday
https://2beach0.blogspot.com/2022/12/station-club-hopes-to-assemble-600-room.html
https://beach.mystrikingly.com/blog/online-club-organizations-that-put-resources-into-tennis-competitions
https://butom1212.blogspot.com/2022/12/supportive-tips-to-build-your.html
https://site-6955035-8022-3958.mystrikingly.com/blog/elray-assets-inc-secures-online-club-crypto-innovation
https://3cave0.blogspot.com/2022/12/emerald-island-club-and-rainbow-club.html
https://cave000.mystrikingly.com/blog/chicago-gambling-club-clears-key-obstacle-with-plan-commission-endorsement
https://chochoco2.blogspot.com/2022/12/bingo-is-before-long-getting-back-to.html
https://site-7349605-733-2297.mystrikingly.com/blog/how-to-acquire-in-pin-up-club-on-the-web
https://5eclipse.blogspot.com/2022/12/gambling-club-set-to-open-on-december-28.html
https://5eclipse.mystrikingly.com/blog/opening-the-force-of-information-stockpiling-for-gambling-clubs
https://abbba12.blogspot.com/2022/12/who-has-best-innovation-for-internet.html
https://site-6954901-6807-7781.mystrikingly.com/blog/best-web-based-gambling-clubs-in-2023-for-genuine-cash-well-qualified
https://1arctic.blogspot.com/2022/12/do-online-gambling-club-organizations.html
https://artic1.mystrikingly.com/blog/most-loved-internet-based-club-games-among-danish-players
https://2beach0.blogspot.com/2022/12/9-hints-on-most-proficient-method-to.html
https://beach.mystrikingly.com/blog/elray-assets-gets-crypto-club-innovation-from-luxor
https://butom1212.blogspot.com/2022/12/the-best-web-based-gambling-clubs-in.html
https://site-6955035-8022-3958.mystrikingly.com/blog/how-and-why-the-nfl-and-dallas-cowpokes-are-embracing-sportsbook-and-online
https://3cave0.blogspot.com/2022/12/how-online-club-help-out-financial.html
https://cave000.mystrikingly.com/blog/indiana-governing-body-will-consider-betting-extension-in-2023
https://chochoco2.blogspot.com/2022/12/online-club-worldwide-industry.html
https://site-7349605-733-2297.mystrikingly.com/blog/playtech-holland-club-new-exploration-project-presented-for-mindful-betting
https://5eclipse.blogspot.com/2022/12/blockchains-astonishing-effect-on.html
https://5eclipse.mystrikingly.com/blog/how-igaming-has-developed-through-space-games
https://abbba12.blogspot.com/2022/12/why-digital-money-is-clearing-gambling.html
https://site-6954901-6807-7781.mystrikingly.com/blog/macau-to-consent-to-permitting-arrangements-with-the-6-winning-gambling-club
https://1arctic.blogspot.com/2022/12/ballys-club-plan-clears-last-city.html
https://artic1.mystrikingly.com/blog/game-reward-and-legitimate-the-best-club-online-estonia
https://2beach0.blogspot.com/2022/12/proposed-little-club-at-nittany.html
https://beach.mystrikingly.com/blog/state-s-most-up-to-date-club-set-to-open-in-newburgh
https://butom1212.blogspot.com/2022/12/station-gambling-clubs-purchasing-more.html
https://site-6955035-8022-3958.mystrikingly.com/blog/state-pioneer-sure-about-petersburg-s-1-4-billion-club-plan
https://3cave0.blogspot.com/2022/12/what-do-great-internet-based-club.html
https://cave000.mystrikingly.com/blog/playtech-and-holland-club-collaborate-for-mindful-betting-examination
https://chochoco2.blogspot.com/2022/12/do-online-club-utilize-large-information.html
https://site-7349605-733-2297.mystrikingly.com/blog/mount-breezy-club-resort-untouchable-to-visitors-under-21-beginning-this-end
https://5eclipse.blogspot.com/2022/12/las-vegas-strip-adding-famous-gambling.html
https://5eclipse.mystrikingly.com/blog/stupendous-island-club-opening-soon-forthcoming-last-endorsement
https://abbba12.blogspot.com/2022/12/southland-finishes-320-million-gambling.html
https://site-6954901-6807-7781.mystrikingly.com/blog/macau-gambling-clubs-new-agreements-to-hone-center-around-non-gaming-exercises
https://1arctic.blogspot.com/2022/12/louisiana-supports-offer-of-deserted.html
https://artic1.mystrikingly.com/blog/parx-casino-dispatches-credit-only-installment-choices
https://2beach0.blogspot.com/2022/12/bristol-club-reports-126m-november.html
https://beach.mystrikingly.com/blog/chicago-endorses-1-7-billion-riverfront-club-complex-planned-by-scb
https://butom1212.blogspot.com/2022/12/waterways-gambling-club-portsmouth-has.html
https://site-6955035-8022-3958.mystrikingly.com/blog/nuvei-offers-moment-payouts-to-holland-gambling-club
https://3cave0.blogspot.com/2022/12/sovereign-of-terre-haute-gambling-club.html
https://cave000.mystrikingly.com/blog/hard-rock-hits-stop-on-arranged-inn-nearby-northwest-indiana-club
https://chochoco2.blogspot.com/2022/12/englands-club-culture-is-back-and-house.html
https://site-7349605-733-2297.mystrikingly.com/blog/online-incomes-lift-loto-quebec-figures
https://5eclipse.blogspot.com/2022/12/pennsylvanias-mount-breezy-gambling.html
https://5eclipse.mystrikingly.com/blog/sky-stream-gambling-club-dispatches-wreaths-of-trust-benefit
https://abbba12.blogspot.com/2022/12/whats-contrast-between-land-based-and.html
https://site-6954901-6807-7781.mystrikingly.com/blog/concession-grants-mark-a-reset-for-macao-club
https://1arctic.blogspot.com/2022/12/macau-gambling-club-firms-to-up-non.html
https://artic1.mystrikingly.com/blog/macau-concessionaires-arranging-13-5b-in-nongaming-speculations
https://2beach0.blogspot.com/2022/12/schenectady-occupants-demand-focal-park.html
https://beach.mystrikingly.com/blog/sheffield-gambling-club-cook-raises-a-ruckus-around-town-with-culinary-expert
https://butom1212.blogspot.com/2022/12/manual-for-online-club-security.html
https://site-6955035-8022-3958.mystrikingly.com/blog/internet-betting-business-sector-is-supposed-to-arrive-at-us-165-3-billion
https://3cave0.blogspot.com/2022/12/top-web-based-installment-techniques.html
https://cave000.mystrikingly.com/blog/200m-diamondjacks-makeover-will-give-region-its-most-memorable-land-based-club
https://chochoco2.blogspot.com/2022/12/crown-resorts-fined-record-au120-million.html
https://site-7349605-733-2297.mystrikingly.com/blog/open-your-fortune-with-space-gacor
https://5eclipse.blogspot.com/2022/12/each-game-in-one-spot-could.html
https://5eclipse.mystrikingly.com/blog/5-things-each-novice-ought-to-be-aware-prior-to-playing-at-an-internet-based
https://abbba12.blogspot.com/2022/12/club-in-addition-to-fun-web-based.html
https://site-6954901-6807-7781.mystrikingly.com/blog/what-innovations-should-novice-aussie-players-use-for-a-predominant-web-based
https://1arctic.blogspot.com/2022/12/what-are-signs-web-based-club-webpage.html
https://artic1.mystrikingly.com/blog/gambling-club-best-internet-based-gambling-club-locales-top-of-the-line-uk
https://2beach0.blogspot.com/2022/12/fate-of-betting-how-baltic-nations.html
https://beach.mystrikingly.com/blog/5-best-tips-for-handpicking-the-best-internet-based-gambling-club-irish
https://butom1212.blogspot.com/2022/12/picking-bitcoin-as-your-favored.html
https://site-6955035-8022-3958.mystrikingly.com/blog/how-enormous-is-the-igaming-market-in-europe-contrasted-with-the-us
https://3cave0.blogspot.com/2022/12/one-more-abundant-month-for-web-based.html
https://cave000.mystrikingly.com/blog/sure-fire-roulette-techniques-to-pick-and-turn-into-a-champ
https://chochoco2.blogspot.com/2022/12/free-coins-simple-win-big-stake-spaces.html
https://site-7349605-733-2297.mystrikingly.com/blog/real-gaming-s-2023-live-club-ground-breaking-strategy
https://5eclipse.blogspot.com/2022/12/parx-club-reports-credit-only-gaming.html
https://5eclipse.mystrikingly.com/blog/markor-innovation-accomplices-with-loosen-up-gaming
https://abbba12.blogspot.com/2022/12/stable-tech-nv-dispatches-coinslotty.html
https://site-6954901-6807-7781.mystrikingly.com/blog/best-bitcoin-gambling-club-usa-is-it-lawful-these-are-the-best-other-options
https://1arctic.blogspot.com/2022/12/3-elements-you-ought-to-search-for-in.html
https://artic1.mystrikingly.com/blog/the-development-of-the-internet-based-club-industry
https://2beach0.blogspot.com/2022/12/the-most-effective-method-to-recognize.html
https://beach.mystrikingly.com/blog/state-should-go-against-internet-betting
https://butom1212.blogspot.com/2022/12/what-are-internet-based-club-licenses.html
https://site-6955035-8022-3958.mystrikingly.com/blog/investigating-the-advancement-of-portable-gambling-club-games
https://3cave0.blogspot.com/2022/12/nordic-members-joins-norwegian-internet.html
https://cave000.mystrikingly.com/blog/paysafecard-club-what-benefits-do-they-offer
https://chochoco2.blogspot.com/2022/12/leovegas-club-ends-nj-market-access.html
https://site-7349605-733-2297.mystrikingly.com/blog/gig-signs-manage-new-gambling-club-accomplice-luckybet-for-its-foundation
https://5eclipse.blogspot.com/2022/12/step-by-step-instructions-to-find-new.html
https://5eclipse.mystrikingly.com/blog/versatile-gaming-has-spiked-among-welsh-players
https://abbba12.blogspot.com/2022/12/dan-sewell-sports-betting-shelter-for.html
https://site-6954901-6807-7781.mystrikingly.com/blog/rules-to-track-down-a-decent-internet-based-club
https://1arctic.blogspot.com/2022/12/the-most-effective-method-to-pick-web.html
https://artic1.mystrikingly.com/blog/online-gambling-club-tips
https://2beach0.blogspot.com/2022/12/exposing-5-greatest-internet-based-club.html
https://beach.mystrikingly.com/blog/top-game-suppliers-in-canadian-web-based-club
https://butom1212.blogspot.com/2022/12/6-best-web-based-club-in-south-africa.html
https://site-6955035-8022-3958.mystrikingly.com/blog/best-not-gamstop-club-in-2023-betbeard
https://3cave0.blogspot.com/2022/12/contrasts-between-betting-in-uk-and-us.html
https://cave000.mystrikingly.com/blog/5-advantages-of-playing-live-club-games
https://chochoco2.blogspot.com/2022/12/chicagos-most-memorable-gambling-club.html
https://site-7349605-733-2297.mystrikingly.com/blog/uruguay-gambling-club-development-to-start-after-various-deferrals
https://5eclipse.blogspot.com/2022/12/uk-betting-industry-creates-more-than.html
https://5eclipse.mystrikingly.com/blog/armenia-presents-new-assessments-limitations-on-gaming-industry
https://abbba12.blogspot.com/2022/12/new-south-ridges-government-explains.html
https://site-6954901-6807-7781.mystrikingly.com/blog/online-gambling-club-games-with-the-expectation-of-complimentary-versus-club
https://1arctic.blogspot.com/2022/12/10-exciting-club-stories-that-will-keep.html
https://artic1.mystrikingly.com/blog/excellent-island-club-to-open-one-week-from-now
https://2beach0.blogspot.com/2022/12/hard-rock-club-northern-indiana-stops.html
https://beach.mystrikingly.com/blog/downtown-accord-business-building-supported-gambling-club-proposition-needs
https://butom1212.blogspot.com/2022/12/grassland-band-club-and-resort-and.html
https://site-6955035-8022-3958.mystrikingly.com/blog/associations-consent-to-speculative-arrangement-with-hollywood-gambling-club
https://3cave0.blogspot.com/2022/12/whats-situation-with-norfolks-club.html
https://cave000.mystrikingly.com/blog/resorts-world-hudson-valley-gambling-club-set-to-open-dec-28-at-newburgh
https://chochoco2.blogspot.com/2022/12/unbelievable-rapper-in-debate-with-new.html
https://site-7349605-733-2297.mystrikingly.com/blog/czech-club-and-betting-scene-faces-new-difficulties
https://5eclipse.blogspot.com/2022/12/sea-downs-gambling-club-sees-income.html
https://5eclipse.mystrikingly.com/blog/what-made-las-vegas-a-club-area-of-interest
https://1arctic.blogspot.com/2022/12/best-web-based-club-locales-in-malaysia.html
https://artic1.mystrikingly.com/blog/things-to-never-do-in-a-club-on-the-web
https://2beach0.blogspot.com/2022/12/know-these-6-things-before-you-play.html
https://beach.mystrikingly.com/blog/with-further-developed-and-holding-innovation-than-any-time-in-recent-memory
https://3cave0.blogspot.com/2022/12/for-what-reason-really-do-individuals.html
https://cave000.mystrikingly.com/blog/how-to-safe-and-play-the-club-games
https://5eclipse.blogspot.com/2022/12/how-famous-is-web-based-betting-in.html
https://5eclipse.mystrikingly.com/blog/a-manual-for-online-gambling-club-competitions
https://abbba12.blogspot.com/2022/12/advantages-of-picking-on-web-club-for.html
https://site-6954901-6807-7781.mystrikingly.com/blog/crypto-club-is-it-the-fate-of-web-based-betting
https://butom1212.blogspot.com/2022/12/best-web-based-gambling-club-games-that.html
https://site-6955035-8022-3958.mystrikingly.com/blog/what-would-it-be-advisable-for-you-to-be-aware-prior-to-playing-on-the-web
https://chochoco2.blogspot.com/2022/12/the-amount-might-you-at-any-point.html
https://site-7349605-733-2297.mystrikingly.com/blog/what-was-the-primary-internet-based-club
https://abbba12.blogspot.com/2022/12/ozwin-gambling-club-player-scoops.html
https://site-6954901-6807-7781.mystrikingly.com/blog/japan-gambling-club-commission-us-27mln-financial-plan-for-2023
https://1arctic.blogspot.com/2022/12/gigantic-money-rewards-and-free-twist.html
https://artic1.mystrikingly.com/blog/menominee-indian-clan-of-wisconsin-recharges-endeavors-to-carry-a-club-to
https://2beach0.blogspot.com/2022/12/are-you-gambling-club-games-sweetheart.html
https://beach.mystrikingly.com/blog/how-did-online-openings-turn-into-the-most-famous-kind-of-gambling-club-game
https://3cave0.blogspot.com/2022/12/science-behind-internet-based-club-games.html
https://cave000.mystrikingly.com/blog/what-the-internet-betting-industry-means-for-the-gaming-business
https://5eclipse.blogspot.com/2022/12/what-are-least-demanding-games-to.html
https://5eclipse.mystrikingly.com/blog/most-beneficial-club-games-play-to-win
https://butom1212.blogspot.com/2022/12/will-betting-be-allowed-in-uae.html
https://site-6955035-8022-3958.mystrikingly.com/blog/tips-for-extraordinary-game-decorum-in-web-based-games
https://chochoco2.blogspot.com/2022/12/the-best-gambling-clubs-on-world.html
https://site-7349605-733-2297.mystrikingly.com/blog/club-battle-for-gaming-turf-as-vegas-style-machines-appear-in-neighborhood
https://abbba12.blogspot.com/2022/12/the-most-engaging-web-based-club-games.html
https://site-6954901-6807-7781.mystrikingly.com/blog/track-down-the-best-uk-online-gambling-club-rewards-and-advancements
https://1arctic.blogspot.com/2022/12/web-based-betting-most-secure.html
https://artic1.mystrikingly.com/blog/pagcor-cautions-public-against-playing-in-unlawful-web-based-betting-locales
https://2beach0.blogspot.com/2022/12/what-is-payout-speed-and-what.html
https://beach.mystrikingly.com/blog/step-by-step-instructions-to-play-centerfold-girl-pilot-game-at-an-internet
https://butom1212.blogspot.com/2022/12/gamblingcom-gathering-prepared-for-send.html
https://site-6955035-8022-3958.mystrikingly.com/blog/what-impact-will-online-gambling-clubs-have-on-manchester-s-gambling-club-scene
https://3cave0.blogspot.com/2022/12/live-pittsburgh-gm-talks-moves-up-to.html
https://cave000.mystrikingly.com/blog/sports-wagering-versus-club-betting-what-are-the-distinctions
https://chochoco2.blogspot.com/2022/12/could-online-games-wagering-stocks-get.html
https://site-7349605-733-2297.mystrikingly.com/blog/will-we-see-another-rush-of-betting-themed-movies-in-2023
https://5eclipse.blogspot.com/2022/12/a-few-english-punters-go-to-dark.html
https://5eclipse.mystrikingly.com/blog/rush-road-gaming-grows-konami-s-synkors-club-the-board-framework-to
https://abbba12.blogspot.com/2023/01/aquis-finishes-us42-million-offer-of.html
https://site-6954901-6807-7781.mystrikingly.com/blog/korea-s-heaven-gkl-finish-2022-on-a-high-as-club-deals-flood-in-december
https://1arctic.blogspot.com/2023/01/new-president-to-lead-atlantic-citys.html
https://artic1.mystrikingly.com/blog/gambling-club-showcasing-stunts
https://2beach0.blogspot.com/2023/01/usa-casinocom-report-2022-worldwide.html
https://beach.mystrikingly.com/blog/new-york-state-charging-500-million-expense-for-city-club-permit
https://butom1212.blogspot.com/2023/01/south-american-gambling-club.html
https://site-6955035-8022-3958.mystrikingly.com/blog/new-club-ancestral-land-enhancements-coming-to-tucson-s-west-side
https://3cave0.blogspot.com/2023/01/no-store-gambling-club-extra-codes.html
https://cave000.mystrikingly.com/blog/macau-gambling-clubs-managed-dangerous-hand-with-nongaming-commitments
https://chochoco2.blogspot.com/2023/01/motivations-behind-why-portable.html
https://site-7349605-733-2297.mystrikingly.com/blog/uruguay-to-open-new-22m-gambling-club-resort-in-city-of-paysandu
https://5eclipse.blogspot.com/2023/01/bird-mountain-club-gifts-300k-in.html
https://5eclipse.mystrikingly.com/blog/virtual-gambling-club-gaming-stage-cloverland-set-to-send-off-at-ces-2023
https://abbba12.blogspot.com/2023/01/illinois-to-consider-online-club.html
https://site-6954901-6807-7781.mystrikingly.com/blog/spain-s-gross-gaming-income-rises-internet-gaming-leads-the-way
https://1arctic.blogspot.com/2023/01/step-by-step-instructions-to-find-best.html
https://artic1.mystrikingly.com/blog/is-the-internet-based-gambling-club-industry-actually-becoming-after
https://2beach0.blogspot.com/2023/01/curacao-again-pushes-back-web-based.html
https://beach.mystrikingly.com/blog/industry-voice-what-will-web3-mean-for-the-igaming-business
https://butom1212.blogspot.com/2023/01/the-most-effective-method-to-find-safe.html
https://site-6955035-8022-3958.mystrikingly.com/blog/betsson-closes-gambling-club-champ-brand
https://3cave0.blogspot.com/2023/01/realistic-play-openings-go-live-in.html
https://cave000.mystrikingly.com/blog/bally-s-looking-for-igaming-honors-in-pennsylvania-state-school-gambling
https://chochoco2.blogspot.com/2023/01/going-with-educated-choice-why-pick-non.html
https://site-7349605-733-2297.mystrikingly.com/blog/a-manual-for-club-and-sports-wagering-what-you-want-to-be-aware-before-you
https://5eclipse.blogspot.com/2023/01/gambling-club-stocks-in-2023-all-that.html
https://5eclipse.mystrikingly.com/blog/7-motivations-behind-why-interac-club-are-assuming-control-over-the-betting
https://abbba12.blogspot.com/2023/01/earth-shattering-for-seminole-club.html
https://site-6954901-6807-7781.mystrikingly.com/blog/club-stocks-in-2023-all-that-matters-is-this-district-examiners-say
https://1arctic.blogspot.com/2023/01/how-turning-into-live-gambling-club.html
https://artic1.mystrikingly.com/blog/satellite-club-administrator-macau-legend-stops-celebrity-gaming-advancement
https://2beach0.blogspot.com/2023/01/new-york-quick-tracks-rfp-process-for.html
https://beach.mystrikingly.com/blog/uplifting-news-for-gambling-clubs-as-macao-facilitates-travel-limitations
https://butom1212.blogspot.com/2023/01/choice-due-in-gambling-club-permit-claim.html
https://site-6955035-8022-3958.mystrikingly.com/blog/philippine-gambling-clubs-player-avoidance-rate-up-62-in-2022-third-most
https://3cave0.blogspot.com/2023/01/club-regina-show-parlor-shut-for-renos.html
https://cave000.mystrikingly.com/blog/nevada-bison-bill-s-gambling-club-in-primm-resumes-following-two-years
https://chochoco2.blogspot.com/2023/01/walkers-feign-gambling-club-resort.html
https://site-7349605-733-2297.mystrikingly.com/blog/threedbet-offers-200-welcome-reward-for-online-club-and-openings-in-philippines
https://5eclipse.blogspot.com/2023/01/resorts-world-opens-most-current-club.html
https://5eclipse.mystrikingly.com/blog/push-to-grow-igaming-in-the-us-in-2023
https://abbba12.blogspot.com/2023/01/top-3-sorts-of-internet-betting-you.html
https://site-6954901-6807-7781.mystrikingly.com/blog/7-advantages-of-paysafecard-club-for-versatile-players
https://1arctic.blogspot.com/2023/01/worldwide-internet-based-gambling-club.html
https://artic1.mystrikingly.com/blog/online-club-achievement-privileged-insights
https://2beach0.blogspot.com/2023/01/why-michigans-internet-based-gambling.html
https://beach.mystrikingly.com/blog/6-sorts-of-web-based-club-games-you-can-play-on-us-sweepstakes-destinations
https://butom1212.blogspot.com/2023/01/indigo-sky-gambling-club-dispatches-web.html
https://site-6955035-8022-3958.mystrikingly.com/blog/how-do-online-club-utilize-man-made-intelligence
https://3cave0.blogspot.com/2023/01/shacks-development-studios-taking-club.html
https://cave000.mystrikingly.com/blog/sonoma-province-dry-rivulet-clan-ready-to-expand-understanding-restricting
https://chochoco2.blogspot.com/2023/01/gambling-club-laborers-ask-gov-murphy.html
https://site-7349605-733-2297.mystrikingly.com/blog/gaming-board-sets-500m-least-for-new-york-city-gambling-club-offers
https://5eclipse.blogspot.com/2023/01/two-accused-of-deceiving-plan-at.html
https://5eclipse.mystrikingly.com/blog/alliance-for-better-times-square-declares-backing-of-caesars-club
https://abbba12.blogspot.com/2023/01/softswiss-big-stake-aggregator.html
https://site-6954901-6807-7781.mystrikingly.com/blog/macau-legend-inks-manage-sjm-to-run-legend-castle-satellite-club-for-next
https://1arctic.blogspot.com/2023/01/lebanon-poker-room-and-club-to-migrate.html
https://artic1.mystrikingly.com/blog/seminole-gaming-kicks-things-off-on-new-seminole-brighton-club
https://2beach0.blogspot.com/2023/01/non-unimportant-amusement-in-web-based.html
https://beach.mystrikingly.com/blog/live-gambling-club-and-lodging-to-commend-the-extended-time-of-the-hare
https://butom1212.blogspot.com/2023/01/station-gambling-clubs-sells-57-section.html
https://site-6955035-8022-3958.mystrikingly.com/blog/lady-who-won-43million-was-offered-a-nice-meal-rather-than-her-rewards-by
https://3cave0.blogspot.com/2023/01/betmgm-gambling-club-get-25-free-for.html
https://cave000.mystrikingly.com/blog/instructions-to-play-andar-bahar-game-at-a-web-based-gambling-club
https://chochoco2.blogspot.com/2023/01/slidell-authorities-frightened-by-new.html
https://site-7349605-733-2297.mystrikingly.com/blog/mohegan-hanwha-detail-subsidizing-bargain-for-s-korea-resort
https://5eclipse.blogspot.com/2023/01/effortlessness-period-for-macau-egm.html
https://5eclipse.mystrikingly.com/blog/by-2029-club-the-executives-frameworks-market-most-recent-report-2023-bits
https://abbba12.blogspot.com/2023/01/purposes-behind-internet-based-gambling.html
https://site-6954901-6807-7781.mystrikingly.com/blog/7-hints-to-track-down-the-best-web-based-gambling-club
https://1arctic.blogspot.com/2023/01/procedure-to-improve-your-web-based.html
https://artic1.mystrikingly.com/blog/how-a-fledgling-doesn-t-lose-the-bankroll-in-the-spaces
https://2beach0.blogspot.com/2023/01/step-by-step-instructions-to-pick-best.html
https://beach.mystrikingly.com/blog/softswiss-bonanza-aggregator-declares-association-with-online-club-slotwolf
https://butom1212.blogspot.com/2023/01/authorizing-on-web-gambling-clubs-lands.html
https://site-6955035-8022-3958.mystrikingly.com/blog/win-genuine-cash-with-online-gambling-club-rewards-and-games
https://3cave0.blogspot.com/2023/01/best-friendly-gambling-club-games-top.html
https://cave000.mystrikingly.com/blog/web-based-betting-in-portugal-enrolls-a-development-of-8-6-in-the-second
https://chochoco2.blogspot.com/2023/01/turns-are-sans-running-at-delicious.html
https://site-7349605-733-2297.mystrikingly.com/blog/the-most-effective-method-to-bet-in-canada-rules-regulations-and-tips-for
https://5eclipse.blogspot.com/2023/01/australians-are-taking-to-their-iphones.html
https://5eclipse.mystrikingly.com/blog/the-most-effective-method-to-access-betting-destinations-anyplace-with-a-vpn
https://abbba12.blogspot.com/2023/01/breaking-down-developing-ubiquity-of.html
https://site-6954901-6807-7781.mystrikingly.com/blog/2023-ethereum-club-guide-find-the-best-internet-based-gambling-clubs
https://1arctic.blogspot.com/2023/01/streams-club-portsmouth-defers-amazing.html
https://artic1.mystrikingly.com/blog/club-gaming-powerhouse-brian-christopher-vows-to-advance-sans-smoke-gambling
https://2beach0.blogspot.com/2023/01/the-historical-backdrop-of-restraining.html
https://beach.mystrikingly.com/blog/the-best-gambling-clubs-the-baltic-nations-bring-to-the-table
https://butom1212.blogspot.com/2023/01/vici-gets-four-canadian-gambling-clubs.html
https://site-6955035-8022-3958.mystrikingly.com/blog/detroit-gambling-clubs-report-1-28b-in-2022-income
https://3cave0.blogspot.com/2023/01/gaming-development-gathering-signs-laid.html
https://cave000.mystrikingly.com/blog/bison-bill-s-hotel-and-gambling-club-returns-following-multimillion-dollar
https://chochoco2.blogspot.com/2023/01/cambodia-gets-gambling-club-assessment.html
https://site-7349605-733-2297.mystrikingly.com/blog/how-to-play-roobet-like-accident-betting-in-the-us
https://5eclipse.blogspot.com/2023/01/how-is-it-carrying-on-with-gambling.html
https://5eclipse.mystrikingly.com/blog/macau-gambling-club-stocks-gain-in-monday-exchange-after-china-eliminates
https://abbba12.blogspot.com/2023/01/gig-pens-manage-swiss-club.html
https://site-6954901-6807-7781.mystrikingly.com/blog/australian-internet-based-club-2023
https://1arctic.blogspot.com/2023/01/the-5-states-probably-going-to.html
https://artic1.mystrikingly.com/blog/6-moves-toward-increment-your-possibilities-succeeding-at-a-club-in-michigan
https://2beach0.blogspot.com/2023/01/churchill-downs-offers-bet365-way-into.html
https://beach.mystrikingly.com/blog/lowen-play-got-online-gambling-club-permit-in-germany
https://butom1212.blogspot.com/2023/01/5-cutthroat-gambling-club-games-you-can.html
https://site-6955035-8022-3958.mystrikingly.com/blog/the-significance-of-new-advancements-to-the-betting-business
https://3cave0.blogspot.com/2023/01/genuine-cash-online-pokies-all-that-you.html
https://cave000.mystrikingly.com/blog/what-s-in-store-in-igaming-in-2023
https://chochoco2.blogspot.com/2023/01/online-club-or-esports-whats-on-fury-in.html
https://site-7349605-733-2297.mystrikingly.com/blog/why-gambling-club-films-won-t-ever-go-downhill
https://5eclipse.blogspot.com/2023/01/the-5-greatest-bitcoin-club-wins-ever.html
https://5eclipse.mystrikingly.com/blog/sober-minded-play-extends-swiss-impression-with-great-club-bern
https://abbba12.blogspot.com/2023/01/each-of-eight-jeju-gambling-clubs.html
https://site-6954901-6807-7781.mystrikingly.com/blog/macau-govt-sticks-to-us-16bln-figure-for-2023-club-ggr
https://1arctic.blogspot.com/2023/01/tech-developments-upgrading-current.html
https://artic1.mystrikingly.com/blog/las-vegas-sands-proposes-extravagant-gambling-club-amusement-complex-on
https://2beach0.blogspot.com/2023/01/hard-rock-is-top-procuring-indiana.html
https://beach.mystrikingly.com/blog/gambling-club-tampere-stirs-things-up-around-town-with-genelec-shrewd-ip
https://butom1212.blogspot.com/2023/01/berlin-town-gathering-looks-for-club.html
https://site-6955035-8022-3958.mystrikingly.com/blog/station-club-records-plans-for-new-600-room-resort-in-henderson
https://3cave0.blogspot.com/2023/01/manor-gathering-closes-uk-gambling-club.html
https://cave000.mystrikingly.com/blog/visiting-a-gambling-club-interestingly-remember-these-things
https://chochoco2.blogspot.com/2023/01/saks-reveals-jazzy-arrangement-for-bond.html
https://site-7349605-733-2297.mystrikingly.com/blog/thailand-to-talk-about-gambling-club-extension-subtleties-as-administrative
https://5eclipse.blogspot.com/2023/01/first-class-club-resorts-commits-500000.html
https://5eclipse.mystrikingly.com/blog/covered-midtown-reno-piece-club-resumes-for-one-day-just-without-horrendous
https://abbba12.blogspot.com/2023/01/saks-fifth-road-needs-to-add-gambling.html
https://site-6954901-6807-7781.mystrikingly.com/blog/judge-voids-pope-province-club-permit-conceded-to-cherokee-country
https://1arctic.blogspot.com/2023/01/promote-gambling-club-concessionaires.html
https://artic1.mystrikingly.com/blog/portsmouth-organizations-bet-on-huge-lift-from-new-gambling-club
https://2beach0.blogspot.com/2023/01/space-flood-pushes-indiana-gambling.html
https://beach.mystrikingly.com/blog/the-ville-resort-gambling-club-in-townsville-argues-not-blameworthy-to
https://butom1212.blogspot.com/2023/01/nassau-city-affiliations-fight-proposed.html
https://site-6955035-8022-3958.mystrikingly.com/blog/sc-local-american-clan-expected-to-cut-attaches-with-gambling-club-accomplice
https://3cave0.blogspot.com/2023/01/aruze-dispatches-four-space-titles-on.html
https://cave000.mystrikingly.com/blog/pechanga-resort-club-commends-the-time-of-the-bunny
https://chochoco2.blogspot.com/2023/01/second-club-in-virginia-booked-for-jan.html
https://site-7349605-733-2297.mystrikingly.com/blog/resorts-club-market-is-blasting-overall-wynn-resorts-las-vegas-sands-sjm
https://5eclipse.blogspot.com/2023/01/palms-club-resort-will-have-fifteenth.html
https://5eclipse.mystrikingly.com/blog/heaps-of-worry-about-arranged-improvement-close-to-gambling-club-rama
https://abbba12.blogspot.com/2023/01/how-spribes-games-are-changing-internet.html
https://site-6954901-6807-7781.mystrikingly.com/blog/spaces-city-gambling-club-ca-a-chief-web-based-gaming-objective-for-canadian
https://1arctic.blogspot.com/2023/01/reforming-stores-ascent-of-digital.html
https://artic1.mystrikingly.com/blog/crickex-audit-how-to-play-at-the-club
https://2beach0.blogspot.com/2023/01/the-brands-that-are-making-progress.html
https://beach.mystrikingly.com/blog/thailand-s-place-of-agents-supports-report-on-legitimized-gambling-clubs
https://butom1212.blogspot.com/2023/01/focus-areas-proposed-little-gambling.html
https://site-6955035-8022-3958.mystrikingly.com/blog/danville-gambling-club-s-monetary-effect
https://3cave0.blogspot.com/2023/01/succumb-to-free-twists-and-free-wagers.html
https://cave000.mystrikingly.com/blog/best-web-based-club-programming-suppliers-in-2023
https://chochoco2.blogspot.com/2023/01/the-top-rounds-of-month.html
https://site-7349605-733-2297.mystrikingly.com/blog/draftkings-bingo-blackjack-adds-a-turn-to-exemplary-table-game
https://5eclipse.blogspot.com/2023/01/all-chateau-gathering-closing-down-its.html
https://5eclipse.mystrikingly.com/blog/doubledown-gains-super-nation-for-33-million-euros
https://abbba12.blogspot.com/2023/01/summits-rise-in-negotiations-after.html
https://site-6954901-6807-7781.mystrikingly.com/blog/macau-s-biggest-market-tops-79-of-4q-casino-ggr-official
https://1arctic.blogspot.com/2023/01/how-is-casino-industry-progressing.html
https://artic1.mystrikingly.com/blog/the-risk-of-labor-shortages-in-macau-casinos-for-cny-labor-representatives
https://2beach0.blogspot.com/2023/01/best-online-casino-games-to-play-on.html
https://beach.mystrikingly.com/blog/canada-s-largest-casino-opens-in-toronto
https://butom1212.blogspot.com/2023/01/the-debate-about-online-casinos-in.html
https://site-6955035-8022-3958.mystrikingly.com/blog/asian-summit-thailand-approves-casino-plan-new-agem-president-and-nsw-exchange
https://3cave0.blogspot.com/2023/01/century-casinos-leaves-bermuda-resort.html
https://cave000.mystrikingly.com/blog/what-is-the-best-casino-bonus-for-new-players
https://chochoco2.blogspot.com/2023/01/how-to-launch-online-casino-in-2023.html
https://site-7349605-733-2297.mystrikingly.com/blog/casinos-are-demolished-and-rebuilt
https://5eclipse.blogspot.com/2023/01/finally-last-call-casinos-yes-new.html
https://5eclipse.mystrikingly.com/blog/pennsylvania-parx-casino-shippensburg-will-open-on-february-3
https://abbba12.blogspot.com/2023/01/what-you-want-to-be-aware-of-illinois.html
https://site-6954901-6807-7781.mystrikingly.com/blog/slotegrator-to-grandstand-developments-and-wager-free-internet-based-gambling
https://1arctic.blogspot.com/2023/01/best-web-based-gambling-club.html
https://artic1.mystrikingly.com/blog/official-club-mostbet
https://2beach0.blogspot.com/2023/01/opening-games-for-beginners-how-to-get.html
https://beach.mystrikingly.com/blog/the-most-effective-method-to-play-poker-texas-hold-em
https://butom1212.blogspot.com/2023/01/nj-betting-income-matches-all-time-high.html
https://site-6955035-8022-3958.mystrikingly.com/blog/versatile-betting-in-australia-in-2023
https://3cave0.blogspot.com/2023/01/any-place-you-may-lawfully-furnish.html
https://cave000.mystrikingly.com/blog/how-quebec-very-rich-person-fellow-laliberte-lost-millions-on-club-games
https://chochoco2.blogspot.com/2023/01/investigating-regulations-and.html
https://site-7349605-733-2297.mystrikingly.com/blog/skillonnet-makes-vital-interest-in-peter-and-children
https://5eclipse.blogspot.com/2023/01/how-can-iot-be-utilized-in-betting.html
https://5eclipse.mystrikingly.com/blog/waterway-felines-and-jackson-rancheria-gambling-club-resort-structure-new
https://abbba12.blogspot.com/2023/01/the-most-widely-recognized-internet.html
https://site-6954901-6807-7781.mystrikingly.com/blog/saipan-gambling-club-controller-closes-down-office-because-of-absence-of
https://1arctic.blogspot.com/2023/01/princess-anticipate-suitable-way-ahead.html
https://artic1.mystrikingly.com/blog/these-are-the-best-quick-payout-gambling-clubs-that-you-really-want-to-play
https://2beach0.blogspot.com/2023/01/online-gambling-club-australia-genuine.html
https://beach.mystrikingly.com/blog/assessment-gambling-clubs-will-cause-more-damage-than-great-in-new-york-city
https://butom1212.blogspot.com/2023/01/olg-gives-second-from-last-quarter.html
https://site-6955035-8022-3958.mystrikingly.com/blog/experience-the-energy-of-playing-sweepstakes-social-club-games
https://3cave0.blogspot.com/2023/01/jiliko-philippines-club-and-sports.html
https://cave000.mystrikingly.com/blog/macau-satellites-might-continue-past-3-yr-progress-says-executive
https://chochoco2.blogspot.com/2023/01/pascua-yaqui-clan-designs-third.html
https://site-7349605-733-2297.mystrikingly.com/blog/mgm-top-club-stock-pick-at-macquarie-in-view-of-appealing-las-vegas-schedule
https://5eclipse.blogspot.com/2023/01/ohio-gambling-club-control-commission.html
https://5eclipse.mystrikingly.com/blog/tips-to-deal-with-your-funds-while-playing-on-the-web-club-games
https://abbba12.blogspot.com/2023/01/state-rep-records-bill-to-sanction.html
https://site-6954901-6807-7781.mystrikingly.com/blog/the-best-web-based-gambling-club-locales-in-ireland
https://1arctic.blogspot.com/2023/01/investigating-chance-of-disconnected.html
https://artic1.mystrikingly.com/blog/what-online-gambling-club-game-is-least-demanding-to-win
https://2beach0.blogspot.com/2023/01/how-might-metaverse-change-web-based.html
https://beach.mystrikingly.com/blog/iowa-online-club-2023-official-review
https://butom1212.blogspot.com/2023/01/gaming-tips-and-systems-2023-playing.html
https://site-6955035-8022-3958.mystrikingly.com/blog/cen-to-foster-european-norm-on-markers-of-damage-for-internet-betting
https://3cave0.blogspot.com/2023/01/internet-gaming-as-of-now-impacts.html
https://cave000.mystrikingly.com/blog/all-you-really-want-to-be-familiar-with-how-enormous-the-web-based-wagering
https://chochoco2.blogspot.com/2023/01/club-administrator-gambling-club-dreams.html
https://site-7349605-733-2297.mystrikingly.com/blog/patterns-in-web-based-betting-in-2023-in-poland-and-all-over-the-planet
https://5eclipse.blogspot.com/2023/01/limitations-on-betting-gamstop-gamban.html
https://5eclipse.mystrikingly.com/blog/napoleon-sports-and-club-enrolls-in-egba-s-network-safety-master-bunch
https://abbba12.blogspot.com/2023/01/virginia-regulation-would-permit-club.html
https://site-6954901-6807-7781.mystrikingly.com/blog/mgm-chief-not-practical-for-springfield-gambling-club-to-get-to-3-000
https://1arctic.blogspot.com/2023/01/allow-great-times-to-keep-on-moving-at.html
https://artic1.mystrikingly.com/blog/vornado-to-join-club-fight-royale-with-betting-sanctum-at-inn-pennsylvania
https://2beach0.blogspot.com/2023/01/no-way-us-club-organization-pulls-out.html
https://beach.mystrikingly.com/blog/voyage-line-extending-club-on-five-boats
https://butom1212.blogspot.com/2023/01/caesars-new-las-vegas-strip-club-has-go.html
https://site-6955035-8022-3958.mystrikingly.com/blog/portsmouth-organizations-see-an-open-door-in-cafe-week-new-gambling-club-s
https://3cave0.blogspot.com/2023/01/macau-contemplates-future-even-as.html
https://cave000.mystrikingly.com/blog/ny-mets-proprietor-considers-club-permit
https://chochoco2.blogspot.com/2023/01/find-first-class-uk-club-2023.html
https://site-7349605-733-2297.mystrikingly.com/blog/business-gaming-development-cross-country-appears-to-have-no-foreseeable-endgame
https://5eclipse.blogspot.com/2023/01/how-to-win-huge-amount-of-cash-at.html
https://5eclipse.mystrikingly.com/blog/6-best-web-based-opening-games-for-ios
https://abbba12.blogspot.com/2023/01/what-makes-extraordinary-web-based.html
https://site-6954901-6807-7781.mystrikingly.com/blog/what-sorts-of-gambling-club-games-could-michigan-players-at-any-point
https://1arctic.blogspot.com/2023/01/online-gambling-club-games-sports.html
https://artic1.mystrikingly.com/blog/how-might-this-benefit-the-player-to-wager-with-online-club
https://2beach0.blogspot.com/2023/01/positioning-us-online-club-states-from.html
https://beach.mystrikingly.com/blog/the-most-strange-web-based-gambling-club-spaces
https://butom1212.blogspot.com/2023/01/for-what-reason-is-online-gambling-club.html
https://site-6955035-8022-3958.mystrikingly.com/blog/gambling-club-days-designates-xpoint-as-true-geolocation-supplier-in-ontario
https://3cave0.blogspot.com/2023/01/the-best-of-englands-web-based-gambling.html
https://cave000.mystrikingly.com/blog/the-most-effective-method-to-appreciate-online-amusement-while-venturing-out
https://chochoco2.blogspot.com/2023/01/bet-mgm-online-club-in-new-jersey-adds.html
https://site-7349605-733-2297.mystrikingly.com/blog/napoleon-sports-and-gambling-club-joins-egba-s-master-gathering-on-digital
https://5eclipse.blogspot.com/2023/01/contentions-for-picking-legitimate.html
https://5eclipse.mystrikingly.com/blog/chile-entrepreneurs-join-club-dreams-to-get-rid-of-unlawful-betting
https://abbba12.blogspot.com/2023/01/from-asheville-guard-dog-what-are.html
https://site-6954901-6807-7781.mystrikingly.com/blog/online-gambling-club-market-size-is-supposed-to-arrive-at-usd-57395-45
https://1arctic.blogspot.com/2023/01/3-significant-gambling-club-patterns-to.html
https://artic1.mystrikingly.com/blog/parx-gambling-club-has-see-before-excellent-opening
https://2beach0.blogspot.com/2023/01/virginia-legislators-present-bill-that.html
https://beach.mystrikingly.com/blog/sri-lanka-allegedly-investigating-further-gambling-club-industry-guideline-in
https://butom1212.blogspot.com/2023/01/does-understanding-measurements-assist.html
https://site-6955035-8022-3958.mystrikingly.com/blog/shoshone-bannock-clans-propose-club-outside-mountain-home
https://3cave0.blogspot.com/2023/01/how-advanced-installment-innovation-is.html
https://cave000.mystrikingly.com/blog/ags-extends-its-organization-with-igaming-administrator-caesars-sportsbook
https://chochoco2.blogspot.com/2023/01/world-class-gambling-club-resorts-puts.html
https://site-7349605-733-2297.mystrikingly.com/blog/new-lodging-tower-at-south-twist-gambling-club-opens-march-1
https://5eclipse.blogspot.com/2023/01/cambodias-nagaworld-club-strike-new.html
https://5eclipse.mystrikingly.com/blog/initial-step-for-new-us-4-billion-club
https://abbba12.blogspot.com/2023/01/allies-bet-on-web-based-club-games.html
https://site-6954901-6807-7781.mystrikingly.com/blog/the-3-qualities-of-a-decent-internet-based-gambling-club
https://1arctic.blogspot.com/2023/01/what-to-search-for-while-picking-web.html
https://artic1.mystrikingly.com/blog/manga-gambling-club-audit-best-web-based-gambling-club-in-2023
https://2beach0.blogspot.com/2023/01/prepare-to-win-large-with-web-openings.html
https://beach.mystrikingly.com/blog/betting-with-the-economy
https://butom1212.blogspot.com/2023/01/could-blackjack-players-count-cards.html
https://site-6955035-8022-3958.mystrikingly.com/blog/best-quick-payout-online-gambling-clubs-with-a-german-permit
https://3cave0.blogspot.com/2023/01/waterways-club-portsmouth.html
https://cave000.mystrikingly.com/blog/logical-play-accomplices-with-forbes-gambling-club
https://chochoco2.blogspot.com/2023/01/smoking-in-club-isnt-simply-grievance.html
https://site-7349605-733-2297.mystrikingly.com/blog/betmgm-michigan-gambling-club-clears-1-billion-in-lifetime-income
https://5eclipse.blogspot.com/2023/01/breaking-ways-simulated-intelligence.html
https://5eclipse.mystrikingly.com/blog/span-studios-presents-their-space-hits-at-ice-2023-london
https://abbba12.blogspot.com/2023/01/partake-in-definitive-2023-web-based.html
https://site-6954901-6807-7781.mystrikingly.com/blog/denmark-breaks-online-club-income-record-as-betting-fills-in-2022
https://1arctic.blogspot.com/2023/01/best-internet-based-gambling-club-games.html
https://artic1.mystrikingly.com/blog/find-a-famous-web-based-club-that-acknowledges-paypal-in-the-uk
https://2beach0.blogspot.com/2023/01/the-development-of-versatile-gaming.html
https://beach.mystrikingly.com/blog/january-at-delicious-stakes-club-bows-out-in-style
https://butom1212.blogspot.com/2023/01/elements-to-consider-while-picking-web.html
https://site-6955035-8022-3958.mystrikingly.com/blog/gamb-club-survey-2023-trick-or-genuine-internet-based-gambling-club
https://3cave0.blogspot.com/2023/01/online-club-bill-documented-in-maryland.html
https://cave000.mystrikingly.com/blog/betmgm-club-could-owe-its-michigan-strength-to-basic-acknowledgment
https://chochoco2.blogspot.com/2023/01/best-cashback-gambling-clubs-top.html
https://site-7349605-733-2297.mystrikingly.com/blog/a-manual-for-tracking-down-the-best-gambling-club-installment-choices-for-a
https://5eclipse.blogspot.com/2023/01/is-web-based-betting-with-paysafecard.html
https://5eclipse.mystrikingly.com/blog/why-are-high-moving-speculators-exchanging-their-activity-on-the-web
https://abbba12.blogspot.com/2023/01/portsmouths-club-might-see-strategic.html
https://site-6954901-6807-7781.mystrikingly.com/blog/where-will-virginia-s-next-gambling-club-project-end-up
https://1arctic.blogspot.com/2023/01/philippines-weighs-gambling-club.html
https://artic1.mystrikingly.com/blog/accessible-macau-club-tables-occupied-at-tail-of-cny-hols
https://2beach0.blogspot.com/2023/01/benefits-and-detriments-of-1-store.html
https://beach.mystrikingly.com/blog/5-procedures-for-inn-and-club-laborer-wellbeing
https://butom1212.blogspot.com/2023/01/want-to-wager-texas-lawmaking-body-to.html
https://site-6955035-8022-3958.mystrikingly.com/blog/digitain-reports-official-send-off-of-relum-club-motor-to-occur-at-ice-london
https://3cave0.blogspot.com/2023/01/club-in-manhattan-here-are-reasons-that.html
https://cave000.mystrikingly.com/blog/new-gambling-club-arranged-close-to-penn-state-endorsed-for-permit-by-gaming
https://chochoco2.blogspot.com/2023/01/iowas-q-club-declares-multi-stage-75m.html
https://site-7349605-733-2297.mystrikingly.com/blog/club-dreams-can-t-stop-chile-betting-corridor-development
https://5eclipse.blogspot.com/2023/01/world-class-club-resorts-gives-15m-to.html
https://5eclipse.mystrikingly.com/blog/managing-in-advanced-club-gaming
https://abbba12.blogspot.com/2023/01/what-to-search-for-while-picking-web.html
https://site-6954901-6807-7781.mystrikingly.com/blog/ways-to-pick-a-free-from-even-a-hint-of-harm-online-club
https://1arctic.blogspot.com/2023/01/casinoenquirer-talks-about-shared.html
https://artic1.mystrikingly.com/blog/slotegrator-examination-the-betting-business-best-3-principal-mechanical
https://2beach0.blogspot.com/2023/01/is-internet-based-gambling-club-market.html
https://beach.mystrikingly.com/blog/explanations-for-the-allure-of-present-day-web-based-club-games
https://butom1212.blogspot.com/2023/01/how-internet-betting-has-become-well.html
https://site-6955035-8022-3958.mystrikingly.com/blog/the-most-effective-method-to-make-crypto-installments-in-web-based-gambling
https://3cave0.blogspot.com/2023/01/the-most-confided-in-uk-online-gambling.html
https://cave000.mystrikingly.com/blog/betandplay-audit-2023-trick-or-genuine-web-based-club
https://chochoco2.blogspot.com/2023/01/h2-what-is-internet-based-japanese-club.html
https://site-7349605-733-2297.mystrikingly.com/blog/instructions-to-compose-internet-betting-audits
https://5eclipse.blogspot.com/2023/01/worldwide-gambling-club-and-gaming.html
https://5eclipse.mystrikingly.com/blog/why-finns-love-club-without-enlistment
https://abbba12.blogspot.com/2023/01/new-manhattan-gambling-club-bid.html
https://site-6954901-6807-7781.mystrikingly.com/blog/mohegan-named-club-administrator-for-soloviev-gathering-s-new-york-city-club-bid
https://1arctic.blogspot.com/2023/01/reports-say-2022-was-really-great-for.html
https://artic1.mystrikingly.com/blog/nevada-club-close-out-2022-with-record-gaming-income-figures
https://2beach0.blogspot.com/2023/01/how-to-find-best-gambling-club-on-web.html
https://beach.mystrikingly.com/blog/full-resuming-of-cambodian-gambling-club-star-vegas-drives-donaco-to-us-1-3
https://butom1212.blogspot.com/2023/01/petersburgs-gambling-club-plan-clears.html
https://site-6955035-8022-3958.mystrikingly.com/blog/mps-call-for-defer-in-naming-regulators-for-club
https://3cave0.blogspot.com/2023/01/california-sections-of-land-to-convey.html
https://cave000.mystrikingly.com/blog/portsmouth-gambling-club-laborers-welcome-to-join-bunch-battling-indoor-smoking
https://chochoco2.blogspot.com/2023/02/portsmouth-gambling-club-profoundly.html
https://site-7349605-733-2297.mystrikingly.com/blog/state-government-prepared-to-roll-out-any-improvements-suggested-by-survey
https://5eclipse.blogspot.com/2023/02/increasing-game.html
https://5eclipse.mystrikingly.com/blog/december-first-down-month-in-for-a-spell-for-club-income
https://abbba12.blogspot.com/2023/02/macau-club-incomes-flood-in-january.html
https://site-6954901-6807-7781.mystrikingly.com/blog/macau-gambling-club-income-up-82-5-yearly-last-month
https://1arctic.blogspot.com/2023/02/french-retailer-club-says-it-is-in.html
https://artic1.mystrikingly.com/blog/horseshoe-club-baltimore-laborers-request-raises-occasion-pay-in-evening-rally
https://2beach0.blogspot.com/2023/02/a-manual-for-best-web-based-versatile.html
https://beach.mystrikingly.com/blog/atlantic-city-gambling-club-smoking-boycott-bill-to-get-feb-13-hearing
https://butom1212.blogspot.com/2023/02/throw-dice-at-ute-theaters-gambling.html
https://site-6955035-8022-3958.mystrikingly.com/blog/oxford-club-incomes-bounced-back-in-2022
https://3cave0.blogspot.com/2023/02/las-vegas-club-income-establishes.html
https://cave000.mystrikingly.com/blog/malaysia-singapore-club-in-for-a-light-year
https://chochoco2.blogspot.com/2023/02/rivalry-is-furious-for-new-york-city.html
https://site-7349605-733-2297.mystrikingly.com/blog/reits-lead-charge-to-solidify-gambling-club-land
https://5eclipse.blogspot.com/2023/02/mexican-hooters-is-getting-its-own.html
https://5eclipse.mystrikingly.com/blog/financial-plan-panels-next-stop-for-petersburg-gambling-club-bills
https://abbba12.blogspot.com/2023/02/heres-reason-you-really-want-to-pick.html
https://site-6954901-6807-7781.mystrikingly.com/blog/endorphina-debuts-in-the-netherlands-through-manage-online-gambling-club
https://1arctic.blogspot.com/2023/02/the-fate-of-online-club-gaming-glance.html
https://artic1.mystrikingly.com/blog/previous-dutch-club-proprietor-to-suffer-27m-consequence-to-settle-unlawful
https://2beach0.blogspot.com/2023/02/7-internet-based-club-realities-you.html
https://beach.mystrikingly.com/blog/online-club-news-industry-most-recent-patterns-and-advancements
https://butom1212.blogspot.com/2023/02/how-gamification-is-altering-web-based.html
https://site-6955035-8022-3958.mystrikingly.com/blog/penn-s-games-wagering-business-posts-head-turning-final-quarter-benefit
https://3cave0.blogspot.com/2023/02/get-virgin-gambling-club-promotion-code.html
https://cave000.mystrikingly.com/blog/bd88-dispatches-new-game-pilot
https://chochoco2.blogspot.com/2023/02/bragg-gaming-presently-live-in-belgium.html
https://site-7349605-733-2297.mystrikingly.com/blog/ncpg-report-features-dependable-betting-deficiencies
https://5eclipse.blogspot.com/2023/02/crypto-records-adds-outline-area.html
https://5eclipse.mystrikingly.com/blog/the-most-famous-installment-techniques-in-canadian-web-based-gambling-clubs
https://abbba12.blogspot.com/2023/02/petersburg-club-bill-has-limited-way.html
https://site-6954901-6807-7781.mystrikingly.com/blog/amazing-korea-recreation-club-incomes-up-5-in-january
https://1arctic.blogspot.com/2023/02/betting-defenders-disclose-new.html
https://artic1.mystrikingly.com/blog/videoslots-online-club-audit-get-the-best-greeting-rewards-in-2023
https://2beach0.blogspot.com/2023/02/pickering-gambling-club-resort-opens.html
https://beach.mystrikingly.com/blog/the-best-club-in-florida-a-definitive-2023-aide
https://butom1212.blogspot.com/2023/02/gambling-club-spaces-and-item.html
https://site-6955035-8022-3958.mystrikingly.com/blog/investigators-suspicious-as-gambling-club-opens-talks-with-teract
https://3cave0.blogspot.com/2023/02/bragg-enters-belgium-with-napoleon.html
https://cave000.mystrikingly.com/blog/local-gambling-club-stocks-could-demonstrate-solid
https://chochoco2.blogspot.com/2023/02/these-are-portion-of-individuals-in.html
https://site-7349605-733-2297.mystrikingly.com/blog/parx-gambling-club-shippensburg-opens-sans-smoke-state-s-fourth-satellite-area
https://5eclipse.blogspot.com/2023/02/about-dexterbet-online-gambling-club.html
https://5eclipse.mystrikingly.com/blog/las-vegas-strip-gambling-clubs-make-a-major-pitch-for-an-enormous-expansion
https://abbba12.blogspot.com/2023/02/five-fundamental-tips-to-utilize-while.html
https://site-6954901-6807-7781.mystrikingly.com/blog/online-club-versus-sports-wagering-which-is-better-for-you
https://1arctic.blogspot.com/2023/02/the-most-effective-method-to-pick.html
https://artic1.mystrikingly.com/blog/games-worldwide-conveys-lucky-series-of-video-spaces-in-february
https://2beach0.blogspot.com/2023/02/scorpion-promoter-club-will-have.html
https://beach.mystrikingly.com/blog/mifinity-dispatches-mifinity-reward-site-to-improve-client-commitment
https://butom1212.blogspot.com/2023/02/portable-banking-applications-offer.html
https://site-6955035-8022-3958.mystrikingly.com/blog/nevada-club-win-14-8b-off-speculators-in-2022
https://3cave0.blogspot.com/2023/02/next-year-basic-for-crown-clubs-destiny.html
https://cave000.mystrikingly.com/blog/new-york-to-stir-things-up-by-facilitating-3-new-gambling-club-projects
https://chochoco2.blogspot.com/2023/02/gnashvegas-gambling-club-night-set-for.html
https://site-7349605-733-2297.mystrikingly.com/blog/las-vegas-guide-first-latino-themed-club-set-to-open-in-las-vegas
https://5eclipse.blogspot.com/2023/02/thailand-gambling-club-gaming.html
https://5eclipse.mystrikingly.com/blog/cyprus-president-says-melco-s-city-of-dreams-mediterranean-to-change-nearby
https://abbba12.blogspot.com/2023/02/will-gambling-club-at-last-tame-times.html
https://site-6954901-6807-7781.mystrikingly.com/blog/netbet-gambling-club-uk-adds-resident-to-suppliers-list
https://1arctic.blogspot.com/2023/02/regal-caribbean-gamblings-club-royale.html
https://artic1.mystrikingly.com/blog/ags-accomplices-with-draftkings-gambling-club-to-offer-honor-assigned
https://2beach0.blogspot.com/2023/02/new-york-online-gambling-club-pushes.html
https://beach.mystrikingly.com/blog/the-principal-justifications-for-why-gambling-club-games-have-stayed-famous
https://butom1212.blogspot.com/2023/02/ontario-gig-inks-arrangement-to-drive.html
https://site-6955035-8022-3958.mystrikingly.com/blog/top-malta-club-not-on-gamstop-for-uk-players-in-2023
https://3cave0.blogspot.com/2023/02/arranging-board-part-questions-gambling.html
https://cave000.mystrikingly.com/blog/would-it-be-a-good-idea-for-you-guarantee-online-club-rewards
https://chochoco2.blogspot.com/2023/02/connecticut-gambling-clubs-preparing.html
https://site-7349605-733-2297.mystrikingly.com/blog/investor-claim-after-star-gambling-club-wrongdoing-tests
https://5eclipse.blogspot.com/2023/02/the-best-gambling-club-games-to-play.html
https://5eclipse.mystrikingly.com/blog/the-most-effective-method-to-get-everything-rolling-playing-at-jeetwin
https://abbba12.blogspot.com/2023/02/maryland-congresspersons-desire-to-push.html
https://site-6954901-6807-7781.mystrikingly.com/blog/master-experiences-into-96m-internet-based-gambling-club-a-trusted-and-solid
https://1arctic.blogspot.com/2023/02/online-gambling-clubs-in-ontario-top-10.html
https://artic1.mystrikingly.com/blog/live-sellers-will-rejuvenate-online-gambling-clubs-in-illinois
https://2beach0.blogspot.com/2023/02/most-well-known-bitcoin-club-games-2023.html
https://beach.mystrikingly.com/blog/web3-and-metaverse-gaming-could-open-new-entryways-for-online-club-in-new-jersey
https://butom1212.blogspot.com/2023/02/10-stunts-to-attempt-in-web-based.html
https://site-6955035-8022-3958.mystrikingly.com/blog/super-bowl-wagering-genuine-cash-online-gambling-club-no-store-extra-codes
https://3cave0.blogspot.com/2023/02/online-gambling-club-news-reports-on.html
https://cave000.mystrikingly.com/blog/division-of-gaming-authorization-starts-utilizing-information-on-players-web
https://chochoco2.blogspot.com/2023/02/best-web-based-gambling-clubs-in.html
https://site-7349605-733-2297.mystrikingly.com/blog/best-iphone-gambling-clubs-in-2023
https://5eclipse.blogspot.com/2023/02/318m-created-by-sasks-first-directed.html
https://5eclipse.mystrikingly.com/blog/identification-innovation-accomplices-with-olympic-park-club-estonia-to-giv
https://abbba12.blogspot.com/2023/02/might-club-at-some-point-be-big-stake.html
https://site-6954901-6807-7781.mystrikingly.com/blog/digitain-dispatches-new-live-club-brand-envision-inhabit-ice-london
https://1arctic.blogspot.com/2023/02/yet-again-web-gambling-club-gaming-bill.html
https://artic1.mystrikingly.com/blog/state-clears-way-for-everett-club-development
https://2beach0.blogspot.com/2023/02/texas-legislators-restore-push-for-club.html
https://beach.mystrikingly.com/blog/the-most-alluring-gambling-club-rewards-in-2023
https://butom1212.blogspot.com/2023/02/havenick-family-out-poarch-band-of.html
https://site-6955035-8022-3958.mystrikingly.com/blog/virginia-petersburg-gambling-club-plan-passes-house-bill-presently-set-to
https://3cave0.blogspot.com/2023/02/new-york-mgms-realm-city-club-overhauls.html
https://cave000.mystrikingly.com/blog/love-is-all-around-this-valentine-s-at-fair-go-club
https://chochoco2.blogspot.com/2023/02/will-club-at-last-tame-times-square.html
https://site-7349605-733-2297.mystrikingly.com/blog/spb-s-club-night-offers-games-prizes-and-artworks
https://5eclipse.blogspot.com/2023/02/10-vital-hints-to-consider-while.html
https://5eclipse.mystrikingly.com/blog/rockford-club-hits-bonanza-with-january-income-numbers
https://abbba12.blogspot.com/2023/02/new-to-online-gambling-club-gaming.html
https://site-6954901-6807-7781.mystrikingly.com/blog/how-digital-money-changes-online-gambling-club-circle
https://1arctic.blogspot.com/2023/02/well-known-bitcoin-betting-games-in.html
https://artic1.mystrikingly.com/blog/revealing-the-best-web-based-betting-involvement-with-thailand-a-nitty
https://2beach0.blogspot.com/2023/02/illinois-online-gambling-club-bills.html
https://beach.mystrikingly.com/blog/plunge-into-the-most-recent-web-based-gambling-club-news-associations-and-more
https://butom1212.blogspot.com/2023/02/best-web-based-club-games-for.html
https://site-6955035-8022-3958.mystrikingly.com/blog/new-jersey-betting-controllers-request-stretched-out-investigation-of-online
https://3cave0.blogspot.com/2023/02/mostbet-gambling-club-login-and-live.html
https://cave000.mystrikingly.com/blog/all-you-really-want-to-be-aware-of-playing-baccarat-on-the-web
https://chochoco2.blogspot.com/2023/02/top-10-gambling-club-objections-all.html
https://site-7349605-733-2297.mystrikingly.com/blog/why-club-accept-age-z-will-supportive-to-bet
https://5eclipse.blogspot.com/2023/02/mohegans-south-korea-resort-development.html
https://5eclipse.mystrikingly.com/blog/hellspin-club-survey
https://abbba12.blogspot.com/2023/02/louisiana-club-gaming-income-actually.html
https://site-6954901-6807-7781.mystrikingly.com/blog/illinois-gaming-board-supports-originally-set-of-licenses-for-brief-bally-s
https://1arctic.blogspot.com/2023/02/what-happens-next-is-anyones-guess.html
https://artic1.mystrikingly.com/blog/bristol-club-gets-ready-for-super-bowl-sunday
https://2beach0.blogspot.com/2023/02/stations-rapidly-spreading-fire.html
https://beach.mystrikingly.com/blog/best-web-based-club-top-five-genuine-cash-club-locales-in-2023
https://butom1212.blogspot.com/2023/02/wow-vegas-club-survey-2023-theres-many.html
https://site-6955035-8022-3958.mystrikingly.com/blog/all-that-you-really-want-to-be-familiar-with-gambling-clubs-in-the-metaverse
https://3cave0.blogspot.com/2023/02/exposing-most-well-known-club-legends.html
https://cave000.mystrikingly.com/blog/delays-cynicism-developing-over-japanese-incorporated-hotel-improbable
https://chochoco2.blogspot.com/2023/02/the-best-mentality-about-club-betting.html
https://site-7349605-733-2297.mystrikingly.com/blog/lake-ozark-takes-gambling-club-issue-to-the-missouri-governing-body
https://5eclipse.blogspot.com/2023/02/club-card-shark-in-argentina-assaults.html
https://5eclipse.mystrikingly.com/blog/gigantic-gaming-declares-world-s-most-memorable-stable-blockchain-based
https://abbba12.blogspot.com/2023/02/the-most-well-known-internet-based-club.html
https://site-6954901-6807-7781.mystrikingly.com/blog/free-internet-based-club-games-how-you-can-utilize-them-to-burn-through-cash
https://1arctic.blogspot.com/2023/02/what-makes-canadian-accommodating.html
https://artic1.mystrikingly.com/blog/how-you-can-step-up-your-web-based-gaming-fun
https://2beach0.blogspot.com/2023/02/casinoscout-declares-association-with.html
https://beach.mystrikingly.com/blog/web-based-wagering-for-super-bowl-takes-off-in-arkansas
https://butom1212.blogspot.com/2023/02/surely-understand-online-korean.html
https://site-6955035-8022-3958.mystrikingly.com/blog/hawaii-tries-to-boycott-club-promoting-and-charge-betting-get-aways
https://3cave0.blogspot.com/2023/02/service-recommends-month-to-month-pay.html
https://cave000.mystrikingly.com/blog/meet-three-incredible-bgaming-spaces-get-beguiling-reskins-for-valentine-s-day
https://chochoco2.blogspot.com/2023/02/ballys-eyes-new-york-city-club-close-to.html
https://site-7349605-733-2297.mystrikingly.com/blog/however-it-once-confronted-slim-chances-club-style-betting-is-currently
https://5eclipse.blogspot.com/2023/02/information-shows-louisiana-gambling.html
https://5eclipse.mystrikingly.com/blog/jake-s-58-on-lengthy-island-86-s-full-new-york-club-permit-pursuit
https://abbba12.blogspot.com/2023/02/endorsement-forthcoming-on-club-plan.html
https://site-6954901-6807-7781.mystrikingly.com/blog/bally-s-gambling-club-proposition-might-depend-on-evacuation-of-single-word
https://1arctic.blogspot.com/2023/02/laborers-anticipate-as-nj.html
https://artic1.mystrikingly.com/blog/shares-hit-record-low-for-huge-australian-gambling-club-bunch
https://2beach0.blogspot.com/2023/02/this-present-time-is-perfect-open-door.html
https://beach.mystrikingly.com/blog/66-of-online-gambling-club-benefactors-charmed-by-the-capability-of
https://butom1212.blogspot.com/2023/02/correlation-site-csgoradar-offers.html
https://site-6955035-8022-3958.mystrikingly.com/blog/why-some-think-betting-everything-on-a-fairfax-province-gambling-club-would
https://3cave0.blogspot.com/2023/02/issues-with-proposed-club-complex.html
https://cave000.mystrikingly.com/blog/macau-everyday-club-ggr-strong-after-cny-businesses
https://chochoco2.blogspot.com/2023/02/ags-reward-twist-xtreme-at-borgata.html
https://site-7349605-733-2297.mystrikingly.com/blog/judge-disallows-massachusetts-occupants-in-suit-over-local-clan-s-gambling
https://5eclipse.blogspot.com/2023/02/ballys-moves-to-boot-tribune.html
https://5eclipse.mystrikingly.com/blog/should-club-speculators-be-expected-to-demonstrate-their-earnings
https://abbba12.blogspot.com/2023/02/everymatrix-accomplices-with-holland.html
https://site-6954901-6807-7781.mystrikingly.com/blog/the-bitfiring-on-the-web-club-with-bitcoin-stores-audit
https://1arctic.blogspot.com/2023/02/what-illinois-can-gain-from-web-based.html
https://artic1.mystrikingly.com/blog/online-gambling-club-organization-betty-raises-5m-during-seed-round-to
https://2beach0.blogspot.com/2023/02/live-gambling-club-house-definitive-web.html
https://beach.mystrikingly.com/blog/the-ascent-of-web-based-betting-in-south-africa
https://butom1212.blogspot.com/2023/02/what-are-best-club-programming.html
https://site-6955035-8022-3958.mystrikingly.com/blog/online-gambling-club-news-increment-your-gaming-benefit-in-2023
https://3cave0.blogspot.com/2023/02/investigating-most-recent-mechanical.html
https://cave000.mystrikingly.com/blog/getting-a-charge-out-of-internet-gaming-without-burning-through-every-last
https://chochoco2.blogspot.com/2023/02/figuring-out-chances-likelihood-in.html
https://site-7349605-733-2297.mystrikingly.com/blog/realities-about-web-based-betting-in-sweden
https://5eclipse.blogspot.com/2023/02/a-bet-wagering-terminal-innovation.html
https://5eclipse.mystrikingly.com/blog/vietnam-s-da-lat-intends-to-fabricate-gambling-club-to-lift-evening-economy
https://abbba12.blogspot.com/2023/02/get-valentines-day-feels-at-succulent.html
https://site-6954901-6807-7781.mystrikingly.com/blog/talking-stick-resort-and-club-arizona-have-another-chief
https://1arctic.blogspot.com/2023/02/club-rounded-up-record-breaking-60.html
https://artic1.mystrikingly.com/blog/petersburg-gambling-club-bill-progresses-however-faces-genuine-test
https://2beach0.blogspot.com/2023/02/nagasaki-marks-us11mln-for-gambling.html
https://beach.mystrikingly.com/blog/nj-online-club-6-extraordinary-applications-and-offers
https://butom1212.blogspot.com/2023/02/ballys-divulges-proposition-for-online.html
https://site-6955035-8022-3958.mystrikingly.com/blog/talking-stick-resort-and-gambling-club-arizona-have-another-president
https://3cave0.blogspot.com/2023/02/atlantic-city-club-laborers-look-for.html
https://cave000.mystrikingly.com/blog/pool-of-the-lights-resort-gambling-club-chooses-visa-innovation-s-lush
https://chochoco2.blogspot.com/2023/02/nh-club-style-betting-is-blasting.html
https://site-7349605-733-2297.mystrikingly.com/blog/hollywood-club-toledo-laborers-endorse-new-work-bargain-following-quite-a
https://5eclipse.blogspot.com/2023/02/everi-advanced-to-give-high-performing.html
https://5eclipse.mystrikingly.com/blog/macau-ggr-expected-to-arrive-at-1-4b-in-february-gambling-club-traffic-and
https://abbba12.blogspot.com/2023/02/exploring-web-based-club-industry-with.html
https://site-6954901-6807-7781.mystrikingly.com/blog/blue-blood-to-give-online-club-content-to-betmgm
https://1arctic.blogspot.com/2023/02/new-jersey-establishes-one-more.html
https://artic1.mystrikingly.com/blog/the-most-effective-method-to-pick-a-dependable-internet-based-gambling-club
https://2beach0.blogspot.com/2023/02/2023-expectations-for-internet-based.html
https://beach.mystrikingly.com/blog/everymatrix-enters-new-long-term-content-organization-with-holland-gambling
https://butom1212.blogspot.com/2023/02/gambling-club-and-gaming-business.html
https://site-6955035-8022-3958.mystrikingly.com/blog/tips-on-the-most-proficient-method-to-track-down-the-best-web-based-club
https://3cave0.blogspot.com/2023/02/seven-motivations-to-play-at-online-club.html
https://cave000.mystrikingly.com/blog/minority-claimed-organizations-request-consideration-in-maryland-online-club
https://chochoco2.blogspot.com/2023/02/ballys-to-push-for-igaming-endorsement.html
https://site-7349605-733-2297.mystrikingly.com/blog/everi-computerized-to-supply-online-gambling-club-content-to-caesars
https://5eclipse.blogspot.com/2023/02/top-business-thoughts-to-think-about-in.html
https://5eclipse.mystrikingly.com/blog/3-fortunate-betting-games-you-can-play-with-insignificant-experience
https://abbba12.blogspot.com/2023/02/sen-morrissey-says-petersburg-will-win.html
https://site-6954901-6807-7781.mystrikingly.com/blog/petersburg-club-bill-falls-flat
https://1arctic.blogspot.com/2023/02/asian-club-betting-business-sector.html
https://artic1.mystrikingly.com/blog/it-is-clear-now-that-we-won-t-ever-see-a-gambling-club-in-bermuda
https://2beach0.blogspot.com/2023/02/hollywood-club-pays-wyandotte-area-more.html
https://beach.mystrikingly.com/blog/nebraska-bill-pushing-back-cutoff-time-for-gambling-club-influence-studies
https://butom1212.blogspot.com/2023/02/top-gaming-controllers-in-pa-met-with.html
https://site-6955035-8022-3958.mystrikingly.com/blog/bally-s-selecting-vendors-for-chicago-club
https://3cave0.blogspot.com/2023/02/what-makes-kakekkorinrin-extraordinary.html
https://cave000.mystrikingly.com/blog/bally-s-to-look-for-endorsement-for-online-club-gaming-in-ri
https://chochoco2.blogspot.com/2023/02/club-not-harming-different-types-of.html
https://site-7349605-733-2297.mystrikingly.com/blog/pickering-to-impart-gambling-club-income-to-durham-locale
https://5eclipse.blogspot.com/2023/02/will-greater-clovis-gambling-club.html
https://5eclipse.mystrikingly.com/blog/caesars-extends-prizes-program-to-open-new-york-club
https://abbba12.blogspot.com/2023/02/head-signals-regulation-changes-to.html
https://site-6954901-6807-7781.mystrikingly.com/blog/what-are-the-advantages-of-a-crypto-gambling-club
https://1arctic.blogspot.com/2023/02/perceive-how-to-begin-on-web-based.html
https://artic1.mystrikingly.com/blog/gold-strike-gambling-club-deal-made-official
https://2beach0.blogspot.com/2023/02/ruler-club-and-resort-inc-nasdaqmcri.html
https://beach.mystrikingly.com/blog/las-vegas-strip-card-sharks-these-gaming-machines-pay-out-the-most
https://butom1212.blogspot.com/2023/02/best-web-based-gambling-clubs-to-play.html
https://site-6955035-8022-3958.mystrikingly.com/blog/initiative-magnolia-plans-gambling-club-night-for-region-organization-on
https://3cave0.blogspot.com/2023/02/best-gambling-club-mostbet.html
https://cave000.mystrikingly.com/blog/equipment-utilized-by-online-gambling-clubs
https://chochoco2.blogspot.com/2023/02/reasons-virtual-betting-appears-to-be.html
https://site-7349605-733-2297.mystrikingly.com/blog/best-web-based-club-for-2023-as-per-hot-shots
https://5eclipse.blogspot.com/2023/02/5-insider-facts-online-gambling-clubs.html
https://5eclipse.mystrikingly.com/blog/who-may-be-the-following-passage-into-internet-gaming-could-you-trust-rhode
https://1arctic.blogspot.com/2023/02/well-known-wagering-systems.html
https://artic1.mystrikingly.com/blog/club-betting-terms-the-house-edge
https://2beach0.blogspot.com/2023/02/likelihood-in-betting.html
https://beach.mystrikingly.com/blog/gambling-club-games-that-are-generally-famous
https://3cave0.blogspot.com/2023/02/rewards-at-online-gambling-clubs.html
https://cave000.mystrikingly.com/blog/online-gambling-club-benefits
https://5eclipse.blogspot.com/2023/02/instructions-to-store-at-online.html
https://5eclipse.mystrikingly.com/blog/club-behavior
https://abbba12.blogspot.com/2023/02/ways-to-tip.html
https://site-6954901-6807-7781.mystrikingly.com/blog/top-5-gambling-club-lodgings
https://butom1212.blogspot.com/2023/02/what-are-arbitrary-number-generators.html
https://site-6955035-8022-3958.mystrikingly.com/blog/live-vendor-games
https://chochoco2.blogspot.com/2023/02/tips-to-assist-with-having-some-good.html
https://site-7349605-733-2297.mystrikingly.com/blog/bringing-in-your-cash-last
https://1arctic.blogspot.com/2023/02/instructions-to-make-50000-year-betting.html
https://artic1.mystrikingly.com/blog/why-bitcoin-and-betting-is-a-triumphant-mix
https://2beach0.blogspot.com/2023/02/as-first-experience-with-blackjack.html
https://beach.mystrikingly.com/blog/9-activities-in-atlantic-city-other-than-bet
https://3cave0.blogspot.com/2023/02/11-video-poker-mysteries-you-really.html
https://cave000.mystrikingly.com/blog/12-bingo-privileged-insights-you-want-to-be-aware
https://5eclipse.blogspot.com/2023/02/12-bingo-ways-to-win-on-more-regular.html
https://5eclipse.mystrikingly.com/blog/12-poker-ways-to-win-on-a-more-regular-basis
https://abbba12.blogspot.com/2023/02/12-video-poker-ways-to-win-more.html
https://site-6954901-6807-7781.mystrikingly.com/blog/12-spaces-ways-to-win-on-a-more-regular-basis
https://butom1212.blogspot.com/2023/02/the-betting-history-of-las-vegas.html
https://site-6955035-8022-3958.mystrikingly.com/blog/step-by-step-instructions-to-tip-at-a-club
https://chochoco2.blogspot.com/2023/02/the-7-most-famous-gambling-machine.html
https://site-7349605-733-2297.mystrikingly.com/blog/ability-based-games-come-to-the-club
https://abbba12.blogspot.com/2023/02/2023s-most-expected-web-based-club-game.html
https://site-6954901-6807-7781.mystrikingly.com/blog/best-times-to-go-to-a-club
https://1arctic.blogspot.com/2023/02/online-gambling-clubs-most-recent-turns.html
https://artic1.mystrikingly.com/blog/5-important-ways-to-pick-dependable-versatile-club
https://2beach0.blogspot.com/2023/02/the-most-productive-games-in-canadian.html
https://beach.mystrikingly.com/blog/betmgm-reports-mindful-gaming-promoting-technique
https://butom1212.blogspot.com/2023/02/gambling-clubs-and-counseling-pandemic.html
https://site-6955035-8022-3958.mystrikingly.com/blog/winning-ways-betting-at-home-in-singapore-lawful-and-chance-free
https://3cave0.blogspot.com/2023/02/top-travel-objections-for-club-devotees.html
https://cave000.mystrikingly.com/blog/eight-things-the-new-pastors-need-to-realize-about-the-betting-survey
https://chochoco2.blogspot.com/2023/02/searching-for-most-beneficial-club.html
https://site-7349605-733-2297.mystrikingly.com/blog/how-roulette-has-stayed-as-well-known-as-could-be-expected-since-its-initiation
https://5eclipse.blogspot.com/2023/02/social-gambling-club-games-market.html
https://5eclipse.mystrikingly.com/blog/las-vegas-consultant-out-of-control-fire-gambling-club-opens-in-midtown-las
https://1arctic.blogspot.com/2023/02/the-significance-of-discipline-play.html
https://artic1.mystrikingly.com/blog/tips-to-assist-with-having-a-great-time-in-the-club
https://2beach0.blogspot.com/2023/02/settling-on-which-space-games-to-play.html
https://beach.mystrikingly.com/blog/bringing-in-your-cash-last-at-gambling-club
https://abbba12.blogspot.com/2023/02/top-5-genuine-cash-online-club.html
https://site-6954901-6807-7781.mystrikingly.com/blog/stop-the-attack-on-the-old-acropolis-at-springbok-club
https://butom1212.blogspot.com/2023/02/century-diversion-inks-new-five-year.html
https://site-6955035-8022-3958.mystrikingly.com/blog/club-tech-firm-rgb-bounce-back-to-us-2mln-benefit-in-4q
https://3cave0.blogspot.com/2023/02/bitstarz-gambling-club-audit-2023.html
https://cave000.mystrikingly.com/blog/silverton-club-looks-to-become-birthday-central-command-in-las-vegas-with
https://chochoco2.blogspot.com/2023/02/macau-ceo-ho-iat-seng-sure-with-respect.html
https://site-7349605-733-2297.mystrikingly.com/blog/beyond-nevada-mgm-public-harbor-was-top-us-gambling-club-the-year-before
https://5eclipse.blogspot.com/2023/02/council-to-follow-up-on-gambling-club.html
https://5eclipse.mystrikingly.com/blog/club-night-to-raise-assets-for-new-mcdonough-district-creature-cover
https://abbba12.blogspot.com/2023/02/bd88-shortlisted-in-top-web-based.html
https://site-6954901-6807-7781.mystrikingly.com/blog/step-by-step-instructions-to-play-online-gambling-club-while-voyaging
https://1arctic.blogspot.com/2023/02/will-online-gambling-club-guides-assist.html
https://artic1.mystrikingly.com/blog/best-esports-and-online-club-installment-strategies
https://2beach0.blogspot.com/2023/02/for-what-reason-are-so-many-web-based.html
https://beach.mystrikingly.com/blog/ascent-of-the-advanced-club-figuring-out-the-fame-of-web-based-betting
https://butom1212.blogspot.com/2023/02/baccarat-versus-blackjack-which-one-has.html
https://site-6955035-8022-3958.mystrikingly.com/blog/web-based-betting-in-new-zealand-guideline-and-betting-regulations
https://3cave0.blogspot.com/2023/02/why-are-there-no-genuine-land-based.html
https://cave000.mystrikingly.com/blog/mgm-public-harbor-was-2022-s-driving-non-nevada-gambling-club
https://chochoco2.blogspot.com/2023/02/why-no-check-club-was-made-and-way-that.html
https://site-7349605-733-2297.mystrikingly.com/blog/bragg-gaming-dispatches-in-new-jersey-with-caesars
https://5eclipse.blogspot.com/2023/02/valuable-ways-to-play-online-poker-at.html
https://5eclipse.mystrikingly.com/blog/australian-internet-based-club-no-store-reward-keep-what-you-win
https://abbba12.blogspot.com/2023/03/sonoma-area-bosses-support-gambling.html
https://site-6954901-6807-7781.mystrikingly.com/blog/softswiss-big-stake-aggregator-gives-first-bonanza-opportunity-to-six-club
https://1arctic.blogspot.com/2023/03/online-club-invite-reward-guarantee-now.html
https://artic1.mystrikingly.com/blog/guests-rush-to-macau-once-more-yet-its-betting-reliance-draws-beijing-s-rage
https://2beach0.blogspot.com/2023/03/macao-gambling-club-income-will.html
https://beach.mystrikingly.com/blog/moment-withdrawal-club-locales-top-10-quick-withdrawal-gambling-clubs
https://butom1212.blogspot.com/2023/03/club-night-returns.html
https://site-6955035-8022-3958.mystrikingly.com/blog/the-most-recent-club-updates-in-the-uk
https://3cave0.blogspot.com/2023/03/precious-stone-inlet-gambling-club.html
https://cave000.mystrikingly.com/blog/hollywood-club-joliet-gets-endorsement-by-city-chamber-for-rock-run
https://chochoco2.blogspot.com/2023/03/the-most-gone-to-land-based-gambling.html
https://site-7349605-733-2297.mystrikingly.com/blog/california-yaamava-resort-and-gambling-club-gets-forbes-travel-guide
https://5eclipse.blogspot.com/2023/03/nebraska-defenders-of-growing-club.html
https://5eclipse.mystrikingly.com/blog/advantages-and-disadvantages-of-utilizing-club-versatile-applications
https://abbba12.blogspot.com/2023/03/5-best-web-based-gambling-club-games-to.html
https://site-6954901-6807-7781.mystrikingly.com/blog/online-gambling-club-diversion-stars-and-cons
https://1arctic.blogspot.com/2023/03/the-significance-of-appraisals-while.html
https://artic1.mystrikingly.com/blog/illinois-online-gambling-club-authorization-creeping-nearer-to-the-real-world
https://2beach0.blogspot.com/2023/03/the-fate-of-live-web-based-gambling.html
https://beach.mystrikingly.com/blog/extraordinary-music-pics-while-playing-an-internet-based-club
https://butom1212.blogspot.com/2023/03/a-profound-jump-into-web-based-betting.html
https://site-6955035-8022-3958.mystrikingly.com/blog/which-indian-states-play-online-gambling-club-the-most
https://3cave0.blogspot.com/2023/03/is-there-such-incredible-concept-as.html
https://cave000.mystrikingly.com/blog/the-all-in-approach-supporting-australian-gaming-industry
https://chochoco2.blogspot.com/2023/03/the-amount-can-mgm-springfield-lift.html
https://site-7349605-733-2297.mystrikingly.com/blog/track-down-the-best-web-based-betting-suppliers-with-wewi
https://5eclipse.blogspot.com/2023/03/the-upsides-and-downsides-of-playing-at.html
https://5eclipse.mystrikingly.com/blog/crash-games-are-seeing-the-greatest-development-in-web-based-gambling-clubs
https://abbba12.blogspot.com/2023/03/is-coney-island-club-smart-thought.html
https://site-6954901-6807-7781.mystrikingly.com/blog/online-club-betting-shows-up-off-the-table-this-regulative-meeting
https://1arctic.blogspot.com/2023/03/sky-stream-gambling-club-edging-nearer.html
https://artic1.mystrikingly.com/blog/s-korea-gambling-club-operation-gkl-s-february-deals-take-off-to-us-28mln
https://2beach0.blogspot.com/2023/03/caesars-discharges-refreshed-plans-for.html
https://beach.mystrikingly.com/blog/uae-gambling-club-las-vegas-style-bedouin-strip-coming-soon-wynn-resorts
https://butom1212.blogspot.com/2023/03/better-club-stock-purchase-mgm-or-wynn.html
https://site-6955035-8022-3958.mystrikingly.com/blog/andorra-getting-its-most-memorable-club-with-entryways-opening-this-week
https://3cave0.blogspot.com/2023/03/how-do-online-live-gambling-club-games.html
https://cave000.mystrikingly.com/blog/cash-desperados-are-back-to-capture-everyone-s-attention-at-springbok-club
https://chochoco2.blogspot.com/2023/03/new-jersey-gambling-club-smoking.html
https://site-7349605-733-2297.mystrikingly.com/blog/all-that-you-really-want-to-be-familiar-with-fairspin-gambling-club-online
https://5eclipse.blogspot.com/2023/03/best-gambling-club-urban-areas-on-planet.html
https://5eclipse.mystrikingly.com/blog/hard-rock-russia-ties-could-endanger-new-york-club-plans
Laura Hobson
I was really stressed by Acid reflux issues with my newborn and had consulted Chief Dr Lucky. He gave us a thorough consultation and the medicines were equally effective. In a couple of weeks there was big improvement in my son and we are very pleased with the progress. We cannot thank Chief Dr Lucky enough. Highly recommended.
Email chiefdrlucky@gmail.com
WhatsApp +2348132777335
Facebook page http://facebook.com/chiefdrlucky
Tom Peacock
My name is Tom Peacock from USA, I want to say thank you to Dr Emu for the good thing he has done for me, Though am not sure if this is the best forum to show my joy and happiness for what he has done for me but i can’t hide my happiness and my joy so i have to share it with people, my marriage got crashed about two years ago and i tried all i could within my power but to no avail. I saw a post and testimonial about the good things Dr Emu has been doing so I decided to give it a try. though he is always a busy man but when he responded back to my email, he gave me 48 hours for my marriage to be restored really just like he said my marriage was restored since then I am happy and i am living happily i am so grateful to Dr Emu you can always email him here: {emutemple@gmail.com} or WhatsApp: {+2347012841542}
Isabella Lucas
My ex-husband and I had always managed to stay friendly after our divorce in February 2017. But I always wanted to get back together with him, All it took was a visit to this spell casters website last December, because my dream was to start a new year with my husband, and live happily with him.. This spell caster requested a specific love spell for me and my husband, and I accepted it. And this powerful spell caster began to work his magic. And 48 hours after this spell caster worked for me, my husband called me back for us to be together again, and he was remorseful for all his wrong deeds. My spell is working because guess what: My “husband” is back and we are making preparations on how to go to court and withdraw our divorce papers ASAP. This is nothing short of a miracle. Thank you Dr Emu for your powerful spells. Words are not enough.
Email emutemple@gmail.com
Phone/WhatsApp +2347012841542.